The last time I wrote an in-depth article on component communication, it was about vue2. I recently browsed station b and saw a new video released by Shang Silicon Valley. I found that there are some differences in usage and writing of component communication between vue3 and vue2, so record it. The following are all about the component communication of vue3 in-depth
To review, the component communication method of vue2
**props:** can realize communication between parent-child components, child-parent components, and even sibling components
Custom event: communication between child and parent components can be realized
Global event bus $bus: can realize any component communication
**pubsub:** publish and subscribe mode to realize arbitrary component communication
vuex: Centralized state management container to realize arbitrary component communication
ref: The parent component obtains the child component instance VC, and obtains the responsive data and methods of the child component
**slot:**Slots (default slots, named slots, scoped slots) implement parent-child component communication…
1.props
props can realize parent-child component communication. In vue3, we can get the data passed by the parent component through defineProps. And do not need to introducedefineProps method inside the component can be used directly! (Let’s focus here: defineProps, defineEmits, difineExpose do not need additional introduction)
The parent component passes data to the child component
<Child info="I love the motherland" :money="money"></Child>
The child component obtains the data passed by the parent component: method 1
let props = defineProps({
  info:{
   type: String,//accepted data type
   default:'Default parameter',//Accept the default data
  },
  money:{
   type:Number,
   default: 0
}})
The child component obtains the data passed by the parent component: method 2
let props = defineProps(["info",'money']);
Subcomponents can use the props data in the template, but remember that props is read-only (can only be read, not modified),Follow unidirectional data flow
To illustrate with examples:


2. Custom event
There are two types of events in the vue framework: one is a native DOM event, and the other is a custom event.
Native DOM events allow users to interact with web pages, such as click, dbclick, change, mouseenter, mouseleave…
Custom events can realize child components to pass data to parent components
2.1 Native DOM events
code show as below:
 <button@click="handler">
      I am the old flower bone of the motherland
 </button>
The current code level binds the native DOM event click event to the button button, and the event event object is injected into the event callback by default. Of course, if you want to inject multiple parameters into the click event, you can follow the steps below. But remember that the injected event object must be called $event.
<div @click="handler1(1,2,3,$event)">I want to pass multiple parameters</div>
In the vue3 framework click, dbclick, change (this kind of native DOM event), whether it is on a label or a custom label ( Component tags) are native DOM events. (That is to say, when defining click, change and other events for components, they will also be triggered, no need to add .native)< /strong>

This is not the case in vue2. In vue2, component tags need to pass native modifiers to become native DOM events (refer to my vue2 article)
2.2 Custom events
Custom events can implement child components to pass data to parent components. It is more commonly used in projects.
For example, bind a custom event to the child component (Event2) inside the parent component
<Event2 @xxx="handler3"></Event2>
Trigger this custom event inside the Event2 subcomponent
<template>
  <div>
    <h1>I am subcomponent 2</h1>
    <button @click="handler">Click me to trigger xxx custom event</button>
  </div>
</template>

<script setup lang="ts">
let $emit = defineEmits(["xxx"]);
const handler = () => {
  $emit("xxx", "Ferrari", "Maotai");
};
</script>
<style scoped>
</style>
We will find that inside the script tag, the defineEmits method is used. This method is provided by vue3, and does not need to be introduced and used directly . defineEmits method is executed, and an array is passed. The array elements are the custom event types that the component needs to trigger in the future. This method will return a $emit method to use for triggering custom events.
When the button is clicked, the event callback internally calls the $emit method to trigger the custom event. The first parameter is the trigger event type, and the second, third, and N parameters are the data passed to the parent component.
Note: the code is as follows
<Event2 @xxx="handler3" @click="handler"></Event2>
It is normal to say that @click should be a native DOM event, but if the subcomponent is defined by defineEmits, it becomes a custom event
let $emit = defineEmits(["xxx",'click']);

3. Global event bus
The global event bus can realize arbitrary component communication. In vue2, the global event bus can be launched according to the relationship between VM and VC.
But there is no Vue constructor in vue3, so there is no Vue.prototype. And there is no this in the combined API writing method,
Then it is a bit unrealistic to implement the bus function of global events in Vue3. If you want to use the global event bus function in Vue3
This can be achieved using the plugin mitt.
mitt: Official website address: https://www.npmjs.com/package/mitt
3.1 Step 1: Install mitt
npm install --save mitt
3.2. The second step: import mitt and export $bus
//Introduce the mitt plug-in: mitt is a method, and the method execution will return the bus object
import mitt from 'mitt';
const $bus = mitt();
export default $bus;

3.3 Implement brother component communication
Below is the parent component at the same time. Introduce two subcomponents, let these two subcomponents communicate with each other
<template>
  <div class="box">
    <h1>Global event bus $bus</h1>
    <hr />
    <div class="container">
      <Child1></Child1>
      <Child2></Child2>
    </div>
  </div>
</template>

<script setup>
//Introduce child components
import Child1 from "@/components/eventBus/Child1.vue";
import Child2 from "@/components/eventBus/Child2.vue";
</script>

<style scoped>
.box {<!-- -->
  width: 100vw;
  height: 400px;
  background: yellowgreen;
}
.container{<!-- -->
  display: flex;
  justify-content: space-between;
}
</style>
Child2 gives Child1 a data, then Child2 needs to provide it through $bus.emit

Child1 receiver, need to receive via $bus.on


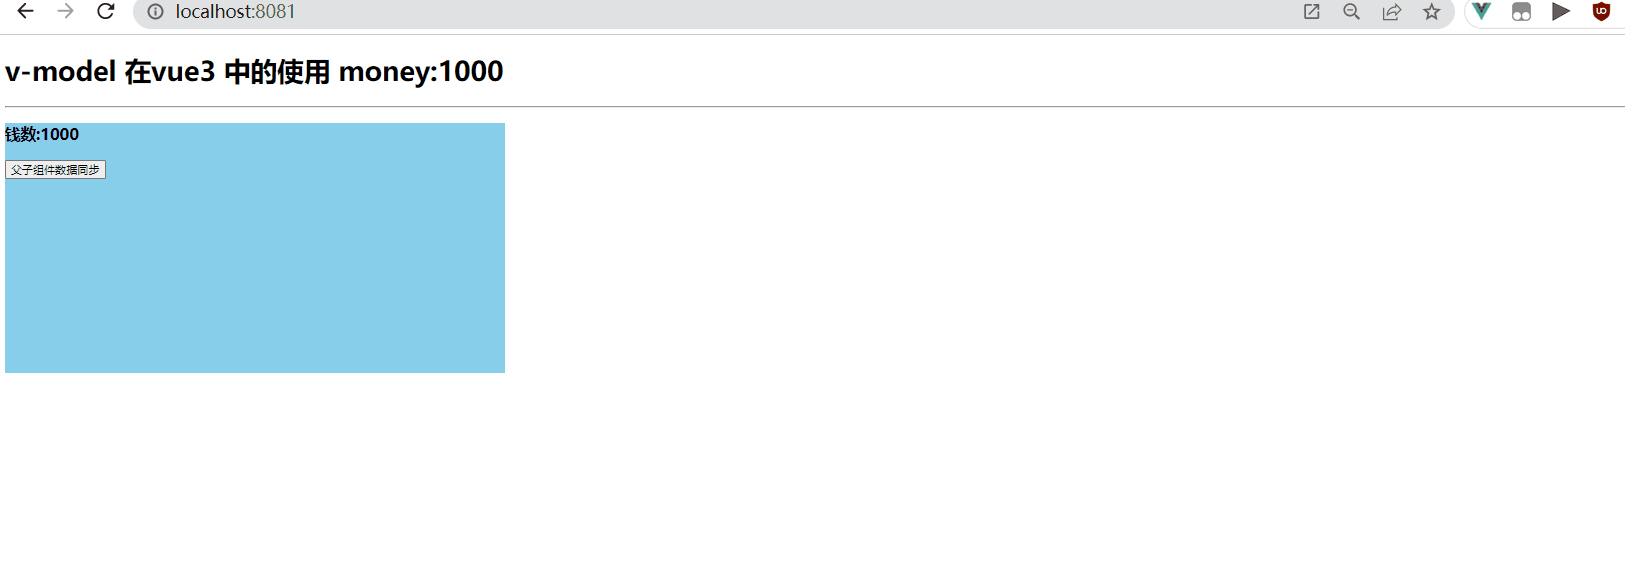
4. v-model
The principle of v-model in vue2 is through :value=”msg” + @input=”msg=$event”
The .sync modifier is implemented by :value=”msg” + @update:value, and now the v-model of vue3 has the same principle as .sync
The v-model command can collect form data (two-way data binding), and it can also realize parent-child component data synchronization.
And v-model actually refers to the realization of using props[modelValue] and custom event [update:modelValue].
The code below: is equivalent to passing a props(modelValue) to the component Child and binding a custom event update:modelValue
Realize parent-child component data synchronization
<Child v-model="msg"></Child>


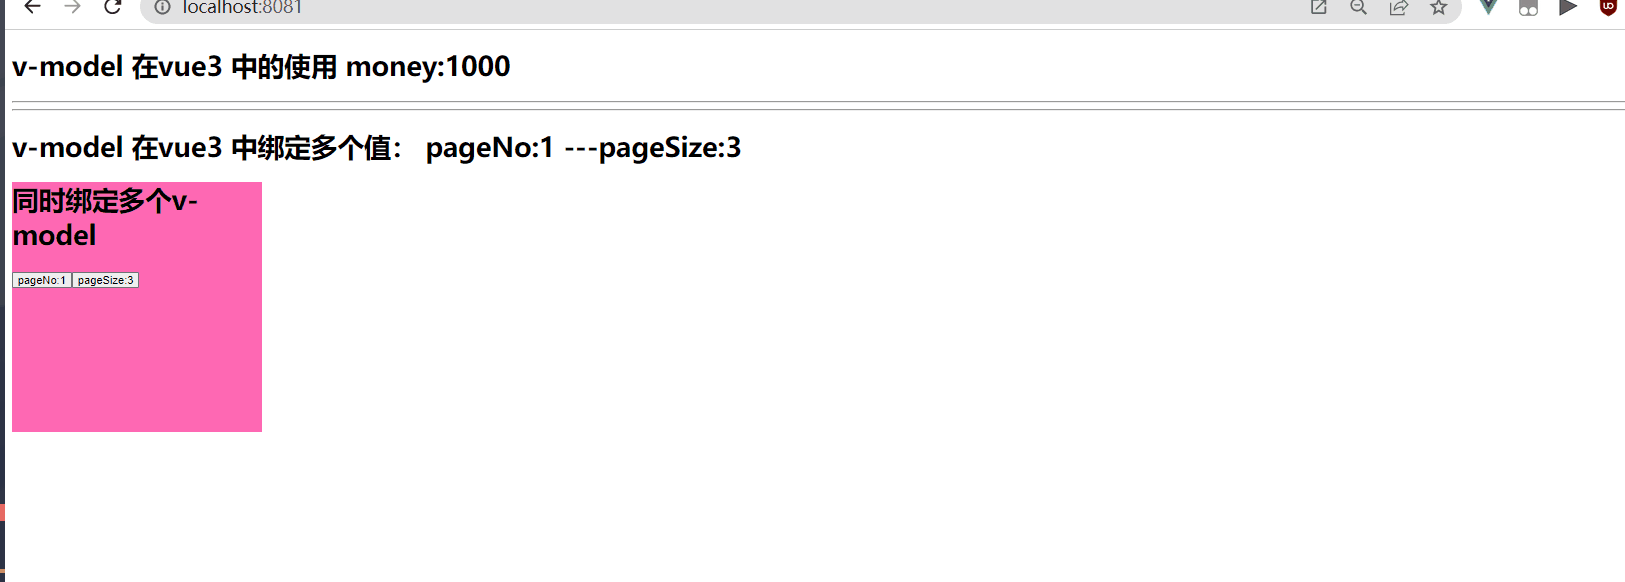
Multiple v-models can be used to bind in vue3, the usage is: v-model:value1 v-model:value2 …
Vue2 doesn’t work
In vue3, a component can use multiple v-model to synchronize multiple data between parent and child components. The code below is equivalent to giving the component Child Pass two props are pageNo and pageSize, and bind two custom events update:pageNo and update:pageSize realizes parent-child data synchronization
<Child v-model:pageNo="msg" v-model:pageSize="msg1"></Child>
App.vue file

The Child2.vue file is as follows
<template>
    <div class="child2">
      <h1>Bind multiple v-models at the same time</h1>
      <button @click="handler">pageNo:{<!-- -->{ pageNo }}</button>
      <button @click="$emit('update:pageSize', pageSize + 4)">
        pageSize:{<!-- -->{ pageSize }}
      </button>
    </div>
  </template>

  <script setup>
  let props = defineProps(["pageNo", "pageSize"]);
  let $emit = defineEmits(["update:pageNo", "update:pageSize"]);
  //Event callback for the first button
  const handler = () => {<!-- -->
    $emit("update:pageNo", props.pageNo + 3);
  };
  </script>

  <style scoped>
  .child2 {<!-- -->
    width: 300px;
    height: 300px;
    background: hotpink;
  }
  </style>

5. useAttrs
In Vue3, you can use the useAttrs method to get the attributes and events of components (including: native DOM events or custom event), its function is similar to the $attrs attribute and $listeners method in the Vue2 framework.
For example: use a child component my-button inside the parent component
<my-button type="success" size="small" title='title' @click="handler"></my-button>
Component attributes and events can be obtained through the useAttrs method inside the subcomponent. So you also found that it is similar to props, which can accept the attributes and attribute values passed by the parent component. It should be noted that if defineProps accepts a certain attribute, the object returned by the useAttrs method does not have the corresponding attribute and attribute value.
<script setup lang="ts">
import {useAttrs} from 'vue';
let $attrs = useAttrs();
</script>


Note that
useAttrscan also get events similar to$listenersinvue2


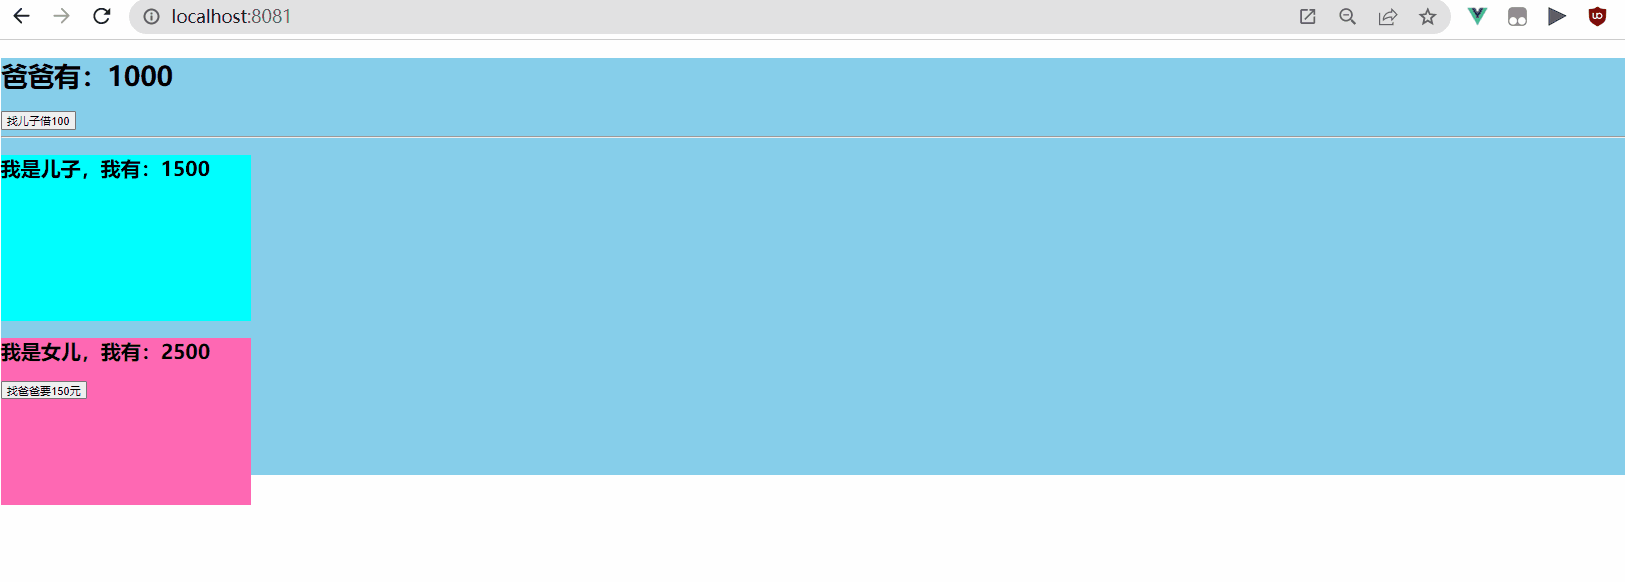
6. ref and $parent
Vue3 deleted $children and filter
ref, when you mention ref, you may think that it can get the DOM of the element or get the VC< of the subcomponent instance /code>. Since the child component instance VC can be obtained through ref inside the parent component, the methods and responsive data inside the child component can be used by the parent component.
For example: Get the component instance after the parent component is mounted
Parent component internal code:
<template>
  <div>
    <h1>ref and $parent</h1>
    <Son ref="son"></Son>
  </div>
</template>
<script setup>
import Son from "./Son.vue";
import {<!-- --> onMounted, ref } from "vue";
const son = ref();
onMounted(() => {<!-- -->
  console.log(son.value);
});
</script>
However, it should be noted that If you want the parent component to obtain the data or methods of the child component, you need to expose it to the outside world through defineExpose, because the data inside the component in vue3 is "closed to the outside world". ", no external access
Using ref in vue2 does not require subcomponents to expose data externally, and can directly obtain the data and methods of subcomponents
<script setup>
import {<!-- --> ref } from "vue";
//data
let money = ref(1000);
//method
const handler = ()=>{<!-- -->
}
defineExpose({<!-- -->
  money,
   handler
})
</script>

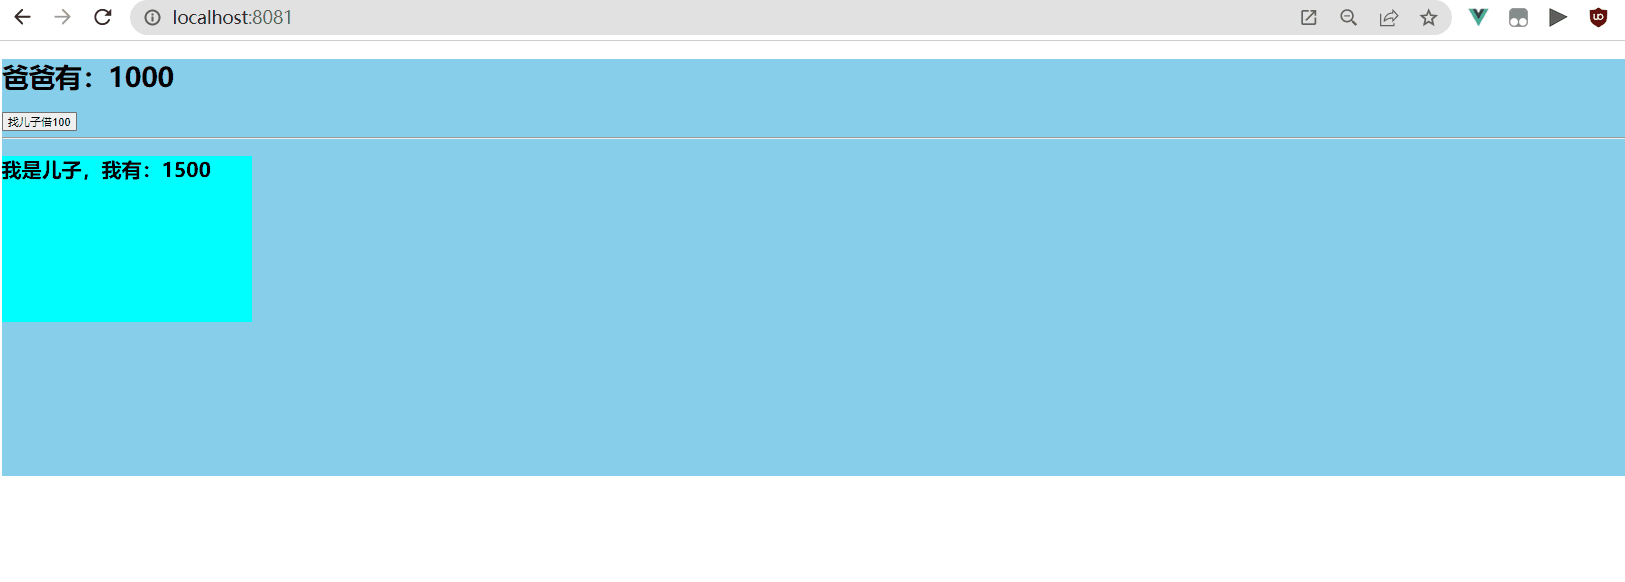
$parent can get the parent component instance VC of a certain component, so you can use the data and methods inside the parent component. There must be a button inside the child component to get the parent component instance when it is clicked. Of course, the data and methods of the parent component need to be exposed to the outside world through the defineExpose method
<button @click="handler($parent)">Click me to get the parent component instance</button>

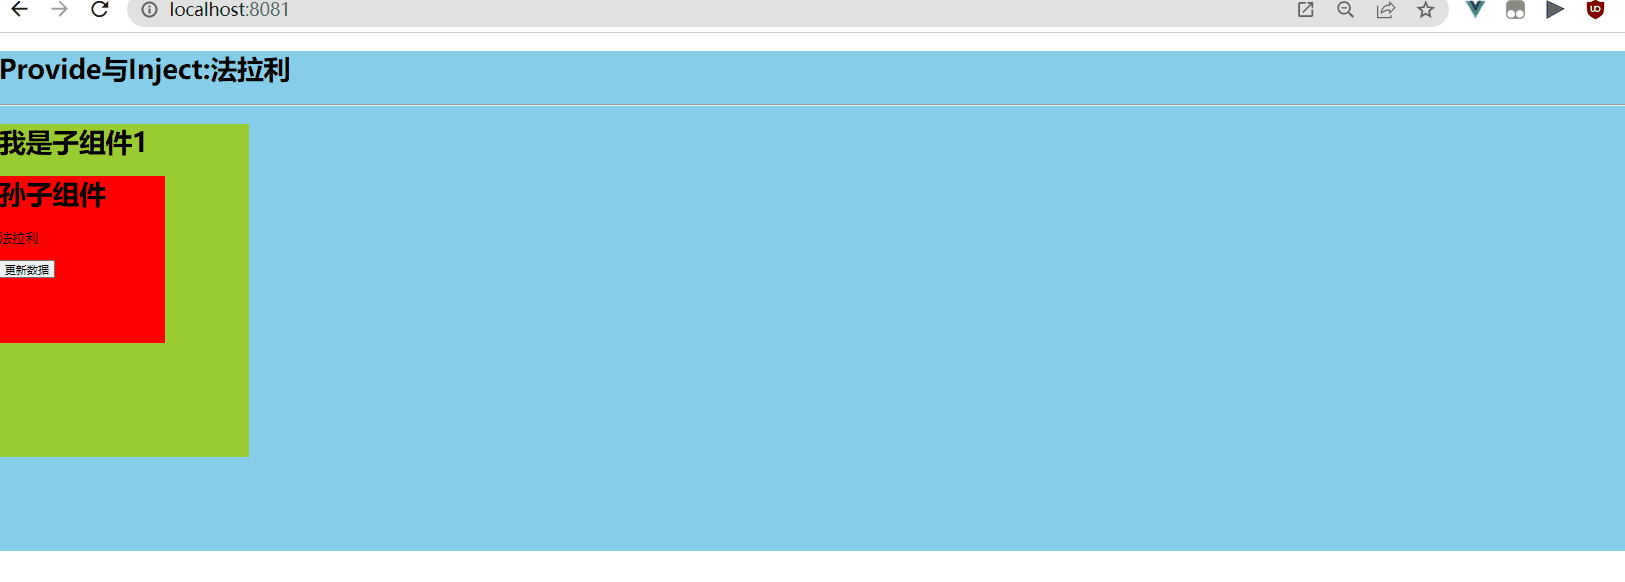
7. provide and inject
provide[provide]
inject[injection]
vue3 provides two methods provide and inject, which can realize passing parameters between generational components (ancestors and Descendants)
Components Components provide data:
The provide method is used to provide data. This method needs to pass two parameters, respectively providing data key and providing data value
<script setup lang="ts">
import {<!-- -->provide} from 'vue'
provide('token','admin_token');
</script>
Descendant components can obtain data through the inject method, and obtain stored values through key
<script setup lang="ts">
import {<!-- -->inject} from 'vue'
let token = inject('token');
</script>


If you need to modify the "Ferrari" passed by your grandfather, see the picture below

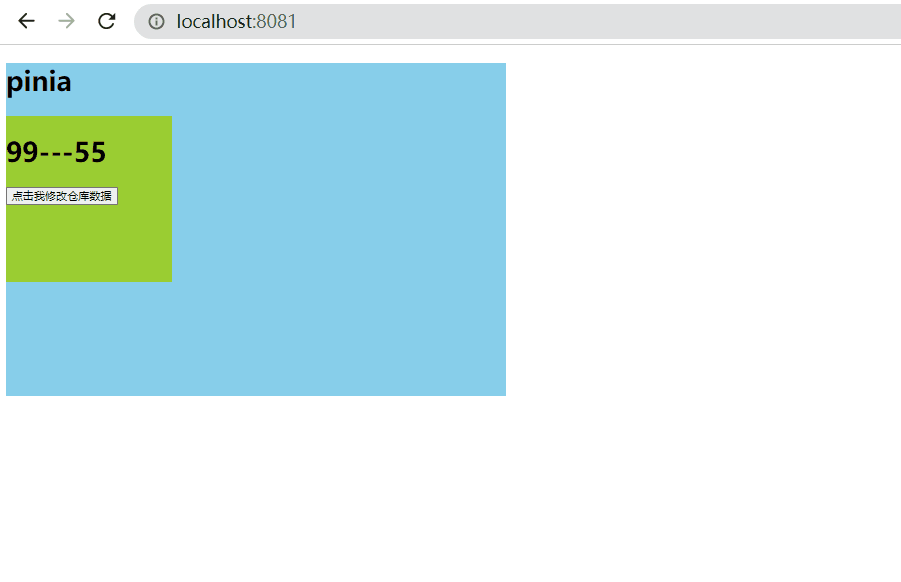
8. pinia
pinia official website: https://pinia.web3doc.top/
pinia is also a centralized management state container, similar to vuex. But the core concept does not have mutation, modules, refer to the official website for usage
vuex: Centralized management state container, which can realize communication between any components! ! !
Core concepts: state, mutations, actions, getters, modules
pinia: Centralized management state container, which can realize communication between any components! ! !
Core concepts: state, actions, getters
pinia writing: selector API, combined API
8.1 Selector API writing method:
Step 1: Create a new store directory, and create a new index.js file under the store directory, the content is as follows:
//Create a large warehouse
import {<!-- --> createPinia } from 'pinia';
//createPinia method can be used to create a large warehouse
let store = createPinia();
//Exposed to the outside world, install the warehouse
export default store;

Step 2: Introduce in the main.js file

Step 3: Create a new modules folder and create a info.js small warehouse
//Define info small warehouse
import {<!-- --> defineStore } from "pinia";
//The first warehouse: the name of the small warehouse The second parameter: the configuration object of the small warehouse
//defineStore method execution will return a function, the function of the function is to allow the component to obtain the warehouse data
let useInfoStore = defineStore("info", {<!-- -->
    //Store data: state
    state: () => {<!-- -->
        return {<!-- -->
            count: 99,
            arr: [1, 2, 3, 4, 5, 6, 7, 8, 9, 10]
        }
    },
    actions: {<!-- -->
        //Note: The function does not have a context object
        //No commit, no mutations to modify data
        updateNum(a, b) {<!-- -->
            this.count += a;
        }
    },
    getters: {<!-- -->
        total() {<!-- -->
            let result= this.arr.reduce((prev, next) => {<!-- -->
                return prev + next;
            }, 0);
            return result;
        }
    }
});
//exposed method
export default useInfoStore;

Step 4: Use pinia

8.2. Combined API writing method:
//Define the combined API warehouse
import {<!-- --> defineStore } from "pinia";
import {<!-- --> ref, computed} from 'vue';
//Create a small warehouse
let useTodoStore = defineStore('todo', () => {<!-- -->
    let todos = ref([{<!-- --> id: 1, title: 'Eat' }, {<!-- --> id: 2, title: 'Sleep' }, {< !-- --> id: 3, title: 'Beat Doudou' }]);
    let arr = ref([1,2,3,4,5]);

    const total = computed(() => {<!-- -->
        return arr.value.reduce((prev, next) => {<!-- -->
            return prev + next;
        }, 0)
    })
    // Be sure to return an object: properties and methods can be provided to components
    return {<!-- -->
        todos,
        arr,
        total,
        updateTodo() {<!-- -->
            todos.value.push({<!-- --> id: 4, title: 'combined API method' });
        }
    }
});

export default useTodoStore;


9. slot
Slots: Default slots, named slots, and scoped slots can realize parent-child component communication.
Default slot:
Write the slot global component tag in the template inside the subcomponent
<template>
  <div>
    <slot></slot>
  </div>
</template>
<script setup lang="ts">
</script>
<style scoped>
</style>
Provide structure inside the parent component: Todo is the child component. When used inside the parent component, write the structure inside the double tag and pass it to the child component
Note that when developing a project, there is generally only one default slot
<Todo>
  <h1>I'm the default slot filled structure</h1>
</Todo>
Named slot:
As the name suggests, this slot with the name leaves multiple slots with the specified name inside the component.
The following is inside a subcomponent, leaving two slots in the template
<template>
  <div>
    <h1>todo</h1>
    <slot name="a"></slot>
    <slot name="b"></slot>
  </div>
</template>
<script setup lang="ts">
</script>

<style scoped>
</style>
The parent component internally passes the struct to the specified named slot. Note that v-slot can be replaced by #
<template>
  <div>
    <h1>slot</h1>
    <Todo>
      <template v-slot:a> //can be replaced with #a
        <div>Fill in the structure of part A of the component</div>
      </template>
      <template v-slot:b>//can be replaced with #b
        <div>Fill in the structure of part B of the component</div>
      </template>
    </Todo>
  </div>
</template>

<script setup lang="ts">
import Todo from "./Todo.vue";
</script>
<style scoped>
</style>
Scoped slots
Scope slot: It can be understood that the data of the subcomponent is provided by the parent component, but the structure and appearance (style) of the subcomponent cannot be determined inside
The subcomponent Todo code is as follows:
<template>
  <div>
    <h1>todo</h1>
    <ul>
     <!--The array is traversed inside the component-->
      <li v-for="(item,index) in todos" :key="item.id">
         <!--Scope slot returns data to parent component-->
         <slot :$row="item" :$index="index"></slot>
      </li>
    </ul>
  </div>
</template>
<script setup lang="ts">
defineProps(['todos']);//Accept the data passed by the parent component
</script>
<style scoped>
</style>
The internal code of the parent component is as follows:
<template>
  <div>
    <h1>slot</h1>
    <Todo :todos="todos">
      <template v-slot="{$row,$index}">
         <!--The parent component determines the structure and appearance of the child component-->
         <span :style="{color:$row.done?'green':'red'}">{<!-- -->{$row.title}}</span>
      </template>
    </Todo>
  </div>
</template>

<script setup lang="ts">
import Todo from "./Todo.vue";
import {<!-- --> ref } from "vue";
// parent component internal data
let todos = ref([
  {<!-- --> id: 1, title: "Eating", done: true },
  {<!-- --> id: 2, title: "Sleep", done: false },
  {<!-- --> id: 3, title: "Beat Doudou", done: true },
]);
</script>
<style scoped>
</style>
