Table of Contents
1. Export ONNX model
2. Convert to bin model in the development board
(1) Configure the docker development environment provided by Horizon
(2) Start the docker container
(3)onnx model checking
(4) Process pictures
(5) Convert to .bin model
3. Verify the model
1. Export ONNX model
from ultralytics import YOLO

# Load a model
model = YOLO(r'G:\Yolov8\yolov8-detect-pt\yolov8n.pt') # load an official model
# model = YOLO('path/to/best.pt') # load a custom trained

# Export the model
# model.export(format='onnx')
model.export(format='onnx')
Run to get onnx

![]()
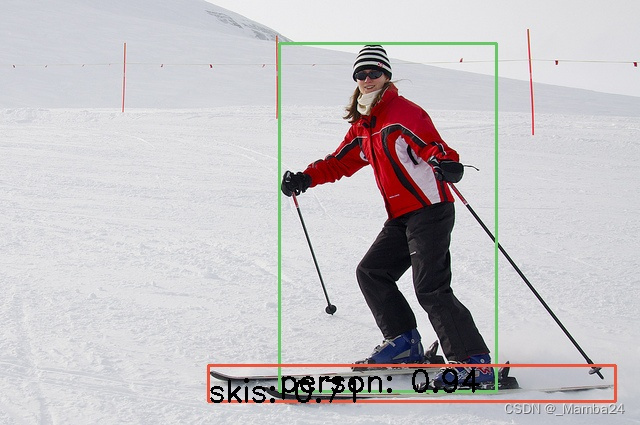
Verify that the exported onnx is available. If it runs normally, the saved picture will contain detected objects.
from ultralytics import YOLO
import glob
import os
# Load a model
model = YOLO(r'G:\Yolov8\yolov8-detect-pt\yolov8n.onnx') # load an official model

# Predict with the model
imgpath = r'G:\Yolov8\ultralytics-main-detect\imgs'
imgs = glob.glob(os.path.join(imgpath,'*.jpg'))
for img in imgs:
    model.predict(img, save=True)
2. Convert to bin model in the development board
(1) Configure the docker development environment provided by Horizon
This article configures the Docker environment under Windows system. Everyone can configure it themselves.
(2) Start docker container
If you have not used docker on your computer before, you need to install docker first.
(3) onnx model checking
Enter the horizon_xj3_open_explorer_v1.8.5_20211224\ddk\samples\ai_toolchain\horizon_model_convert_sample\04_detection path, create a mapper folder (personal file management, can be ignored), and then create a 08_yolov8 folder (can be named by yourself), Create the onnx_model folder under the path and put onnx into
Put the yolov8n.onnx model obtained in the first step into the specified location:

Then create a new 01_check.sh file in the mapper folder with the following content:
#!/usr/bin/env sh

set -e -v
cd $(dirname $0) || exit

# Model type, this article takes onnx as an example
model_type="onnx"
# The location of the onnx model to be checked
onnx_model="./onnx_model/yolov8n.onnx"
# Check the output log and where to put it
# Although it is still placed in the same directory as 01_check.sh (it feels like a small bug)
output="./model_output/yolov8_checker.log"
# What architecture is used? No need to change it.
march="bernoulli2"

hb_mapper checker --model-type ${model_type} \
                  --model ${onnx_model} \
                  --output ${output} --march ${march}
cd to the mapper folder and execute the command:
sh 01_check.sh

(4) Processing pictures
Select a part of the pictures (20-100) and put them in the mapper folder

In the mapper folder, create a new 02_preprocess.sh file with the following content:
#!/usr/bin/env bash
# Copyright (c) 2020 Horizon Robotics.All Rights Reserved.
#
# The material in this file is confidential and contains trade secrets
# of Horizon Robotics Inc. This is proprietary information owned by
# Horizon Robotics Inc. No part of this work may be disclosed,
# reproduced, copied, transmitted, or used in any way for any purpose,
# without the express written permission of Horizon Robotics Inc.

set -e -v
cd $(dirname $0) || exit

python3 ../../../data_preprocess.py \
  --src_dir data/pcd \
  --dst_dir ./pcd_rgb_f32 \
  --pic_ext .rgb \
  --read_mode opencv
data_preprocess.py is located in the picture below (officially included)

In the mapper folder, create a new preprocess.py file with the following content:
target_size=(640, 640) -> adjust the output size
# Copyright (c) 2021 Horizon Robotics.All Rights Reserved.
#
# The material in this file is confidential and contains trade secrets
# of Horizon Robotics Inc. This is proprietary information owned by
# Horizon Robotics Inc. No part of this work may be disclosed,
# reproduced, copied, transmitted, or used in any way for any purpose,
# without the express written permission of Horizon Robotics Inc.

importsys
sys.path.append("../../../01_common/python/data/")
from transformer import *
from dataloader import *


def calibration_transformers():
    transformers = [
        PadResizeTransformer(target_size=(640, 640)),
        HWC2CHWTransformer(),
        BGR2RGBTransformer(data_format="CHW"),
    ]
    return transformers


def infer_transformers(input_shape, input_layout="NHWC"):
    transformers = [
        PadResizeTransformer(target_size=input_shape),
        BGR2RGBTransformer(data_format="HWC"),
        RGB2NV12Transformer(data_format="HWC"),
        NV12ToYUV444Transformer(target_size=input_shape,
                                yuv444_output_layout=input_layout[1:]),
    ]
    return transformers


def infer_image_preprocess(image_file, input_layout, input_shape):
    transformers = infer_transformers(input_shape, input_layout)
    origin_image, processed_image = SingleImageDataLoaderWithOrigin(
        transformers, image_file, imread_mode="opencv")
    return origin_image, processed_image


def eval_image_preprocess(image_path, annotation_path, input_shape,
                          input_layout):
    transformers = infer_transformers(input_shape, input_layout)
    data_loader = COCODataLoader(transformers,
                                 image_path,
                                 annotation_path,
                                 imread_mode='opencv')

    return data_loader
run
sh 02_preprocess.sh

(5) Convert to .bin model
After preparing the processed image data, the next step is to obtain a model that can be run on the development board. The suffix of Horizon’s model running on the development board is .bin, so it is called the .bin model here.
This step requires preparing two files, one is 03_build.sh and the other is yolov8_config.yaml. Both files are placed in the mapper folder.
Note: Before running 03_build.sh, make sure that the rgb size generated in the previous step is consistent with the input size set in the yolov8_config.yaml file (model input).
03_build.sh
#!/bin/bash


set -e -v
cd $(dirname $0)
config_file="./yolov8_config.yaml"
model_type="onnx"
# build model
hb_mapper makertbin --config ${config_file} \
                    --model-type ${model_type}
yolov8_config.yaml
# Copyright (c) 2020 Horizon Robotics.All Rights Reserved.
#
# The material in this file is confidential and contains trade secrets
# of Horizon Robotics Inc. This is proprietary information owned by
# Horizon Robotics Inc. No part of this work may be disclosed,
# reproduced, copied, transmitted, or used in any way for any purpose,
# without the express written permission of Horizon Robotics Inc.

# Parameters related to model conversion
# ------------------------------------
# model conversion related parameters
model_parameters:
  #Onnx floating point network data model file
  #------------------------------------------------ ----------
  # the model file of floating-point ONNX neural network data
  onnx_model: 'onnx_model/yolov8n.onnx'

  #Applicable to BPU architecture
  #--------------------------------
  # the applicable BPU architecture
  march: "bernoulli2"

  # Specify whether to output the intermediate results of each layer during the model conversion process. If it is True, the intermediate output results of all layers will be output.
  #------------------------------------------------ ----------------------------------------
  # specifies whether or not to dump the intermediate results of all layers in conversion
  # if set to True, then the intermediate results of all layers shall be dumped
  layer_out_dump: False

  # Output control parameters of the log file,
  # debug output model conversion details
  # info only outputs key information
  # warn outputs information above warning and error levels
  #------------------------------------------------ ---------------------------------------
  # output control parameter of log file(s),
  # if set to 'debug', then details of model conversion will be dumped
  # if set to 'info', then only important imformation will be dumped
  # if set to 'warn', then information ranked higher than 'warn' and 'error' will be dumped
  log_level: 'debug'

  # Storage directory for model conversion output results
  #------------------------------------------------ ----------
  # the directory in which model conversion results are stored
  working_dir: 'model_output'

  # The name prefix of the model file output by the model conversion for board execution
  #------------------------------------------------ ----------------------------------------
  # model conversion generated name prefix of those model files used for dev board execution
  output_model_file_prefix: 'yolov8n_rgb'

# Model input related parameters. If multiple nodes are input, they should be separated by ';'. To use the default settings, write None.
#------------------------------------------------ -----------------------
# model input related parameters,
# please use ";" to seperate when inputting multiple nodes,
# please use None for default setting
input_parameters:

  # (Optional) The node name of the model input. This name should be consistent with the name in the model file, otherwise an error will be reported. If not filled in, the node name in the model file will be used.
  #------------------------------------------------ -------------------------------------------------- -----
  # (Optional) node name of model input,
  # it shall be the same as the name of model file, otherwise an error will be reported,
  # the node name of model file will be used when left blank
  input_name: ""

  # When the network is actually executed, the data format input to the network includes nv12/rgb/bgr/yuv444/gray/featuremap,
  #------------------------------------------------ ----------------------------------------
  # the data formats to be passed into neural network when actually performing neural network
  # available options: nv12/rgb/bgr/yuv444/gray/featuremap,
  input_type_rt: 'nv12'

  # Arrangement of input data when the network is actually executed, optional values are NHWC/NCHW
  # If input_type_rt is configured as nv12, the parameters here do not need to be configured.
  #------------------------------------------------ ------------------
  # the data layout formats to be passed into neural network when actually performing neural network, available options: NHWC/NCHW
  # If input_type_rt is configured as nv12, then this parameter does not need to be configured
  #input_layout_rt: ''

  # Data format input during network training, the optional value is rgb/bgr/gray/featuremap/yuv444
  #------------------------------------------------ -------------------
  # the data formats in network training
  # available options: rgb/bgr/gray/featuremap/yuv444
  input_type_train: 'rgb'

  # Arrangement of data input during network training, optional values are NHWC/NCHW
  #------------------------------------------------ ------------------
  # the data layout in network training, available options: NHWC/NCHW
  input_layout_train: 'NCHW'

  # (Optional) The input size of the model network, separated by 'x'. If left blank, the network input size in the model file will be used, otherwise the input size in the model file will be overwritten.
  #------------------------------------------------ ------------------------------------------
  # (Optional)the input size of model network, separated by 'x'
  # note that the network input size of model file will be used if left blank
  # otherwise it will overwrite the input size of model file
  input_shape: '1x3x640x640'

  # When the network is actually executed, the batch_size input to the network, the default value is 1
  #------------------------------------------------ -------------------
  # the data batch_size to be passed into neural network when actually performing neural network, default value: 1
  #input_batch: 1

  # Preprocessing methods for network input mainly include the following:
  # no_preprocess does nothing
  # data_mean minus channel mean mean_value
  #data_scale Multiply the image pixels by the data_scale coefficient
  # data_mean_and_scale subtracts the channel mean and then multiplies it by the scale coefficient
  #------------------------------------------------ ------------------------------------------
  # preprocessing methods of network input, available options:
  # 'no_preprocess' indicates that no preprocess will be made
  # 'data_mean' indicates that to minus the channel mean, i.e. mean_value
  # 'data_scale' indicates that image pixels to multiply data_scale ratio
  # 'data_mean_and_scale' indicates that to multiply scale ratio after channel mean is minused
  norm_type: 'data_scale'

  #The mean value subtracted from the image. If it is the channel mean value, the values must be separated by spaces.
  #------------------------------------------------ -----------------------
  # the mean value minused by image
  # note that values must be seperated by space if channel mean value is used
  mean_value: ''

  # Image preprocessing scaling ratio. If it is a channel scaling ratio, the values must be separated by spaces.
  #------------------------------------------------ --------------------------
  # scale value of image preprocess
  # note that values must be seperated by space if channel scale value is used
  scale_value: 0.003921568627451

# Model quantification related parameters
#--------------------------------
# model calibration parameters
calibration_parameters:

  # Storage directory for reference images for model quantification. The image format supports Jpeg, Bmp and other formats. The input image
  # It should be a typical scenario of use. Generally, 20~100 pictures are selected from the test set and input
  # The pictures should cover typical scenes, not remote scenes, such as overexposed, saturated, blurred, pure black, pure white, etc.
  # If there are multiple input nodes, they should be separated by ';'
  #------------------------------------------------ --------------------------------------------------------
  # the directory where reference images of model quantization are stored
  # image formats include JPEG, BMP etc.
  # should be classic application scenarios, usually 20~100 images are picked out from test datasets
  # in addition, note that input images should cover typical scenarios
  # and try to avoid those overexposed, oversaturated, vague,
  #pure blank or pure white images
  # use ';' to seperate when there are multiple input nodes
  cal_data_dir: './pcd_rgb_f32'

  # If the size of the input image file is inconsistent with the size of the model training, and preprocess_on is true,
  #The default preprocessing method (skimage resize) will be used,
  # Scale or crop the input image to the specified size. Otherwise, the user needs to process the image to the training size in advance.
  #------------------------------------------------ --------------------------------
  # In case the size of input image file is different from that of in model training
  # and that preprocess_on is set to True,
  # shall the default preprocess method(skimage resize) be used
  # i.e., to resize or crop input image into specified size
  # otherwise user must keep image size as that of in training in advance
  preprocess_on: False

  # The algorithm type for model quantification supports kl and max. Usually KL can meet the requirements. If it is a model exported by QAT, load should be selected.
  #------------------------------------------------ ----------------------------------
  # types of model quantization algorithms, usually kl will meet the need
  # available options:kl and max
  # if converted model is quanti model exported from QAT , then choose `load`
  calibration_type: 'default'

# Compiler related parameters
#--------------------------
# compiler related parameters
compiler_parameters:

  # Compilation strategy supports bandwidth and latency optimization modes;
  # bandwidth aims to optimize the access bandwidth of ddr;
  #latency aims to optimize inference time
  #------------------------------------------------ ------------------------------------------
  # compilation strategy, there are 2 available optimization modes: 'bandwidth' and 'lantency'
  # the 'bandwidth' mode aims to optimize ddr access bandwidth
  # while the 'lantency' mode aims to optimize inference duration
  compile_mode: 'latency'

  # Setting debug to True will turn on the debug mode of the compiler, which can output performance simulation-related information, such as frame rate, DDR bandwidth usage, etc.
  #------------------------------------------------ ----------------------------------
  # the compiler's debug mode will be enabled by setting to True
  # this will dump performance simulation related information
  # such as: frame rate, DDR bandwidth usage etc.
  debug: False

  # Specify the number of cores when compiling the model. If you do not specify, the single-core model will be compiled by default. If you want to compile the dual-core model, just open the comment below.
  #------------------------------------------------ ----------------------------------
  # specifies number of cores to be used in model compilation
  # as default, single core is used as this value left blank
  # please delete the "# " below to enable dual-core mode when compiling dual-core model
  # core_num: 2

  # Optional optimization level range is O0~O3
  # O0 does not do any optimization, has the fastest compilation speed and the lowest degree of optimization.
  # O1-O3 As the optimization level increases, it is expected that the compiled model will execute faster, but the required compilation time will also become longer.
  # It is recommended to use O2 for the fastest verification
  #------------------------------------------------ -------------------------------------------------- -------
  # optimization level ranges between O0~O3
  # O0 indicates that no optimization will be made
  # the faster the compilation, the lower optimization level will be
  # O1-O3: as optimization levels increase gradually, model execution, after compilation, shall become faster
  # while compilation will be prolonged
  # it is recommended to use O2 for fastest verification
  optimize_level: 'O3'
run
sh 03_build.sh


After the conversion is successful, several files are obtained:

3. Verification model
After getting the model, you can write your own post-processing code to verify the model on the horizon board: