NippleJs is a js library for virtual joysticks. It is designed to provide interfaces for touch-enabled devices. It is often used in games and apps or web pages that can operate hardware devices.
In a 3D scene built using Threejs, use nippleJs to control character walking and camera following functions. The effect is as shown below: 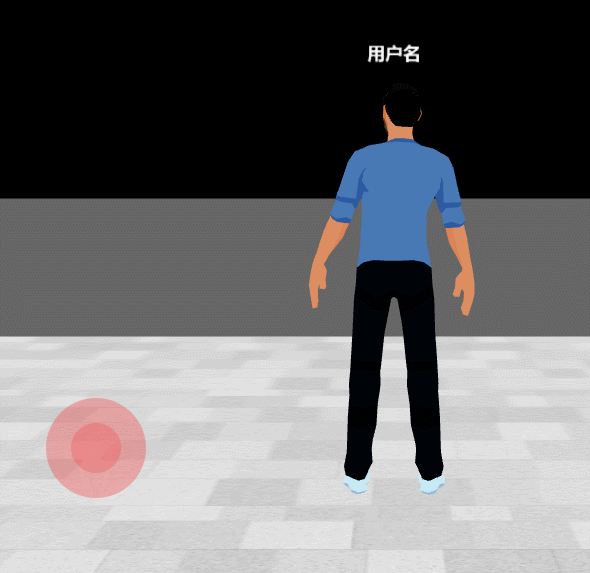
1. Download nippleJs: Nipplejs by yoannmoinet
Or npm install:
npm install nipplejs --save
2. Create a rocker:
const joystickContainer = document.getElementById("joystick-container");
const option = {
    zone: joystickContainer,
    mode: "static", // Static mode, the joystick is fixed on the screen
    position: { top: "70%", left: "20%" }, // Initial position of the joystick
    color: "red", // Color of the joystick
}
//Initialize virtual joystick
const joystick = nipplejs.create(option);
The other configuration parameters of option are as follows:
//options parameter description
var options = {
    zone: Element, // active zone
    color: String,
    size: Integer,
    threshold: Float, // before triggering a directional event
    fadeTime: Integer, // transition time
    multitouch: Boolean,
    maxNumberOfNipples: Number, // when multitouch, what is too many?
    dataOnly: Boolean, // no dom element whatsoever
    position: Object, // preset position for 'static' mode
    mode: String, // 'dynamic', 'static' or 'semi'
    restJoystick: Boolean|Object, // Re-center joystick on rest state
    restOpacity: Number, // opacity when not 'dynamic' and rested
    lockX: Boolean, // only move on the X axis
    lockY: Boolean, // only move on the Y axis
    catchDistance: Number, // distance to recycle previous joystick in
                                    // 'semi' mode
    shape: String, // 'circle' or 'square'
    dynamicPage: Boolean, // Enable if the page has dynamically visible elements
    follow: Boolean, // Makes the joystick follow the thumbstick
};
3. Add character binding
// Main character
function host() {
    let gloader = new THREE.GLTFLoader();
    const dracoLoader = new THREE.DRACOLoader();
    dracoLoader.setDecoderPath("./plugins/Three/libs/draco/"); // Set the decoding path under public, pay attention to the last /
    gloader.setDRACOLoader(dracoLoader);
        gloader.load("./models/man.glb", (result) => {
        peopleObj = result.scene;
        peopleObj.position.set(0, 0, 1);
        peopleAnimations = result.animations;

        // Add the combined object to the scene
        scene.add(peopleObj);

        calcplayerdir(); // Calculate angle

        mixer = new THREE.AnimationMixer(peopleObj);
        mixerArr.push(mixer);
        activeAction = mixer.clipAction(peopleAnimations[1]);
        activeAction.play();
    });
}
4. Add events to the joystick
joystick
  .on("start", function (evt, data) {
    canmove = true;
    hostWalk(); //Character walking animation
    controls.enabled = false;
    lastpx = data.position.x;
    lastpy = data.position.y;
  })
  .on("move", function (evt, data) {
    // Direction does not exist
    // console.log(data.direction);
    if (data.direction) {
      canmove = true;
      peopleObj.movedistance = data.distance;
      if (data.direction) {
        playerforward.set(
          lastpx - data.position.x,
          0,
          lastpy-data.position.y
        );
      }
    }
  })
  .on("end", function (evt, data) {
    canmove = false;
    hostStop(); //The character walking animation stops
    if (!peopleObj) return;
    controls.target.copy(peopleObj.position).add(new THREE.Vector3(0, 1, 0));
    controls.enabled = true;
  });
5. Camera lens and character following
//Camera following
function cameraFollow() {
  if (!peopleObj || controls.enabled) return;

  const d = new THREE.Vector3();
  d.copy(dir);
  d.multiplyScalar(1);
  d.negate();

  const playerpos = new THREE.Vector3();
  playerpos.copy(peopleObj.position);
  playerpos.add(d);
  camera.position.copy(playerpos).add(new THREE.Vector3(0, 1, 0));
  camera.lookAt(new THREE.Vector3(peopleObj.position.x, peopleObj.position.y + 1, peopleObj.position.z));
}
//character walking
function run(delta) {
    if (qqq) {
        const forward = new THREE.Vector3(0, 0, 0);
        forward.copy(playerforward);
        forward.applyQuaternion(qqq);
        forward.normalize();
        forward.multiplyScalar(movedistance * 0.01 * delta);
        const p = new THREE.Vector3().copy(peopleObj.position);
        p.add(forward);
        peopleObj.lookAt(p);
        peopleObj.position.copy(p);
    }
}
6. Calculate the angle
//After touching or raising the mouse, recalculate the angle
renderer.domElement.addEventListener("touchend", () => {
  calcplayerdir();
});
renderer.domElement.addEventListener("mouseup", () => {
  calcplayerdir();
});

/* Calculate angle*/
function calcplayerdir() {
  const campos = new THREE.Vector3();
  campos.copy(camera.position);
  const playerpos = new THREE.Vector3();
  playerpos.copy(peopleObj.position);
  campos.y = playerpos.y;
  dir = playerpos.sub(campos);
  console.log("ddd: ", dir);

  const d = new THREE.Vector3();
  d.copy(dir);
  d.multiplyScalar(2);
  const p = new THREE.Vector3().copy(peopleObj.position);
  p.add(d);
  const player1 = peopleObj.clone();
  player1.lookAt(p);
  player1.updateMatrixWorld();
  player1.visible = false;
  qqq = new THREE.Quaternion();
  qqq.copy(player1.quaternion);
}
7. Put it in render to render
controls.update(dt);
if (peopleObj) {
        if (canmove) {
        run(dt);
        }
        cameraFollow();
  }
Changing the joystick style and only changing the color can be achieved through the parameters of option. First, make the disc look like a picture you designed, and then change the style. Mainly add !important to enforce constraints.
.back{
    background: url(images/back_bg.png) no-repeat center !important;
    background-size: 100% !important;
}
.front{
    background: url(images/front_bg.png) no-repeat center !important;
    background-size: 100% !important;
}
This is the end of the case for using nippleJs to create a joystick to control characters and lenses~