Introduction
This codelab introduces how to implement a simple electronic photo album application. The main functions include:
1. Implement the carousel effect at the top of the home page.
2. Implement multiple page layout methods.
3. Achieve effects such as zooming in, zooming out, and sliding left and right to view details through gesture control.
Related concepts
● Swiper: Slider view container, providing the ability to display a sliding carousel of subcomponents.
● Grid: Grid container, consisting of cells divided by “rows” and “columns”. Various layouts can be made by specifying the cells where the “items” are located.
● Navigation: The Navigation component generally serves as the root container of the Page page and displays the page’s title, toolbar, and menu through attribute settings.
● List: A list contains a series of list items of the same width. Suitable for continuous and multiple rows of similar data, such as pictures and text.
● Combined gestures: Gesture recognition group, multiple gestures are combined into composite gestures, supporting continuous recognition, parallel recognition and mutually exclusive recognition.
Complete example
gitee source code address
Source code download
Electronic photo album (ArkTS).zip
Environment setup
We first need to complete the establishment of the HarmonyOS development environment. Please refer to the following steps.
Software requirements
● DevEco Studio version: DevEco Studio 3.1 Release.
● HarmonyOS SDK version: API version 9.
Hardware requirements
● Device type: Huawei mobile phone or Huawei mobile phone device simulator running on DevEco Studio.
● HarmonyOS system: 3.1.0 Developer Release.
Environment setup
1. Install DevEco Studio. For details, please refer to Download and Install the Software.
2. Set up the DevEco Studio development environment. The DevEco Studio development environment depends on the network environment. You need to be connected to the network to ensure the normal use of the tool. You can configure the development environment according to the following two situations: If you can directly access the Internet, you only need to download it. HarmonyOS SDK operation.
a. If the network cannot directly access the Internet and needs to be accessed through a proxy server, please refer to Configuring the Development Environment.
3. Developers can refer to the following link to complete the relevant configuration for device debugging: Debugging using a real device
a. Use the simulator for debugging

Interpretation of code structure
This codelab only explains the core code. For the complete code, we will provide it in the source code download or gitee.
├──entry/src/main/ets // Code area</code><code>│ ├──common</code><code>│ │ ├──constansts</code><code>│ │ │ └──Constants.ets // Constant class</code><code>│ │ └──utils</code><code>│ │ └──Logger.ets // Logger public class</code><code>│ ├──entryability</code><code>│ │ └──EntryAbility.ts // Program entry class</code><code>│ ├──pages</code><code>│ │ ├─ ─DetailListPage.ets // Picture details page</code><code>│ │ ├──DetailPage.ets // View large picture page</code><code>│ │ ├──IndexPage.ets // Electronic photo album homepage Face</code><code>│ │ └──ListPage.ets // Picture list page</code><code>│ └──view</code><code>│ └──PhotoItem.ets // Home page Album Item component</code><code>└──entry/src/main/resources // Resource file
Build application page
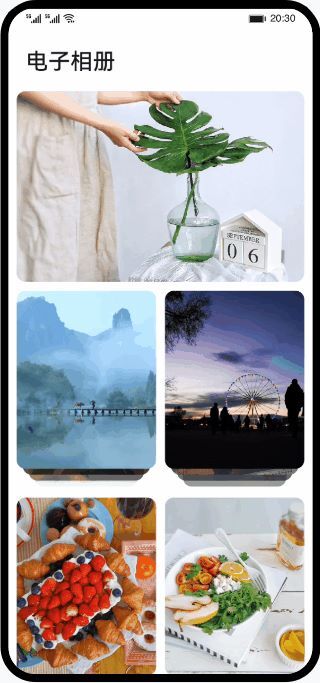
The application homepage uses the Column component to implement a vertical layout. From top to bottom are the title component Text, the carousel Swiper, and the album list Grid. Both the title and the carousel are set to a fixed height, and the album list at the bottom uses the layoutWeight attribute to implement adaptive layout to occupy the remaining space.
// IndexPage.ets</code><code>Column() {<!-- --></code><code> Row() {<!-- --></code><code> Text($r('app.string.EntryAbility_label'))</code><code> }</code>
<code> Swiper(this.swiperController) {<!-- --></code><code> ForEach(Constants.BANNER_IMG_LIST, (item: Resource, index?: number) => {<!-- --> </code><code> Row() {<!-- --></code><code> Image(item)</code><code> ...</code><code> }</code><code> }, (item: Resource, index?: number) => JSON.stringify(item) + index)</code><code> }</code><code> ...</code>
<code> Grid() {<!-- --></code><code> ForEach(IMG_ARR, (photoArr: Array<Resource>, index?: number) => {<!-- --></code><code> GridItem() {<!-- --></code><code> PhotoItem({ photoArr })</code><code> }</code><code> ...</code><code> .onClick(() => {<!-- --></code><code> router.pushUrl({<!-- --></code><code> url: Constants.URL_LIST_PAGE ,</code><code> params: { photoArr: JSON.stringify(photoArr) }</code><code> });</code><code> })</code><code> }, (item : Array<Resource>, index?: number) => JSON.stringify(item) + index)</code><code> }</code><code> .columnsTemplate(Constants.INDEX_COLUMNS_TEMPLATE)</code><code> .columnsGap($r('app.float.grid_padding'))</code><code> .rowsGap($r('app.float.grid_padding'))</code><code> . padding({ left: $r('app.float.grid_padding'), right: $r('app.float.grid_padding') })</code><code> .layoutWeight(1)</code><code>}</code>

The picture list page is a grid-like expanded picture list, mainly using the Grid component and the GridItem component. The GridItem height is set to be consistent with the width through the aspectRatio attribute.
// ListPage.ets</code><code>Navigation() {<!-- --></code><code> Grid() {<!-- --></code><code> ForEach(this.photoArr, (img: Resource, index?: number) => {<!-- --></code><code> GridItem() {<!-- --></code><code> Image(img)</code><code> .onClick(() => {<!-- --></code><code> if (!index) {<!-- --></code><code> index = 0;</code><code> }</code><code> this.selectedIndex = index;</code><code> router.pushUrl({<!-- --></code><code> url: Constants.URL_DETAIL_LIST_PAGE,</code><code> params: {<!-- --></code><code> photoArr: JSON.stringify(this.photoArr),</code><code> }</code><code> });</code><code> })</code><code> }</code><code> ...</code><code> . aspectRatio(1)</code><code> }, (item: Resource) => JSON.stringify(item))</code><code> }</code><code> .columnsTemplate(Constants.GRID_COLUMNS_TEMPLATE) / / Display 4 items per line</code><code> ...</code><code> .layoutWeight(1)</code><code>}

The picture details page is composed of two horizontally scrolling List components at the top and bottom to complete the overall layout. There is a linkage effect between the two components. The large image shown above is always the image in the middle of the screen at the bottom of the List. Scroll or click the List at the bottom, and the large picture displayed above will change accordingly. Similarly, when you slide the picture above left or right, the List component at the bottom will also scroll accordingly.
// DetailListPage.ets</code><code>Stack({ alignContent: Alignment.Bottom }) {<!-- --></code><code> // Upper large picture list component</code><code> List({ scroller: this.bigScroller, initialIndex: this.selectedIndex }) {<!-- --></code><code> ForEach(this.photoArr, (img: Resource) => {< !-- --></code><code> ListItem() {<!-- --></code><code> Image(img)</code><code> ...</code><code> .gesture(PinchGesture({ fingers: Constants.DOUBLE_NUMBER })</code><code> .onActionStart(() => this.goDetailPage()))</code><code> .onClick(() => this.goDetailPage())</code><code> }</code><code> }, (item: Resource) => JSON.stringify(item))</code><code> }</code><code> ...</code><code> .onScroll((scrollOffset, scrollState) => {<!-- --></code><code> if (scrollState === ScrollState.Fling) {<! -- --></code><code> this.bigScrollAction(scrollTypeEnum.SCROLL);</code><code> }</code><code> })</code><code> .onScrollStop(() => this.bigScrollAction(scrollTypeEnum.STOP))</code><code> // Bottom small picture list component</code><code> List({ </code><code> scroller: this.smallScroller, </code> code><code> space: Constants.LIST_ITEM_SPACE,</code><code> initialIndex: this.selectedIndex</code><code> }) {<!-- --></code><code> ForEach(this .smallPhotoArr, (img: Resource, index?: number) => {<!-- --></code><code> ListItem() {<!-- --></code><code> this. SmallImgItemBuilder(img, index)</code><code> }</code><code> }, (item: Resource) => JSON.stringify(item))</code><code> }</code><code> ...</code><code> .listDirection(Axis.Horizontal)</code><code> .onScroll((scrollOffset, scrollState) => {<!-- --></code><code> if (scrollState === ScrollState.Fling) {<!-- --></code><code> this.smallScrollAction(scrollTypeEnum.SCROLL);</code><code> }</code><code> })</code><code> .onScrollStop(() => this.smallScrollAction(scrollTypeEnum.STOP))</code><code>}</code>

The large picture viewing page consists of a horizontally scrolling List component to realize the function of switching pictures when sliding left and right, and a Row component to realize the functions of zooming and dragging pictures to view details. When zooming a picture, it will switch from the List component to the Row component to realize the operation of a single picture. When performing a sliding operation on a single picture, it will also switch from the Row component to the List component to realize the picture switching function.
// DetailPage.ets</code><code>Stack() {<!-- --></code><code> List({ scroller: this.scroller, initialIndex: this.selectedIndex }) { <!-- --></code><code> ForEach(this.photoArr, (img: Resource) => {<!-- --></code><code> ListItem() {<!-- --></code><code> Image(img)</code><code> ...</code><code> .onClick(() => router.back())</code><code> }</code><code> .gesture(gesture(GestureGroup(GestureMode.Exclusive,</code><code> PinchGesture({ fingers: Constants.DOUBLE_NUMBER })</code><code> .onActionStart(() = > {<!-- --></code><code> this.resetImg();</code><code> this.isScaling = true;</code><code> this.imgOffSetX = 0;</code><code> this.imgOffSetY = 0;</code><code> })</code><code> .onActionUpdate((event?: GestureEvent) => {<!-- --></code> <code> if (event) {<!-- --></code><code> this.imgScale = this.currentScale * event.scale;</code><code> }</code><code> } )</code><code> .onActionEnd(() => {<!-- --></code><code> if (this.imgScale < 1) {<!-- --></code> <code> this.resetImg();</code><code> this.imgOffSetX = 0;</code><code> this.imgOffSetY = 0;</code><code> } else {<!-- - -></code><code> this.currentScale = this.imgScale;</code><code> }</code><code> }), PanGesture()</code><code> .onActionStart(() => {<!-- --></code><code> this.resetImg();</code><code> this.isScaling = true;</code><code> })</code><code> .onActionUpdate((event?: GestureEvent) => {<!-- --></code><code> if (event) {<!-- --></code><code> this.imgOffSetX = this.preOffsetX + event.offsetX;</code><code> this.imgOffSetY = this.preOffsetY + event.offsetY;</code><code> }</code><code> })</code><code> ...</code><code> ))</code><code> }, (item: Resource) => JSON.stringify(item))</code><code> }</code><code> ...</code><code> .onScrollStop(() => {<!-- --></code><code> let currentIndex = Math.round((this.scroller.currentOffset()</code><code> .xOffset + (this.imageWidth / Constants.DOUBLE_NUMBER)) / this.imageWidth);</code><code> this.scroller.scrollTo({ xOffset: currentIndex * this.imageWidth, yOffset: 0 });</code><code> })</code><code> .visibility(this.isScaling ? Visibility.Hidden : Visibility.Visible)</code>
<code> Row() {<!-- --></code><code> Image(this.photoArr[this.selectedIndex])</code><code> ...</code><code> } </code><code> .visibility(this.isScaling ? Visibility.Visible : Visibility.Hidden)</code><code>}</code>
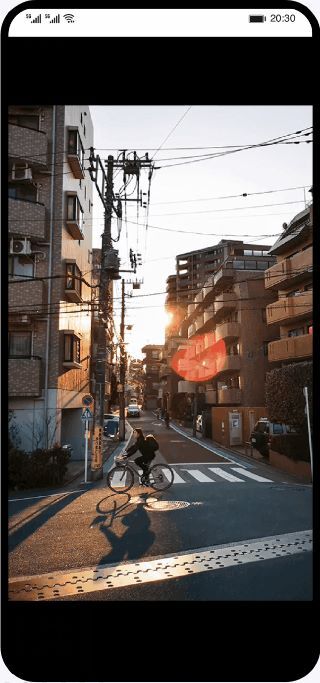
Control pictures with gestures
In the large image browsing interface, when pinching with two fingers, the zoom of the image is controlled by changing the scale of the Image component. When dragging with one hand, the position of the image is controlled by changing the offset of the Image. The gesture operation is implemented by calling the combined gesture GestureGroup. Among them, PinchGesture implements two-finger zoom gestures, and PanGesture implements single-finger drag gestures.
// DetailPage.ets </code><code>// When the gesture ends, determine whether the display image needs to be switched based on the boundary value</code><code>handlePanEnd(): void {<!-- --> </code><code> let initOffsetX = (this.imgScale - 1) * this.imageWidth + this.smallImgWidth;</code><code> if (Math.abs(this.imgOffSetX) > initOffsetX) {<!- - --></code><code> if (this.imgOffSetX > initOffsetX & amp; & amp; this.selectedIndex > 0) {<!-- --></code><code> this.selectedIndex -= 1;</code><code> } else if (this.imgOffSetX < -initOffsetX & amp; & amp; this.selectedIndex < (this.photoArr.length - 1)) {<!-- --></code><code> this.selectedIndex + = 1;</code><code> }</code><code> this.isScaling = false;</code><code> this.resetImg();</code><code> this.scroller.scrollTo({ xOffset: this.selectedIndex * this.imageWidth, yOffset: 0 });</code><code> }</code><code>}</code>
<code>build() {<!-- --></code><code> Stack() {<!-- --></code><code> ...</code><code> Row () {<!-- --></code><code> Image(this.photoArr[this.selectedIndex])</code><code> .position({ x: this.imgOffSetX, y: this.imgOffSetY })</code><code> .scale({ x: this.imgScale, y: this.imgScale })</code><code> ...</code><code> }</code><code> .gesture(GestureGroup(GestureMode.Exclusive,</code><code> PinchGesture({ fingers: Constants.DOUBLE_NUMBER })</code><code> .onActionUpdate((event?: GestureEvent) => {<!-- --></code><code> if (event) {<!-- --></code><code> this.imgScale = this.currentScale * event.scale;</code><code> }</code><code> })</code><code> .onActionEnd(() => {<!-- --></code><code> // When the pinch gesture ends, if the image zoom ratio is less than 1 , then reset the image size and position</code><code> if (this.imgScale < 1) {<!-- --></code><code> this.resetImg();</code><code> this.imgOffSetX = 0;</code><code> this.imgOffSetY = 0;</code><code> } else {<!-- --></code><code> this.currentScale = this. imgScale;</code><code> }</code><code> }),</code><code> PanGesture()</code><code> .onActionStart(() => {<!-- - -></code><code> // Record the current position of the picture when the gesture starts</code><code> this.preOffsetX = this.imgOffSetX;</code><code> this.preOffsetY = this.imgOffSetY;</code> code><code> })</code><code> .onActionUpdate((event?: GestureEvent) => {<!-- --></code><code> // Update the position of the picture</code> <code> if (event) {<!-- --></code><code> this.imgOffSetX = this.preOffsetX + event.offsetX;</code><code> this.imgOffSetY = this.preOffsetY + event .offsetY;</code><code> }</code><code> })</code><code> .onActionEnd(() => this.handlePanEnd())</code><code> ))</code><code> ...</code><code> }</code><code> ...</code><code>}</code>
Summary
You have completed this Codelab and learned the following knowledge points:
1. How to achieve the carousel effect at the top of the home page.
2. How to implement multiple page layout styles.
3. How to use gestures to control the zooming in, zooming out, sliding left and right to view details and other effects of the picture.