Click on the front-end Q above and follow the public account
Reply to join the group and join the front-end Q technology exchange group
Introduction to JSX
JSX is a syntax extension of Javascript, which has all the functions of Javascript while having the semantics and intuitiveness of html. It allows us to write template syntax in JS:
const el = <div>Vue 2</div>;
Copy code
The above code is neither HTML nor a string. It is called JSX, which is an extended syntax of JavaScript. JSX may remind you of template syntax, but it has the full programming power of Javascript.
When to use JSX
When starting to write a component that can only dynamically generate a heading through the level prop, you may quickly think of implementing it like this:
<script type="text/x-template" id="anchored-heading-template">
<h1 v-if="level === 1">
    <slot></slot>
</h1>
<h2 v-else-if="level === 2">
    <slot></slot>
</h2>
<h3 v-else-if="level === 3">
    <slot></slot>
</h3>
</script>
Copy code
Using a template here is not the best choice. Part of the code is repeatedly written in the titles of each level, which is not concise and elegant enough. If you try to write it in JSX, the code will become much simpler:
const App = {
  render() {
    const tag = `h${this.level}`
    return <tag>{this.$slots.default}</tag>
  }
}
Copy code
Or if you have written a lot of render functions, you may find the following code to be painful to write:
createElement(
    'anchored-heading', {
        props: {
            level: 1
        }
    }, [
    createElement('span', 'Hello'),
        'world!'
    ]
)
Copy code
Especially when the corresponding template is so simple:
<anchored-heading :level="1">
    <span>Hello</span> world!
</anchored-heading>
Copy code
At this time, you can use JSX syntax in Vue, which allows us to return to a syntax closer to templates:
import AnchoredHeading from './AnchoredHeading.vue'

newVue({
    el: '#demo',
    render: function (h) {
        return (
            <AnchoredHeading level={1}>
                <span>Hello</span> world!
            </AnchoredHeading>
        )
    }
})
Copy code
During the development process, the message prompt component Message is often used. One possible way to write it is as follows:
Message.alert({
  message: 'Are you sure you want to delete?',
  type: 'warning'
})
Copy code
But I hope that message can customize some styles. At this time, you may need to make Message.alert support JSX (of course you can also use slots /html and other methods to solve)
Message.alert({
  messge: <div>Are you sure you want to delete <span style="color:red">xxx</span>'s notes?</div>,
  type: 'warning'
})
Copy code
In addition, only one component can be written in a .vue file. This may not be convenient in some scenarios. In many cases, when writing a page, you may actually need to split some small node fragments into For reuse in small components, these small components can actually be solved by writing simple function components. Usually, due to the limitations of SFC, we may be accustomed to writing everything in one file, but I have to say that we can try this method.
//Write multiple components in one file
const Input = (props) => <input {...props} />
export const Textarea = (props) => <input {...props} />
export const Password = (props) => <input type="password" {...props} />

export default Input
Copy code
For example, an Input component is encapsulated here. We hope to export the Password component and Textarea component at the same time to facilitate users to use them according to actual needs. These two components themselves use the Input component internally, but some props are customized. It is very convenient in JSX. It is basically enough to write a simple function component, and just declare props through interface. But if it is written using a template, it may be split into three files, and perhaps an entry file of index.js must be added to export the three components.
Since JSX is essentially JavaScript, it has the full programming capabilities of JavaScript. For another example, we need to use a piece of logic to reverse a set of DOM nodes. If we write it in the template, we will probably need to write two pieces of code.
Although this example may not be common, we have to admit that in some scenarios, JSX is still easier to write than templates.
Starting from Vue 2, template will be compiled into JavaScript’s render function before running.

Vue recommends using templates to create your HTML in most cases. However, in some scenarios, you need to use the render function, which is more flexible than template. These render functions are the legendary Virtual DOM during the runtime stage.

Basic use of JSX in Vue2
Configuration
In Vue 2, JSX compilation relies on @vue/babel-preset-jsx and @vue/babel-helper-vue-jsx-merge-props Bag. The former package is responsible for compiling the syntax of JSX, and the latter package is used to introduce the runtime mergeProps function.
npm install @vue/babel-preset-jsx @vue/babel-helper-vue-jsx-merge-props
Copy code
And add configuration in babel.config.js:
module.exports = {
  presets: ['@vue/babel-preset-jsx'],
}
Copy code
Text interpolation
Text interpolation in template code uses double curly braces by default:
<h1>{<!-- -->{ msg }}</h1>
Copy code
In JSX you need to use single curly braces:
const name = 'Vue'
const element = <h1>Hello, { name }</h1>
Copy code
Like text interpolation in template syntax, any valid JS expression is supported within curly brackets, such as: 2 + 2, user.firstName, formatName(user )etc.
Conditional and loop rendering
In the template code, we use v-for to traverse the elements, and use v-if to determine whether to render the element. In JSX, for v-for code>, you can use for loop or array.map instead. For v-if, you can use if-else statement, ternary expression, etc. instead
Use if-else statements
const element = (name) => {
  if (name) {
    return <h1>Hello, { name }</h1>
  } else {
    return <h1>Hello, Stranger</h1>
  }
}
Copy code
Use ternary expressions
const element = icon ? <span class="icon"></span> : null;
Copy code
Using the map method of an array
const list = ['java', 'c++ ', 'javascript', 'c#', 'php']
return (
  <ul>
  {list.map(item => {
   return <li>{item}</li>
  })}
  </ul>
)
Copy code
Attribute binding
In the template code, generally use v-bind:prop="value" or :prop="value" to bind properties to the component. In JSX< You can no longer use the v-bind instruction in /code>, but bind it in the form of single curly braces:
const href = 'https://xxx.com'
const element = <a href={href}>xxx</a>
Copy code
const properties = {a: 1, b: 2}
Copy code
In addition, tag attributes can be bound in batches through
in the template code.
There is also a corresponding replacement solution in JSX:
.
Class binding also uses single curly brackets.
const element = <div className={`accordion-item-title ${ disabled ? 'disabled' : '' }`}></div>
const element = <div class={
    [ 'accordion-item-title', disabled & amp; & amp; 'disabled' ]
  }
>Item</div>
Copy code
Style binding requires the use of double braces
const width = '100px'
const element = <button style={<!-- -->{ width, fontSize: '16px' }}></button>
Copy code
Event binding
In the template code, the event is monitored through the v-on directive. In JSX, the event is monitored through on + the event name written in camel case, and the bound event is also used in curly brackets. For example, the click event is written as onClick, the mouseenter event should be written as onMouseenter
const confirm = () => {
  // confirm submission
}
<button onClick={confirm}>Confirm</button>
Copy code
Sometimes we hope to monitor native events on the root element of a component. In this case, the .native modifier will be used, but it cannot be used in JSX. However, there are alternatives to monitor native events. The rules are the same as ordinary events. You only need to replace the previous on with nativeOn, as follows
render() {
    //Listen to the click event of the root element of the drop-down box
    return <CustomSelect nativeOnClick={this.handleClick}></CustomSelect>
  }
Copy code
In addition to the above methods of monitoring events, we can also use objects to monitor events.
render() {
    return (
      <ElInput
        value={this.content}
        on={<!-- -->{
          focus: this.handleFocus,
          input: this.handleInput
        }}
        nativeOn={<!-- -->{
          click: this.handleClick
        }}
      ></ElInput>
    )
  }
Copy code
For the event modifiers .passive, .capture and .once, Vue provides corresponding prefixes that can be used for on code>:
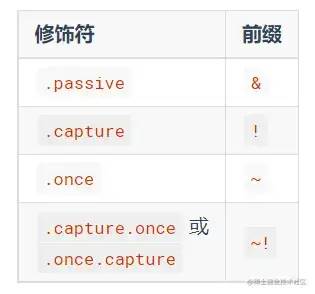
For example:
on: {
    '!click': this.doThisInCapturingMode,
    '~keyup': this.doThisOnce,
    '~!mouseover': this.doThisOnceInCapturingMode
}
Copy code
For all other modifiers, the private prefix is not necessary because you can use the event method in the event handler: .jpeg" alt="b4d5788bb489de7a79478278443df21e.jpeg"> For details, please refer to the Vue specification document.
v-show and v-model
Most directives cannot be used in JSX. For native directives, only v-show is supported.
And v-model is a syntax sugar provided by Vue. It is essentially composed of value attribute (default) + input event (default), so in JSX, we can return to the essence by passing the value attribute and listening to the input event To manually implement two-way binding of data:
export default {
  data() {
    return {
      name: ''
    }
  },
  methods: {
    // Listen to the onInput event for assignment operations
    handleInput(e) {
      this.name = e.target.value
    }
  },
  render() {
    // Pass the value attribute and listen to the onInput event
    return <input value={this.name} onInput={this.handleInput}></input>
  }
}
Copy code
In addition, in the scaffolding vue-cli4, support for v-model has been integrated by default, and you can directly use , if the project is relatively old, you can also install the plug-in babel-plugin-jsx-v-model for support.
Similarly, in JSX, .sync also needs to be implemented using attributes + events, as shown in the following code:
export default {
  methods: {
    handleChangeVisible(value) {
      this.visible = value
    }
  },
  render() {
    return (
      <ElDialog
        title="Test.sync"
        visible={this.visible}
        on={<!-- -->{ 'update:visible': this.handleChangeVisible }}
      ></ElDialog>
    )
  }
}
Copy code
Slot
(1)Default slot:
When using element-ui's Dialog, the pop-up content uses the default slot. The usage of using the default slot in JSX is the same as that of ordinary The usage of the slot is basically the same, as follows
render() {
    return (
      <ElDialog title="Pop title" visible={this.visible}>
        {/*This is the default slot*/}
        <div>Here is the pop-up content</div>
      </ElDialog>
    )
  }
Copy code
Customize the default slot:
There is an attribute $slots on the instance Vue of this, which mounts all the slots inside this component. Use this.$slots.default can add the default slot to the component.
export default {
  props: {
    visible: {
      type: Boolean,
      default: false
    }
  },
  render() {
    return (
      <div class="custom-dialog" vShow={this.visible}>
        {/**Define the default slot through this.$slots.default*/}
        {this.$slots.default}
      </div>
    )
  }
}
Copy code
(2) Named slot
Sometimes we need multiple slots for a component. At this time, we need to give each slot a name. For example, the pop-up box of element-ui can define the content of the bottom button area by using the name. Slot for footer
render() {
    return (
      <ElDialog title="Pop title" visible={this.visible}>
        <div>Here is the pop-up content</div>
        {/** Named slot */}
        <template slot="footer">
          <ElButton>OK</ElButton>
          <ElButton>Cancel</ElButton>
        </template>
      </ElDialog>
    )
  }
Copy code
Customize named slots: $slots was mentioned in the previous section when customizing default slots. For default slots, use this.$slots.default, and for named slots Slots can be customized using this.$slots.footer
render() {
    return (
      <div class="custom-dialog" vShow={this.visible}>
        {this.$slots.default}
        {/**Custom named slot*/}
        <div class="custom-dialog__foolter">{this.$slots.footer}</div>
      </div>
    )
  }
Copy code
(3) Scope slot
Sometimes it is useful to allow slot content to access data only in child components. In this case, scope slots are needed. In JSX, because there is no v-slot directive, so the way the scope slot is used is different from the way in the template code. For example, in element-ui, when we use el-table, we can customize the content of table cells. In this case, we need to use scope slots
data() {
    return {
      data: [
        {
          name: 'xxx'
        }
      ]
    }
  },
  render() {
    return (
      {/**scopedSlots is the scoped slot, default is the default slot, if it is a named slot, set default to the corresponding slot name*/}
      <ElTable data={this.data}>
        <ElTableColumn
          label="name"
          scopedSlots={<!-- -->{
            default: ({ row }) => {
              return <div style="color:red;">{row.name}</div>
            }
          }}
        ></ElTableColumn>
      </ElTable>
    )
  }
Copy code
Custom scope slot:
Using scope slots is different, and defining scope slots is also different from the template code. We have customized a list item component. The user wants to customize the list item title. At this time, the list data needs to be passed out through the scope slot.
render() {
    const { data } = this
    // Get the title scope slot
    const titleSlot = this.$scopedSlots.title
    return (
      <div class="item">
        {/** If there is a title slot, use the title slot, otherwise use the default title */}
        {titleSlot ? titleSlot(data) : <span>{data.title}</span>}
      </div>
    )
  }
Copy code
Use custom components
Just import it, no need to declare it in the components attribute, just write it directly in jsx:
import MyComponent from './my-component'

export default {
  render() {
    return <MyComponent>hello</MyComponent>
  },
}
Copy code
Return JSX in method
We can define method, then return JSX in method, and then call this method in the render function, not only In this way, JSX can also be directly assigned to variables, such as:
methods: {
    renderFooter() {
      return (
        <div>
          <ElButton>OK</ElButton>
          <ElButton>Cancel</ElButton>
        </div>
      )
    }
  },
  render() {
    const buttons = this.renderFooter()
    return (
      <ElDialog visible={this.visible}>
        <div>content</div>
        <template slot="footer">{buttons}</template>
      </ElDialog>
    )
  }
Copy code
Use JSX to implement simple chat records
Assume that the message chat record has only three message types: text, picture, and quote. A message can contain any type of content, and a reference type message can continuously reference other types of messages. The effect diagram is roughly as follows:
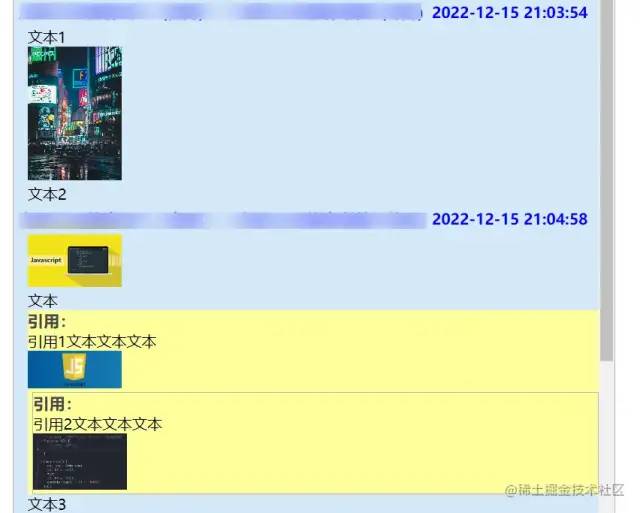
The message data structure is as follows:
message: [
      // The first parameter of each array is the message type: 0: text 1: image 2: reference. The second parameter is the specific content
      [
        0,
        'text'
      ],
      [
        1,
        'Picture link xxx'
      ],
      [
        2,
        [
          [
            0,
            'Quote text text text'
          ],
          [
            1,
            'Quote picture link xxx'
          ]
        ]
      ]
    ]
Copy code
There are two main ideas:
1. Idea 1: Return a message template rendered using array.map in render. For the three message types, use if-else to judge and render them separately. For reference type messages, you can encapsulate a method for rendering. In the method, if If there are still reference type messages, recursive rendering will continue.
methods: {
    // Display reference message
    showQuote (msg) {
      return (
        <div class="content-quote">
          <span class="quote-title">Quote:</span>
          {msg.map(item => {
            if (item[0] === 0) {
              return <p class="content-text">{item[1]}</p>
            } else if (item[0] === 1) {
              return (
                <el-image
                  class="content-img"
                  src={item[1]}
                  preview-src-list={[item[1]]}>
                </el-image>
              )
            } else {
              return this.showQuote(item[1])
            }
          })}
        </div>
      )
    }
  },
  render (h) {
    return (
      <ul class="chat-record-list">
        {this.recordList.map(item => {
          return (
            <li
              class="chat-record-item"
              key={item.timeStamp}
            >
              <div class="title">
                <span class="person-info">
                  { `${item.sendUserNick}(${item.sendUserNet}) → ${item.receiverNick}(${item.receiverNet})` }
                </span>
                <span class="sendtime">
                  { this.formatTime('YYYY-mm-dd HH:MM:SS', item.timeStamp) }
                </span>
              </div>
              <div class="content">
                {item.message.map(msg => {
                  if (msg[0] === 0) {
                    return <p class="content-text">{msg[1]}</p>
                  } else if (msg[0] === 1) {
                    return (
                      <el-image
                        class="content-img"
                        src={msg[1]}
                        preview-src-list={[msg[1]]}>
                      </el-image>
                    )
                  } else {
                    // Recursively render reference type messages
                    return this.showQuote(msg[1])
                  }
                })}
              </div>
            </li>
          )
        })}
      </ul>
    )
  }
Copy code
2. Idea 2: The code in showQuote encapsulated in the first idea is basically similar to the code for rendering message content in render, so its implementation is not elegant enough. In fact, you can encapsulate the rendering of the entire message into a component, introduce yourself into the component, and then render yourself. Since the specific details of the code are similar to the above, only the idea code is given here. Please ignore the specific details.
//The current component is the RecordMessage component, introduce yourself
import RecordMessage from './RecordMessage.vue'

export default {
    props: {
        message: {
            type: Array,
            default: () => []
        }
    },
    render () {
        const parseMessage = msg => {
            const type = msg[0]
            if (type === 0) {
                // text
            } else if (type === 2) {
                // picture
            } else {
                // reference type
                return (
                    <div>
                        <div>Quote:</div>
                        {
                            msg[1].map(subMsg => (
                                // Render yourself recursively
                                <recorded-message>
                                </recorded-message>
                            ))
                        }
                    </div>
                )
            }
        }
        return parseMessage(this.message)
    }
Copy code
About this article
Author: Rockky
https://juejin.cn/post/7188898676993949752

Recommended in the past
Solve the problem of messy import import order

Restore the scene - front-end recording user behavior technical solution

Sorry localStorage, now I'm in love with localForage!

at last
-
Welcome to add me on WeChat and join the technical group for long-term communication and learning...
-
Welcome to pay attention to "Front-End Q", learn front-end seriously, and become a professional technical person...


Click Watching to support me
