1. CameraX architecture
See official documentation CameraX architecture
There is the following passage
Using CameraX, you interact with your device’s camera with the help of abstract concepts called “use cases.”
- Preview: Accepts a Surface used to display previews, such as
PreviewView - Image Analysis : Provides a CPU-accessible buffer for analysis (e.g. machine learning)
- Picture Capture : Capture and save pictures
- Video Capture : Capture video and audio via
VideoCapture
Different use cases can be combined or active at the same time.
For example, a preview use case could be included in the app to allow the user to see what is coming into the camera’s field of view
Add an image analysis use case to determine if the person in the photo is smiling
You can also add a picture taking use case to take a picture when the person is smiling
When I first read it, I was confused as to what the hell a “use case” was.
Later, after some research, I learned that the original English text of “use case” is called Use Case. Each operation in CameraX corresponds to a UseCase
- Preview:
Preview.java - Image analysis:
ImageAnalysis.java - Image capture:
ImageCapture.java - Video Capture:
VideoCapture.java
As you can see, these classes are inherited from the UseCase.java class
public final class Preview extends UseCase {<!-- -->
//...
}
public final class ImageAnalysis extends UseCase {<!-- -->
//...
}
public final class ImageCapture extends UseCase {<!-- -->
//...
}
public final class VideoCapture extends UseCase {<!-- -->
//...
}
Let’s try it out next.
2. Pre-operation
First, we need to create a new project and then introduce dependencies
// CameraX core library using the camera2 implementation
def camerax_version = "1.2.0-alpha02" //1.2.0-alpha02
// The following line is optional, as the core library is included indirectly by camera-camera2
implementation "androidx.camera:camera-core:${camerax_version}"
implementation "androidx.camera:camera-camera2:${camerax_version}"
// If you want to additionally use the CameraX Lifecycle library
implementation "androidx.camera:camera-lifecycle:${camerax_version}"
// If you want to additionally use the CameraX VideoCapture library
implementation "androidx.camera:camera-video:${camerax_version}"
// If you want to additionally use the CameraX View class
implementation "androidx.camera:camera-view:${camerax_version}"
// If you want to additionally add CameraX ML Kit Vision Integration
implementation "androidx.camera:camera-mlkit-vision:${camerax_version}"
// If you want to additionally use the CameraX Extensions library
implementation "androidx.camera:camera-extensions:${camerax_version}"
Add permissions in AndroidManifest.xml
<!--Camera permissions-->
<uses-permission android:name="android.permission.CAMERA" />
<!--With camera-->
<uses-feature android:name="android.hardware.camera.any" />
<!--Permission to store images or videos-->
<uses-permission android:name="android.permission.WRITE_EXTERNAL_STORAGE" />
<uses-permission android:name="android.permission.READ_EXTERNAL_STORAGE" />
<!--Permission to record audio-->
<uses-permission android:name="android.permission.RECORD_AUDIO" />
Don’t forget to apply for permission
ActivityCompat.requestPermissions(
        this, arrayOf(
            Manifest.permission.CAMERA,
            Manifest.permission.WRITE_EXTERNAL_STORAGE,
            Manifest.permission.READ_EXTERNAL_STORAGE,
            Manifest.permission.RECORD_AUDIO
        ), 123
    )
3. Preview: Preview.java
First modify activity_main.xml
<androidx.constraintlayout.widget.ConstraintLayout xmlns:android="http://schemas.android.com/apk/res/android"
    xmlns:app="http://schemas.android.com/apk/res-auto"
    android:id="@ + id/camera_container"
    android:layout_width="match_parent"
    android:layout_height="match_parent"
    android:background="@android:color/black">

    <androidx.camera.view.PreviewView
        android:id="@ + id/previewView"
        android:layout_width="0dp"
        android:layout_height="0dp"
        app:layout_constraintBottom_toBottomOf="parent"
        app:layout_constraintLeft_toLeftOf="parent"
        app:layout_constraintRight_toRightOf="parent"
        app:layout_constraintTop_toTopOf="parent" />

</androidx.constraintlayout.widget.ConstraintLayout>
Modify MainActivity.kt
class MainActivity : AppCompatActivity() {<!-- -->
    private lateinit var binding: ActivityMainBinding
    private lateinit var cameraProvider: ProcessCameraProvider
    private var preview: Preview? = null
    private var camera: Camera? = null

    override fun onCreate(savedInstanceState: Bundle?) {<!-- -->
        super.onCreate(savedInstanceState)
        binding = ActivityMainBinding.inflate(layoutInflater)
        setContentView(binding.root)

        //TODO omits permission application, please refer to the "Pre-operation" section of the article for details

        setUpCamera(binding.previewView)
    }

    private fun setUpCamera(previewView: PreviewView) {<!-- -->
        val cameraProviderFuture: ListenableFuture<ProcessCameraProvider> =
            ProcessCameraProvider.getInstance(this)
        cameraProviderFuture.addListener({<!-- -->
            try {<!-- -->
                cameraProvider = cameraProviderFuture.get()
                bindPreview(cameraProvider, previewView)
            } catch (e: Exception) {<!-- -->
                e.printStackTrace()
            }
        }, ContextCompat.getMainExecutor(this))
    }

    private fun bindPreview(
        cameraProvider: ProcessCameraProvider,
        previewView: PreviewView
    ) {<!-- -->
//Unbind all bindings to prevent CameraProvider from being repeatedly bound to Lifecycle and causing exceptions.
        cameraProvider.unbindAll()
        preview = Preview.Builder().build()
        camera = cameraProvider.bindToLifecycle(
            this,
            CameraSelector.DEFAULT_BACK_CAMERA, preview
        )
        preview?.setSurfaceProvider(previewView.surfaceProvider)
    }
}
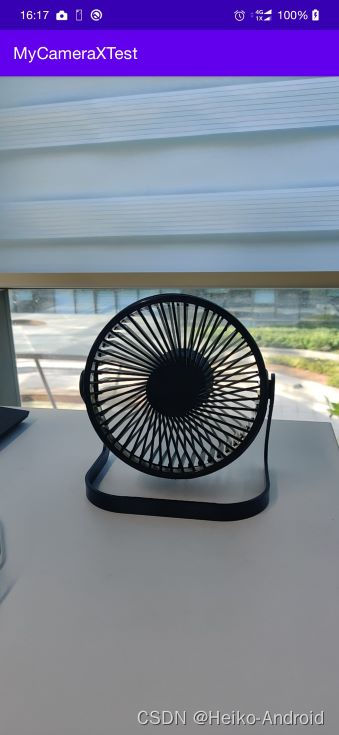
Take a look at the effect
4. Image analysis: ImageAnalysis.java
The Image Analysis use case ImageAnalysis provides applications with image data that can be analyzed in real time, and we can perform image processing, computer vision, or machine learning inference on these images.
val imageAnalysis = ImageAnalysis.Builder()
    // enable the following line if RGBA output is needed.
    // .setOutputImageFormat(ImageAnalysis.OUTPUT_IMAGE_FORMAT_RGBA_8888)
    .setTargetResolution(Size(1280, 720))
    .setBackpressureStrategy(ImageAnalysis.STRATEGY_KEEP_ONLY_LATEST)
    .build()
imageAnalysis.setAnalyzer(executor, ImageAnalysis.Analyzer {<!-- --> imageProxy ->
    val rotationDegrees = imageProxy.imageInfo.rotationDegrees
    // insert your code here.
    // Process the analysis of images here, such as parsing them into QR codes and so on.
    ...
    // after done, release the ImageProxy object
    imageProxy.close()
})
When calling cameraProvider.bindToLifecycle(), pass it in
cameraProvider.bindToLifecycle(
this, CameraSelector.DEFAULT_BACK_CAMERA, preview, imageAnalysis
)
5. Taking pictures: ImageCapture.java
5.1 Take photos only
Here, we need to create an imageCapture first
imageCapture = ImageCapture.Builder()
.setCaptureMode(ImageCapture.CAPTURE_MODE_MINIMIZE_LATENCY)
//.setTargetAspectRatio(screenAspectRatio)
//.setTargetRotation(binding.previewView.display.rotation)
.build()
Then, when calling cameraProvider.bindToLifecycle(), pass in
camera = cameraProvider.bindToLifecycle(
    this,CameraSelector.DEFAULT_BACK_CAMERA, preview, imageCapture
)
Added takePicture() method to take pictures
//Taking photos
private fun takePicture() {<!-- -->
    imageCapture?.let {<!-- --> imageCapture ->
        val mainExecutor = ContextCompat.getMainExecutor(this)
        imageCapture.takePicture(mainExecutor, object : ImageCapture.OnImageCapturedCallback() {<!-- -->
            override fun onCaptureSuccess(image: ImageProxy) {<!-- -->
                super.onCaptureSuccess(image)
            }

            override fun onError(exception: ImageCaptureException) {<!-- -->
                super.onError(exception)
            }
        })

        // Let the screen flash to create the feeling of taking a photo
        // We can only change the foreground Drawable using API level 23 + API
        if (Build.VERSION.SDK_INT >= Build.VERSION_CODES.M) {<!-- -->
            // Display flash animation to indicate that photo was captured
            binding.root.postDelayed({<!-- -->
                binding.root.foreground = ColorDrawable(Color.WHITE)
                binding.root.postDelayed(
                    {<!-- --> binding.root.foreground = null }, 50L
                )
            }, 100L)
        }
    }
}
5.2 Take photos and save them to local storage
We can also take pictures and save them to local storage.
/** Helper function used to create a timestamped file */
private fun createFile(baseFolder: File, format: String, extension: String) =
    File(
        baseFolder, SimpleDateFormat(format, Locale.US)
            .format(System.currentTimeMillis()) + extension
    )

/** Use external media if it is available, our app's file directory otherwise */
fun getOutputDirectory(context: Context): File {<!-- -->
    val appContext = context.applicationContext
    val mediaDir = context.externalMediaDirs.firstOrNull()?.let {<!-- -->
        File(it, appContext.resources.getString(R.string.app_name)).apply {<!-- --> mkdirs() }
    }
    return if (mediaDir != null & amp; & amp; mediaDir.exists())
        mediaDir else appContext.filesDir
}

companion object {<!-- -->
    private const val FILENAME = "yyyy-MM-dd-HH-mm-ss-SSS"
    private const val PHOTO_EXTENSION = ".jpg"
}

//Take a photo and save it locally
private fun takePictureSaveToDisk() {<!-- -->
    imageCapture?.let {<!-- --> imageCapture ->

        // Create output file to hold the image
        val photoFile = createFile(getOutputDirectory(this), FILENAME, PHOTO_EXTENSION)
        Log.i(TAG, "photoFile:$photoFile")

        // Setup image capture metadata
        val metadata = ImageCapture.Metadata().apply {<!-- -->

            // Mirror image when using the front camera
            isReversedHorizontal = lensFacing == CameraSelector.LENS_FACING_FRONT
        }

        // Create output options object which contains file + metadata
        val outputOptions = ImageCapture.OutputFileOptions.Builder(photoFile)
            .setMetadata(metadata)
            .build()

        // Setup image capture listener which is triggered after photo has been taken
        imageCapture.takePicture(
            outputOptions,
            ContextCompat.getMainExecutor(this),
            object : ImageCapture.OnImageSavedCallback {<!-- -->
                override fun onError(exc: ImageCaptureException) {<!-- -->
                    Log.e(TAG, "Photo capture failed: ${exc.message}", exc)
                }

                override fun onImageSaved(output: ImageCapture.OutputFileResults) {<!-- -->
                    val savedUri = output.savedUri ?: Uri.fromFile(photoFile)
                    Log.d(TAG, "Photo capture succeeded: $savedUri")

                    // Implicit broadcasts will be ignored for devices running API level >= 24
                    // so if you only target API level 24 + you can remove this statement
                    if (Build.VERSION.SDK_INT < Build.VERSION_CODES.N) {<!-- -->
                        application.sendBroadcast(
                            Intent(android.hardware.Camera.ACTION_NEW_PICTURE, savedUri)
                        )
                    }

                    // If the folder selected is an external media directory, this is
                    // unnecessary but otherwise other apps will not be able to access our
                    // images unless we scan them using [MediaScannerConnection]
                    val mimeType = MimeTypeMap.getSingleton()
                        .getMimeTypeFromExtension(savedUri.toFile().extension)
                    MediaScannerConnection.scanFile(
                        application,
                        arrayOf(savedUri.toFile().absolutePath),
                        arrayOf(mimeType)
                    ) {<!-- --> _, uri ->
                        Log.d(TAG, "Image capture scanned into media store: $uri")
                    }
                }
            })

 // Let the screen flash to create the feeling of taking a photo
        // We can only change the foreground Drawable using API level 23 + API
        if (Build.VERSION.SDK_INT >= Build.VERSION_CODES.M) {<!-- -->
            // Display flash animation to indicate that photo was captured
            binding.root.postDelayed({<!-- -->
                binding.root.foreground = ColorDrawable(Color.WHITE)
                binding.root.postDelayed(
                    {<!-- --> binding.root.foreground = null }, 50L
                )
            }, 100L)
        }
    }
}
Then, we can find this picture in the album. The real location of the picture is in /storage/emulated/0/Android/media/your package name/project name/.
6. Video recording: VideoCapture.java
Video recording uses VideoCapture
videoCapture = VideoCapture.Builder()
//.setTargetRotation(previewView.getDisplay().getRotation())
.setVideoFrameRate(25)
.setBitRate(3 * 1024 * 1024)
.build()
Pass it in when calling cameraProvider.bindToLifecycle().
camera = cameraProvider.bindToLifecycle(
    this,CameraSelector.DEFAULT_BACK_CAMERA, preview, videoCapture
)
It should be noted that videoCapture cannot be used together with imageAnalysis and imageCapture.
If these functions are integrated on the same page, they need to be judged by flags.
if (isVideo) {<!-- -->
    mCamera = cameraProvider.bindToLifecycle(this, cameraSelector,
            preview, videoCapture);
} else {<!-- -->
    mCamera = cameraProvider.bindToLifecycle(this, cameraSelector,
            preview, imageCapture, imageAnalysis);
}
Start recording
private val RECORDED_FILE_NAME = "recorded_video"
private val RECORDED_FILE_NAME_END = "video/mp4"

@SuppressLint("RestrictedApi")
private fun startRecording() {<!-- -->
//TODO The judgment of RECORD_AUDIO and PERMISSION_GRANTED permissions is omitted here.
\t
    val contentValues = ContentValues()
    contentValues.put(
        MediaStore.MediaColumns.DISPLAY_NAME,
        RECORDED_FILE_NAME + "_" + System.currentTimeMillis()
    )
    contentValues.put(MediaStore.MediaColumns.MIME_TYPE, RECORDED_FILE_NAME_END)

    val outputFileOptions = VideoCapture.OutputFileOptions.Builder(
        getContentResolver(),
        MediaStore.Video.Media.EXTERNAL_CONTENT_URI, contentValues
    ).build()
    videoCapture.startRecording(
        outputFileOptions,
        ContextCompat.getMainExecutor(this),
        object : VideoCapture.OnVideoSavedCallback {<!-- -->
            override fun onVideoSaved(outputFileResults: VideoCapture.OutputFileResults) {<!-- -->
                Log.i(TAG, "Video saved successfully: ${outputFileResults.savedUri}")
            }

            override fun onError(
                videoCaptureError: Int,
                message: String,
                cause: Throwable?
            ) {<!-- -->
                Log.i(TAG, "When an exception occurs cause:$cause")
            }
        }
    )
}
Stop video recording
videoCapture.stopRecording()
When we execute Stop video recording, we can see an additional recorded video in the album.
After introducing some commonly used UseCase in CameraX, let’s take a look at some other functions in CameraX.
7. Switch front and rear cameras
When we used cameraProvider.bindToLifecycle() before, one parameter was CameraSelector.
CameraX provides us with the CameraSelector for the front camera and rear camera by default.
public final class CameraSelector {<!-- -->
    @NonNull
    public static final CameraSelector DEFAULT_FRONT_CAMERA =
            new CameraSelector.Builder().requireLensFacing(LENS_FACING_FRONT).build();

    @NonNull
    public static final CameraSelector DEFAULT_BACK_CAMERA =
            new CameraSelector.Builder().requireLensFacing(LENS_FACING_BACK).build();

//...
}
When we switch cameras, we just need to call the bindPreview method again and pass in the new cameraSelector value.
private fun bindPreview(
        cameraProvider: ProcessCameraProvider,
        previewView: PreviewView,
        cameraSelector : CameraSelector
    ) {<!-- -->
        // Unbind all bindings to prevent CameraProvider from being repeatedly bound to Lifecycle and causing exceptions.
        cameraProvider.unbindAll()
        preview = Preview.Builder().build()
        camera = cameraProvider.bindToLifecycle(
            this,
            cameraSelector, preview
        )
        preview?.setSurfaceProvider(previewView.surfaceProvider)
    }
CameraX also provides us with a method to determine whether the front/rear camera exists
/** Returns true if the device has an available back camera. False otherwise */
private fun hasBackCamera(): Boolean {<!-- -->
    return cameraProvider?.hasCamera(CameraSelector.DEFAULT_BACK_CAMERA) ?: false
}

/** Returns true if the device has an available front camera. False otherwise */
private fun hasFrontCamera(): Boolean {<!-- -->
    return cameraProvider?.hasCamera(CameraSelector.DEFAULT_FRONT_CAMERA) ?: false
}
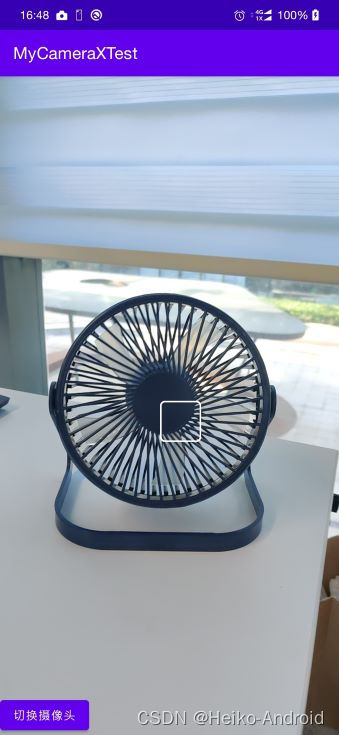
Take a look at the effect

8. Focus
When clicking androidx.camera.view.PreviewView, just call the focus method startFocusAndMetering() of CameraX.
Add the following code in onCreate()
binding.previewView.setOnTouchListener {<!-- --> view, event ->
    val action = FocusMeteringAction.Builder(
        binding.previewView.getMeteringPointFactory()
            .createPoint(event.getX(), event.getY())
    ).build();
    showTapView(event.x.toInt(), event.y.toInt())
    camera?.getCameraControl()?.startFocusAndMetering(action)
    true
}
Added showTapView()
private fun showTapView(x: Int, y: Int) {<!-- -->
    val popupWindow = PopupWindow(
        ViewGroup.LayoutParams.WRAP_CONTENT,
        ViewGroup.LayoutParams.WRAP_CONTENT
    )
    val imageView = ImageView(this)
    imageView.setImageResource(R.drawable.ic_focus_view)
    popupWindow.contentView = imageView
    popupWindow.showAsDropDown(binding.previewView, x, y)
    binding.previewView.postDelayed({<!-- --> popupWindow.dismiss() }, 600)
    binding.previewView.playSoundEffect(SoundEffectConstants.CLICK)
}
Take a look at the effect
9. Zoom
Listen to the zoom event through GestureDetector, and then execute the following code during the callback to zoom in and out of the image using two fingers.
override fun zoom(delta: Float) {<!-- -->
val zoomState = camera?.cameraInfo?.zoomState
zoomState?.value?.let {<!-- -->
val currentZoomRatio = it.zoomRatio
camera?.cameraControl?.setZoomRatio(currentZoomRatio * delta)
}
}
For details on the zoom operation, please see this article. Android uses CameraX to quickly zoom in and out of the camera.
refer to
Android Developer | CameraX
New technology is introduced, will CameraX dominate the world?
Reprint: https://blog.csdn.net/EthanCo/article/details/125603671