
1. Gradle life cycle
The life cycle of Gradle is also a very important concept. After you understand it, you will understand many things, and you can also do some “black technology” for face-to-face processing at each stage of the life cycle.
Author: yechaoa Link: https://juejin.cn/post/7170684769083555877
1.1, three stages
Gradle evaluates and runs the build in three phases, namely Initialization (initialization), Configuration (configuration) and Execution (execution), and any All build tasks will execute these three phases.
-
During the Initialization phase, Gradle determines which projects are included in the build and creates Project instances for each project. In order to determine which projects will be included in the build, Gradle will first look for settings.gradle to determine whether this is a single-project build or a multi-project build. A single project is a module, and a multi-project is project + app + module (1 + n).
-
During the Configuration phase, Gradle evaluates all build scripts included in the build project, then applies plugins, configures the build using the DSL, and finally registers Tasks, while lazily registering their inputs because they are not necessarily executed.
-
Finally, in the Execution (execution) phase, Gradle will execute the set of Tasks required for the build.
1.2, the essence of life cycle
The essence of the life cycle is to combine tasks (Task) at each stage, and then build the project according to our intentions.
Task is the core of Gradle construction, and its model is a directed acyclic graph (DAG). There are dependencies between Tasks, and Gradle will generate a dependency graph during the build (configuration phase), which is a collection of Tasks.
The origin of this Task collection is composed of the above three stages. The first is the initialization stage. It is necessary to clarify which projects are involved in the construction, and then the configuration stage is to analyze the configuration of all projects participating in the construction. This includes registering Tasks. The configuration of the project determines The order of execution of tasks. For example, if there is a custom task in a sub-project that depends on a built-in task to do certain things, then this custom task must also be added to the collection. Finally, it is the execution stage, which is executed sequentially The Task in the collection is used to build the apk.
So in reverse, an apk is composed of many files, these files are combined by the input and output executed by Tasks and merge, and which Tasks to execute specifically, that is, what kind of package to print, is determined by the three life cycle determined by stage.
DAG legend:

2, Initialization (initialization)
During the Initialization phase, Gradle determines which projects are included in the build and creates Project instances for each project. In order to determine which projects will be included in the build, Gradle will first look for settings.gradle to determine whether this is a single-project build or a multi-project build.
2.1, settings.gradle
2.1.1, Settings
In the previous article, we introduced that the configuration and method calls in build.gradle are delegated to the Project object, and the configuration and method calls in build script settings.gradle are delegated to Settings code> object.
A Settings instance is created when Gradle is built, and the settings file is executed based on it. There is a one-to-one correspondence between the Settings instance and the settings.gradle file.
Settings: Declares the configuration required to instantiate and configure a hierarchy that participates in building Project instances.
2.1.2, Project Management
Gradle supports single-project or multi-project builds:
-
Single project build, settings.gradle file is optional;
-
For multi-project construction, the settings.gradle file is required and must be located in the root directory of the project;
settings.gradle file for multi-project build:
pluginManagement {
    repositories {
        gradlePluginPortal()
        google()
        mavenCentral()
    }
}
dependencyResolutionManagement {
    repositoriesMode.set(RepositoriesMode.FAIL_ON_PROJECT_REPOS)
    repositories {
        google()
        mavenCentral()
    }
}
rootProject.name = "GradleX"
include ':app'
include ':lib'
Table of contents:
.
├── app
│...
│ └── build.gradle
├──lib
│...
│ └── build.gradle
└── settings.gradle
The core is include, which means to add the specified project to the build. It can point to the module path included in our project, or it can point to the absolute path of the sub-project in the hard disk, which is switched between the project aar and source code The time is very convenient, and it is also one of the important means to speed up compilation.
2.1.3, plugin management
In addition to managing projects in settings.gradle, another important thing is to manage plugins (Plugin), namely pluginManagement.
2.1.3.1, plug-in warehouse
pluginManagement {
    repositories {
        gradlePluginPortal()
        google()
        mavenCentral()
    }
}
In pluginManagement, repositories specifies the download warehouse address required by the plugin. If the custom plug-in is published in a private warehouse, you need to add the address of the private warehouse here to find your plug-in.
2.1.3.2, plug-in replacement
The pluginManagement configuration is parsed by the PluginManagementSpec interface class, which has 5 methods:
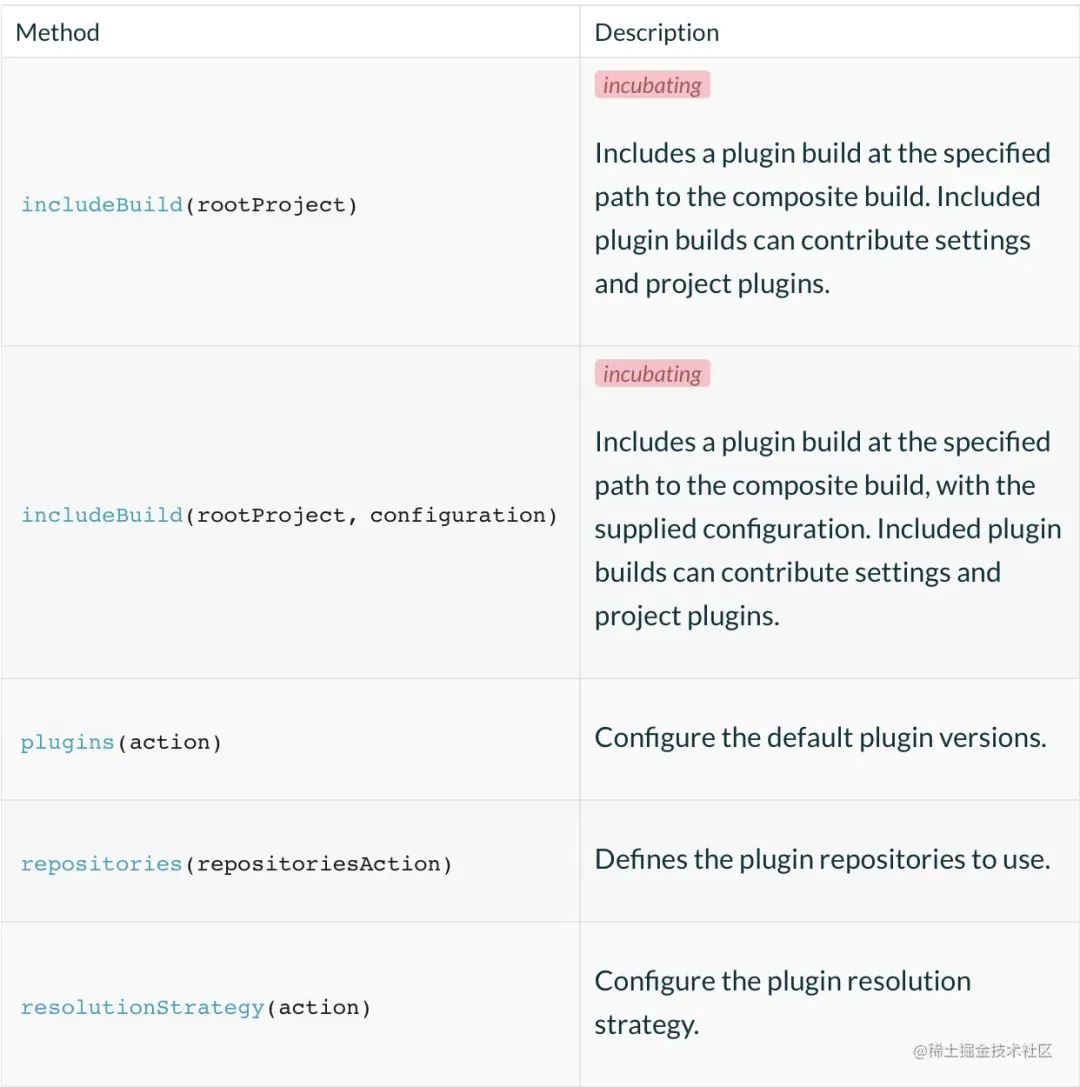
The includeBuild method needs to be available after version 7.0.
We mainly use resolutionStrategy:
@HasInternalProtocol
public interface PluginResolutionStrategy {


    /**
     * Adds an action that is executed for each plugin that is resolved.
     * The {@link PluginResolveDetails} parameter contains information about
     * the plugin that was requested and allows the rule to modify which plugin
     * will actually be resolved.
     */
    void eachPlugin(Action<? super PluginResolveDetails> rule);


}
PluginResolutionStrategy allows it to be modified before PluginRequest, and has a unique callback eachPlugin, the parameter type of eachPlugin is PluginResolveDetails.
PluginResolveDetails:
-
getRequested: Get the requested plugin and return the PluginRequest object, including id, version, and module information;
-
useModule: set the module of the plugin;
-
useVersion: Set the version of the plugin;
-
getTarget: the requested target plugin;
Plug-in replacement mainly uses the useModule method:
pluginManagement {
    resolutionStrategy {
        eachPlugin {
            if (requested. id. id == "org. gradle. sample") {
                useModule("com.yechaoa.plugin:gradlex:1.0")
            }
        }
    }
}
2.1.3.3, plug-in version
The plug-in version mainly uses the useVersion method:
pluginManagement {
    resolutionStrategy {
        eachPlugin {
            if (requested.id.id == "com.yechaoa.plugin") {
                useVersion("2.0")
            }
        }
    }
}
After setting the version, you don’t need to specify the version again if you import the plugin through plugins { } in all build scripts.
2.2, how to find settings.gradle
The importance of settings.gradle has been introduced earlier, so how does Gradle find the settings.gradle file when building?
-
First, the settings.gradle file will be found in the root directory of the project. If it is not found, it will be built as a single project.
-
If it is found, it will check the validity of the include configuration again. If it is not legal, it will continue to be built as a single project. If it is legal, it will be built as a multi-project.
3, Configuration (configuration)
During the Configuration phase, Gradle evaluates all build scripts included in the build project, then applies plugins, configures the build using the DSL, and finally registers Tasks, while lazily registering their inputs because they are not necessarily executed.
Note: No matter which Task is requested to be executed, the configuration phase will be executed. Therefore, in order to keep the construction simple and efficient, it is necessary to avoid any time-consuming operations during the configuration phase, similar to the onDraw method in android.
Simply put, the configuration phase is to create a Project object, execute our build.gradle file, and create a corresponding Task dependency graph based on the code.
3.1, Project
When Gradle is built, a Project object will be created for each project according to the project structure parsed from the Settings object. There is a one-to-one relationship between the Project object and the build.gradle file.
Before Gradle generates the Task dependency graph, the Project object does several things:
-
import plugin
-
configuration properties
-
compile dependencies
3.1.1, importing plug-ins
plugins {
    id 'com.android.application'
    id 'org.jetbrains.kotlin.android'
}
plugins is a method of the Project object, which is used to set the plugins used by the current module.
3.1.2, configuration properties
android {
    namespace 'com.yechaoa.gradlex'
    compileSdk 32


    defaultConfig {
        applicationId "com.yechaoa.gradlex"
        minSdk 23
        targetSdk 32
        versionCode 1
        versionName "1.0"


        testInstrumentationRunner "androidx.test.runner.AndroidJUnitRunner"
    }


    //...
}
We have analyzed the source code of the android { } configuration earlier, and the android { } configuration is actually the DSL configuration of the id 'com.android.application' plugin, which means we are building All configurations in .gradle are actually configurations of plug-ins through DSL. These configurations will affect the execution of plug-ins, thus affecting the entire construction process.
3.1.3, compilation dependencies
dependencies {


    implementation'androidx.core:core-ktx:1.7.0'
    implementation 'androidx.appcompat:appcompat:1.4.1'
    implementation 'com.google.android.material:material:1.5.0'

    //...
}
dependencies { } In addition to the official library, we often add the required three-party library, such as okhttp, glide and so on.
The module’s own three-party dependencies can directly add the warehouse download address in build.gradle:
repositories {
    mavenCentral()
    // other url
}
Equivalent to subprojects { } before 7.0, dependencyResolutionManagement>repositories in settings.gradle is equivalent to allprojects { } before 7.0.
The previous [Gradle-2] article to understand Gradle configuration (https://juejin.cn/post/7160337743552675847#heading-48) missed a little repositoriesMode in dependencyResolutionManagement, that is, Gradle for allprojects { } and the dependency resolution strategy in subprojects { }.
dependencyResolutionManagement {
    repositoriesMode.set(RepositoriesMode.FAIL_ON_PROJECT_REPOS)
    repositories {
        google()
        mavenCentral()
    }
}
repositoriesMode:
-
PREFER_PROJECT: the default value, using repositories { } in build.gradle first, ignoring repositories { } in settings.gradle;
-
PREFER_SETTINGS: Prioritize repositories { } in settings.gradle, ignore repositories { } in build.gradle;
-
FAIL_ON_PROJECT_REPOS: This is awesome, indicating that the repositories { } declared in build.gradle will cause compilation errors;
If there is only the app module, you can write the warehouse address in dependencyResolutionManagement>repositories. If there are multiple modules and the dependencies are very different, it is recommended to write them separately. After all, finding dependencies from the warehouse is time-consuming, although it is not a pain point for compilation. ..(Ignorable)
Of course, the Project object does not only do these things, generally speaking, but you may also have some additional configurations, such as publishing and so on.
4, Execution (execution)
In the Execution (execution) phase, Gradle will execute the set of Tasks required for the build.
In fact, this stage is the real compilation and packaging. For Android, such as our common compileDebugJavaWithJavac, mergeDebugNativeLibs and so on.
5, Hook life cycle
Gradle provides a wealth of callbacks at various stages of the life cycle, which is very useful for us when we do aspect processing.

5.1, Initialization Hook
The Hook in the initialization phase is the Hook Settings object. When settings.gradle is evaluated (evaluate), there is already an initialized Settings object.
We can add Hook through the gradle.settingsEvaluated method, for example in settings.gradle:
println("---Gradle: initialization started")
gradle.settingsEvaluated {
    println("---Gradle: settingsEvaluated Settings object evaluation is complete")
}
At this time, you can get the Settings object. We introduced above that the Settings object is mainly used to manage projects and plug-ins. At this time, you can do some global operations, such as adding a certain plug-in to all projects.
gradle.settingsEvaluated execution is gradle.projectsLoaded:
gradle.projectsLoaded {
    println("---Gradle: projectsLoaded is ready to load the Project object")
}
When projectsLoaded is called back, the Project object of each module has been created according to settings.gradle. We can refer to the Project object to set some hooks:
gradle.allprojects{
    beforeEvaluate {
        println("---Gradle: Project beforeEvaluate Project starts to evaluate, the object is = " + project.name)
    }
    afterEvaluate {
        println("---Gradle: Project afterEvaluate Project is evaluated, the object is = " + project.name)
    }
}
But at this time, it still belongs to the Initialization (initialization) stage, and has not yet reached the Configuration (configuration) stage, so the Project object only contains the basic information of the project, and the configuration information in build.gradle cannot be obtained, so the available objects at this stage are Settings, Gradle objects are available at any stage.
5.2, Configuration Hook
After the initialization is executed, it will enter the Configuration phase. In the configuration phase, you can get the configuration of all projects involved in the construction. First, build.gradle under the root project will be executed, and then build.gradle under the module project.
At this time, you can hook the Project object before and after execution. Because it is a Project object, it cannot be written in settings.gradle, but in build.gradle:
project.beforeEvaluate {
    println("---project: beforeEvaluate Project starts to evaluate, the object is = " + project.name)
}


project. afterEvaluate {
    println("---project: afterEvaluate Project is evaluated, the object is = " + project.name)
}
Through the execution log, it is found that the project.beforeEvaluate method is not executed, because the hook point has passed through the content of build.gradle, so it will not take effect.
The project.afterEvaluate callback is executed, which means that the Project object is evaluated, and the configuration information in the Project object can be obtained at this time. Because the Project object has just been configured at this stage, many dynamic tasks are added to the build at this stage.
After all Project objects are evaluated, gradle.projectsEvaluated will be called back:
gradle.projectsEvaluated {
    println("---Gradle: projectsEvaluated all Project objects have been evaluated")
}
So far, all the objects of a build have been created, including the Gradle object that controls the overall, the Settings object that coordinates the participating modules, and the Project object of each sub-module.
5.3, Execution Hook
Gradle will execute the Task in the Execution (execution) phase, we can add TaskExecutionListener to hook the execution of the Task:
gradle.addBuildListener(new TaskExecutionListener(){


    @Override
    void beforeExecute(Task task) {
        println("---Gradle: Task beforeExecute---")


    }


    @Override
    void afterExecute(Task task, TaskState state) {
        println("---Gradle: Task afterExecute---")
    }
})
Available before 7.3, it has been abandoned after 7.3, and it will cause compilation errors, because in the case of configuration cache, in order to ensure that the API is consistent regardless of whether the configuration cache is enabled, it has to be killed…
Gradle has sacrificed a lot to speed up the compilation, and the development and adaptation will definitely be complained about again…
Task is the smallest construction unit in Gradle, and Action is the smallest execution unit.
You can add TaskActionListener to hook the execution of Task Action:
gradle.addBuildListener(new TaskActionListener(){


    @Override
    void beforeActions(Task task) {
        println("---Gradle: Task beforeActions---")
    }


    @Override
    void afterActions(Task task) {
        println("---Gradle: Task afterActions---")
    }
})
Like TaskExecutionListener, it was also killed, and an error was reported when compiling.
@deprecated This type is not supported when configuration caching is enabled.
5.4, end of construction
When all tasks are executed, it means that the build is over, and gradle.buildFinished will be called back:
gradle.buildFinished {
    println("---Gradle: buildFinished build finished")
}
It is also abandoned, the reason is the same as above, but the compilation does not report an error…
In addition to adding hook points in the way of gradle.xxx, you can also use the method of gradle.addListener(), and the effect is the same.
gradle.addListener(new BuildListener() {
    @Override
    void settingsEvaluated(Settings settings) {


    }


    @Override
    void projectsLoaded(Gradle gradle) {


    }


    @Override
    void projectsEvaluated(Gradle gradle) {


    }


    @Override
    void buildFinished(BuildResult result) {


    }
})
5.4.1, overall output
Look at the overall output to further experience Gradle’s life cycle and build process.
Executing tasks: [:app:assembleDebug] in project /Users/yechao/AndroidStudioProjects/GradleX


---Gradle: Initialization started
---Gradle: settingsEvaluated Settings object evaluation completed
---Gradle: projectsLoaded is ready to load the Project object


> Configure project :
---Gradle:Projec beforeEvaluate Project start evaluating, object is = GradleX
---Gradle:Projec afterEvaluate Project evaluation completed, the object is = GradleX


> Configure project :app
---Gradle:Projec beforeEvaluate Project start evaluation, object is = app
---Gradle:Projec afterEvaluate Project evaluation completed, the object is = app
---project: afterEvaluate Project is evaluated, the object is = app
---Gradle: projectsEvaluated All Project objects have been evaluated


> Task :app:createDebugVariantModel UP-TO-DATE
> Task :app:preBuild UP-TO-DATE
...
> Task :app:assembleDebug
---Gradle: buildFinished build finished


BUILD SUCCESSFUL in 3s
33 actionable tasks: 12 executed, 21 up-to-date


Build Analyzer results available
5.4.2, how to adapt
What to replace TaskActionListener and buildFinished after they are discarded? Gradle provides a Build Service method to replace it.
The Build Service can be used to receive events while executing tasks. To do this, create and register a build service that implements OperationCompletionListener. You can then start receiving events using the BuildEventsListenerRegistry method on the service.
It looks more complicated…
What is that supposed to mean? What’s a BuildEventsListenerRegistry? How do I use ‘the methods’?
Example:
// build.gradle.kts


abstract class BuildListenerService :
    BuildService<BuildListenerService.Params>,
    org.gradle.tooling.events.OperationCompletionListener {


    interface Params : BuildServiceParameters


    override fun onFinish(event: org.gradle.tooling.events.FinishEvent) {
        println("BuildListenerService got event $event")
    }
}


val buildServiceListener = gradle. sharedServices. registerIfAbsent("buildServiceListener", BuildListenerService::class.java) { }


abstract class Services @Inject constructor(
    val buildEventsListenerRegistry: BuildEventsListenerRegistry
)


val services = objects. newInstance(Services::class)


services.buildEventsListenerRegistry.onTaskCompletion(buildServiceListener)
Output:
> Task :service:vp:assemble UP-TO-DATE
> Task :assemble UP-TO-DATE
> Task :service:arc:processResources NO-SOURCE
> Task :service:ar:processResources UP-TO-DATE
> Task :service:ara:processResources UP-TO-DATE
BuildListenerService got event Task :service:vp:assemble UP-TO-DATE
BuildListenerService got event Task :assemble UP-TO-DATE
BuildListenerService got event Task :service:arc:processResources skipped
BuildListenerService got event Task :service:ar:processResources UP-TO-DATE
BuildListenerService got event Task :service:ara:processResources UP-TO-DATE
> Task :service:ti:kaptGenerateStubsKotlin UP-TO-DATE
BuildListenerService got event Task :service:ti:kaptGenerateStubsKotlin UP-TO-DATE
> Task :service:ac:kaptGenerateStubsKotlin UP-TO-DATE
BuildListenerService got event Task :service:ac:kaptGenerateStubsKotlin UP-TO-DATE
> Task :service:ti:kaptKotlin UP-TO-DATE
BuildListenerService got event Task :service:ti:kaptKotlin UP-TO-DATE
> Task :service:ti:compileKotlin NO-SOURCE
BuildListenerService got event Task :service:ti:compileKotlin skipped
> Task :service:ti:compileJava NO-SOURCE
BuildListenerService got event Task :service:ti:compileJava skipped
> Task :service:ti:processResources NO-SOURCE
There is also a sample of foreign friends: BuildService + projectsEvaluated callback example
TaskExecutionListener > BuildEventsListenerRegistry:
@Incubating
public interface BuildEventsListenerRegistry {
    /**
     * Subscribes the given listener to the finish events for tasks, if not already subscribed. The listener receives a {@link org.gradle.tooling.events.task.TaskFinishEvent} as each task completes.
     *
     * <p>The events are delivered to the listener one at a time, so the implementation does not need to be thread-safe. Also, events are delivered to the listener concurrently with
     * task execution and other work, so event handling does not block task execution. This means that a task finish event is delivered to the listener some time "soon" after the task
     * has completed. The events contain timestamps to allow you collect timing information.
     *</p>
     *
     * <p>The listener is automatically unsubscribed when the build finishes.</p>
     *
     * @param listener The listener to receive events. This must be a {@link org.gradle.api.services.BuildService} instance, see {@link org.gradle.api.services.BuildServiceRegistry}.
     */
    void onTaskCompletion(Provider<? extends OperationCompletionListener> listener);
}
buildFinished > OperationCompletionListener:
public interface OperationCompletionListener {
    /**
     * Called when an operation completes.
     */
    void onFinish(FinishEvent event);
}
6. Finally
This article first introduces the three stages of the Gradle life cycle, and what these three stages do. The core is three objects (Gradle, Settings, Project), and finally introduces the corresponding Hook points for these three stages. I believe you can see After finishing this article, you have a better understanding of Gradle’s life cycle and construction process. If it is useful, don’t forget to triple it~
7. Github
https://github.com/yechaoa/GradleX
Follow me for more knowledge or contribution

