Remotely control macOS over the public network [use mac’s built-in VNC]
Article directory
- Remotely control macOS over the public network [use mac’s built-in VNC]
-
- Preface
- 1. Test remote control within LAN
-
- 1.1 Turn on screen sharing on macOS
- 1.2 Test VNC remote control in LAN
- 2. Test public network remote control
-
- 2.1 macOS installation and configuration cpolar intranet penetration
- 2.2 Create a tcp tunnel pointing to port 5900
- 3. Test public network remote control
- 4. Configure a fixed TCP address for the public network
-
- 4.1 Reserve fixed TCP address
- 4.2 Configure fixed TCP port address
- 5. Use fixed public network TCP address for remote control
Foreword
The macOS system comes with VNC remote desktop. We can install and configure the VNC client on the control terminal to remotely control macOS. But it is usually necessary to perform remote control under different networks. For this purpose, we can use cpolar on the macOS controlled terminal for intranet penetration, map the VNC default port 5900, and use the generated public network address to implement the public network environment. Download remote control VNC.
1. Test remote control in LAN
1.1 Turn on screen sharing on macOS
Open System Preferences and turn on Sharing

Check to turn on Screen Sharing and click Computer Settings on the right

Check VNC display program can use password to control the screen and set a connection password

1.2 Test VNC remote control in LAN
This test uses the windows system to remotely control macOS. Of course, you can also use macOS system or mobile phone for remote control. You only need to install and configure VNC locally.
Install vnc viewer on Windows console
vnc viewer download address:
https://www.realvnc.com/en/connect/download/viewer/

After vnc viewer is downloaded and installed, open the client and enter the macOS IP address in the address bar above.

Click continue

Enter the macOS username and vnc login password

Remote login successful

2. Test public network remote control
After successfully testing the remote control in the LAN, next, we will implement remote control in the public network environment. Use cpolar intranet penetration to create a tcp tunnel, map 5900 (vnc default port number), and then pass the generated public network Address for public network remote control, no public network IP, no need to set up a router.
2.1 macOS installation and configuration cpolar intranet penetration
Download the zip package suitable for the macOS platform from the official website, unzip it to get cpolar, and then run it with parameters through the command line.
- Install homebrew
/bin/bash -c "$(curl -fsSL https://raw.githubusercontent.com/Homebrew/install/HEAD/install.sh)"
It should be noted that when installing homebrew, an error may be prompted and the server cannot be connected to download. You can change the script address to the mirror address of HKUST and then install it. For details, please refer to Baidu tutorial.
- Check whether homebrew is installed
brew -v
- Install cpolar intranet penetration
brew tap probezy/core & amp; & amp; brew install cpolar
- token authentication
Log in to the cpolar official website backend, click Verify on the left, check your authentication token, and then paste the token in the command line
cpolar authtoken xxxxxxx

- install service
sudo cpolar service install
- Start service
sudo cpolar service start
- Log in to the cpolar web UI management interface
Access the local port 9200 [http://127.0.0.1:9200/] on the browser and log in using the cpolar account.

After successfully logging in, click Tunnel Management – Tunnel List on the left dashboard. You can see two sample tunnels (you can edit or delete them yourself)
- ssh tunnel: pointing to local port 22, tcp protocol
- website tunnel: pointing to local port 8080, tcp protocol

2.2 Create a tcp tunnel pointing to port 5900
Click Tunnel Management on the left dashboard – Create Tunnel:
- Tunnel name: Customizable, be careful not to duplicate the name of an existing tunnel
- Protocol: tcp protocol
- Local address: 5900 (vnc default port number)
- Port type: Free selection of random temporary tcp port
- Region: Select China VIP
Click Create

After the tunnel is successfully created, the page automatically jumps to the tunnel list. You can see the vnc tunnel that was just created successfully. The status is active, which means it is normally online. Note that there is no need to click to start again.

Click on the status of the dashboard on the left – Online tunnel list. You can see that the vnc tunnel has generated a corresponding public network address. In this case, it is 2.tcp.vip.cpolar.cn:10208. Copy it. Note that there is no need to copy tcp://.

3. Test public network remote control
Open the vnc viewer on the Windows console, click on the address bar above, enter the public network address, and click Connect.

Test remote login with public network address successfully!

4. Configure a fixed TCP address for the public network
The tunnel just created selects a random temporary port address, and the generated public network address will change within 24 hours, which is not very convenient for users who need to be remote for a long time. To do this, we can configure it with a fixed TCP port address and increase the bandwidth at the same time.
Note that you need to upgrade the cpolar package to the professional package or above.
4.1 Reserve fixed TCP address
Log in to the cpolar official website backend, click Reserve on the left, and find the reserved TCP address:
- Region: Select China VIP
- Description: Notes, which can be customized
Click Keep

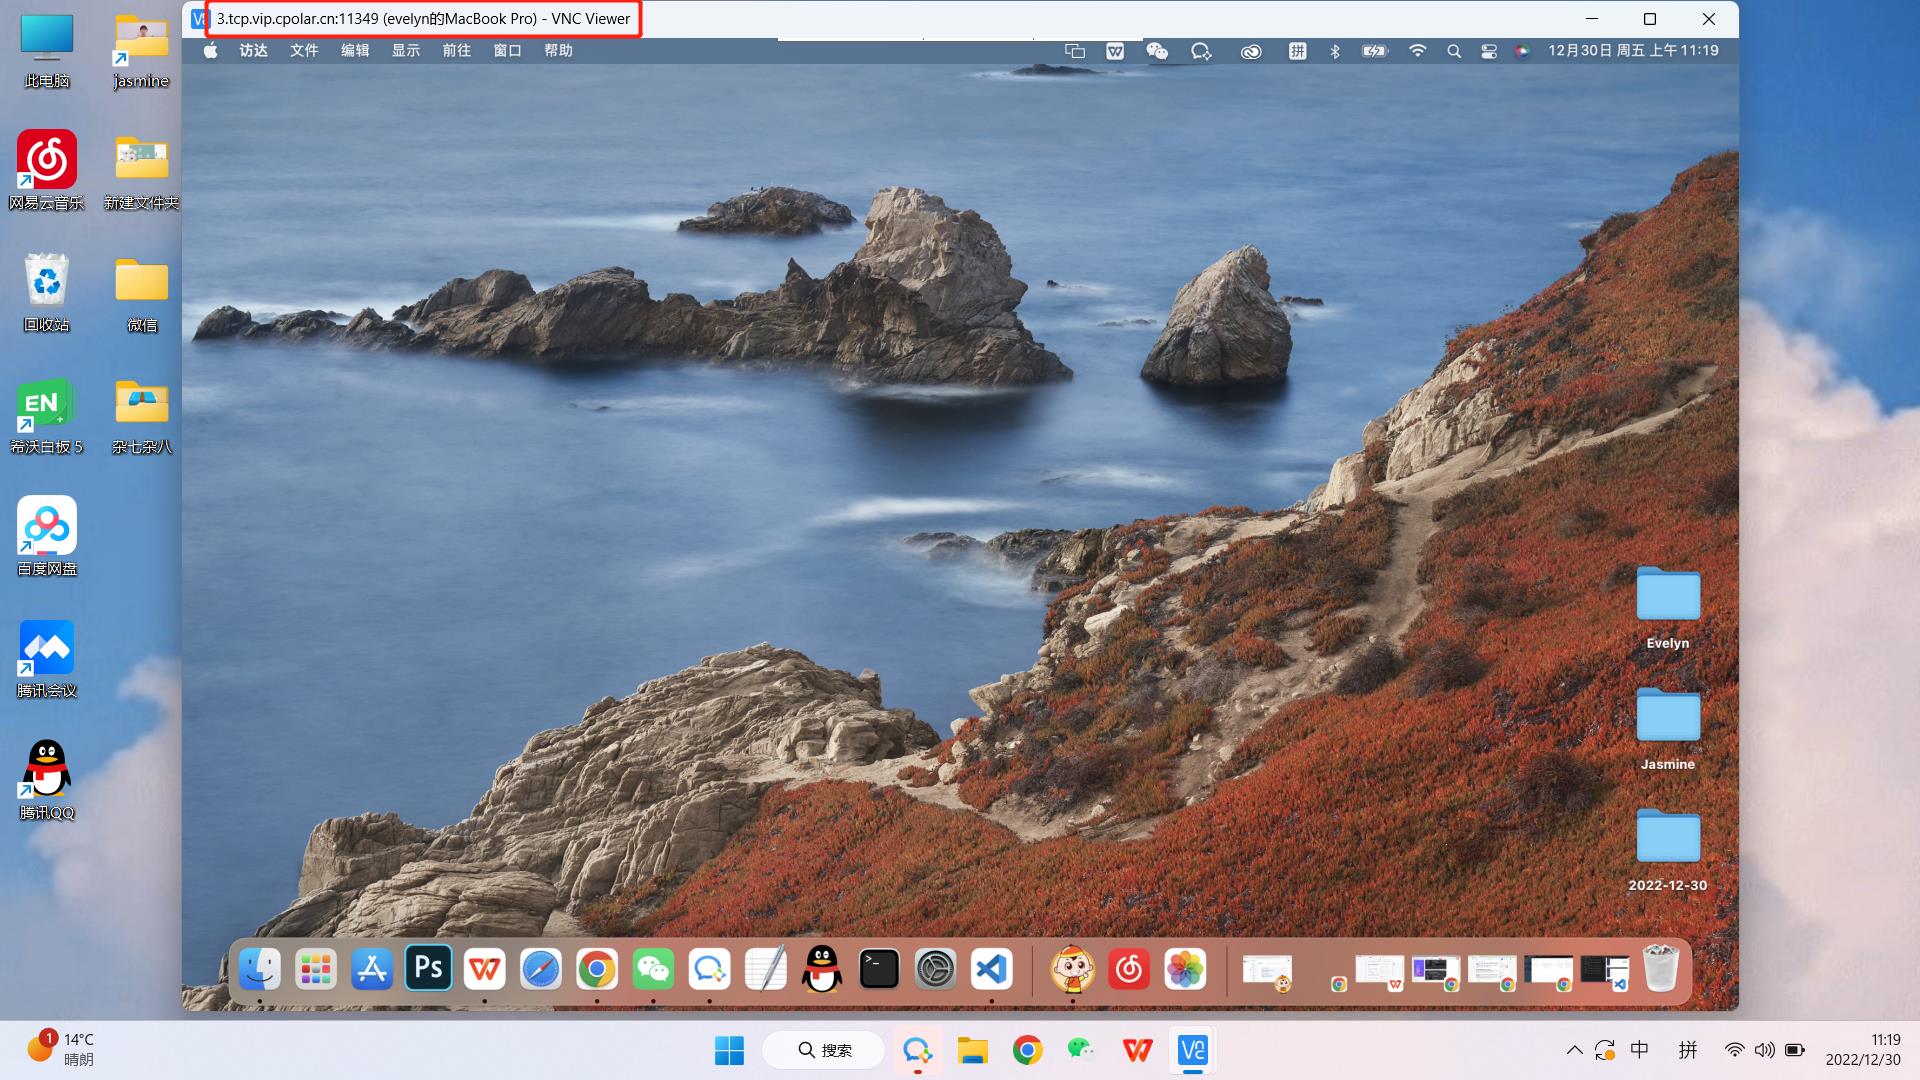
The fixed TCP address is successfully retained. The system generates the corresponding public network address + fixed port number and copies it. In this case, it is 3.tcp.vip.cpolar.cn:11349

4.2 Configure fixed TCP port address
Visit http://127.0.0.1:9200/ with the browser to log in to the cpolar web UI management interface, click Tunnel Management – Tunnel List on the left dashboard, find the vnc tunnel, and click Edit on the right

Modify the tunnel information and configure a fixed TCP port address:
- Port Type: Select
Fixed TCP Portinstead - Reserved TCP address: Fill in the fixed TCP port address that was successfully reserved just now
Click Update

It prompts that the tunnel update is successful. Click the status on the left dashboard – Online Tunnel List. You can see that the public network address of the vnc tunnel has been updated to the fixed TCP port address. Copy it.

5. Remote control using fixed public network TCP address
Click the address bar above, enter the public network fixed TCP port address, and click Connect.

Remote control successful!