The blog is being upgraded, and functions that were not thought of before are being improved bit by bit.
This log records the use of phpmailer to implement such an operation of sending emails.
Occasionally there will be messages and comments on the blog, and I will reply in time, but there is a question, I replied, if the person who left the message does not go to my blog again to check, he will not know, this is very unreasonable.
Check out other people’s blogs. Most replies are via email.
This is pretty good, get one.
Baidu basically introduces two methods.
The first is to use PHP to send emails through the SMTP server of qq mailbox or NetEase mailbox.
The second is to use phpmailer to send emails.
Note that the second method also requires that your email address has the SMTP service enabled.
For how to enable the SMTP service for your mailbox, please refer to “Enabling SMTP Service for QQ Mailbox”. The final effect is as shown in the figure below:
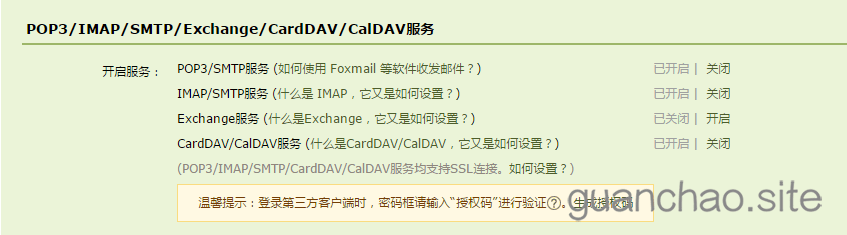
During the opening process, the page will prompt you with an authorization password for calling SMTP, as shown in the figure below, this password must be remembered, if you do not remember it, you can generate it again, I have enabled two SMTP services above, The final authorization password shall prevail.

I tried the first method and got the following error:
Trying to smtp.qq.com:587 220 smtp.qq.com Esmtp QQ Mail Server Connected to relay host smtp.qq.com >
HELO localhost 250 smtp.qq.com > AUTH LOGIN ODA1Nzk1OTU1QHFxLmNvbQ== 530 Must issue a STARTTLS command first.
Error: Remote host returned "530 Must issue a STARTTLS command first."
Error: Error occurred while sending HELO command.
Error: Cannot send email to <[email protected]> Disconnected from remote host
I searched on Baidu and couldn’t find a clear answer. If you have encountered such a problem, please leave a message below and we can discuss it.
What I’m using here is the second method.
I won’t go into details about the specific advantages and disadvantages of Phpmail here. If you want to know more, please go to Baidu.
The first step is to get phpmailer
PHPMailer project address: GitHub – PHPMailer/PHPMailer: The classic email sending library for PHP Use the git command to clone to the local, or directly click “Download ZIP” at the bottom right of the project page to get the complete PHPMailer code package, and then go to Just decompress it locally.
The second step is to enable server support
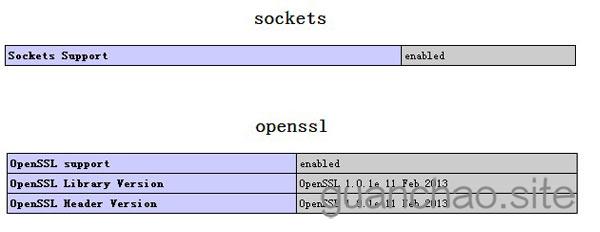
To use phpmailer, our server needs to enable sockets and openssl services.
The third step is to upload phpmailer to our server.
I am using the thinkphp5 framework here, and I uploaded it to the extend directory in the root directory.
In fact, there is no need to talk about this step alone, but not all the project files we downloaded from github are useful, we can just upload a few main files to the server.
The fourth step is to code the public method of sending emails and its calling method
Public methods for sending emails:
/*Send mail method
 *@param $to: recipient $title: title $content: email content
 *@return bool true:sent successfully false:sent failed
 */
function sendMail($to,$title,$content){

    //Introduce the core file of PHPMailer. Use require_once to include warnings to avoid repeated definitions of the PHPMailer class.
    require_once("phpmailer/class.phpmailer.php");
    require_once("phpmailer/class.smtp.php");
    //Instantiate the PHPMailer core class
    $mail = new PHPMailer();

    //Whether to enable SMTP debug for debugging. It is recommended to enable it in the development environment. Just comment it out in the production environment. The debug debugging mode is turned off by default.
    $mail->SMTPDebug = 1;

    //Send mail using smtp authentication
    $mail->isSMTP();

    //smtp requires authentication This must be true
    $mail->SMTPAuth=true;

    //Link to the server address of the qq domain name mailbox
    $mail->Host = 'smtp.qq.com';

    //Set login authentication using ssl encryption
    $mail->SMTPSecure = 'ssl';

    //Set the remote server port number for SSL connection to SMTP server. The previous default was 25, but now the new one seems to be unavailable. Optional 465 or 587
    $mail->Port = 465;

    //Set the helo message header of SMTP. This is optional and the content is arbitrary.
    // $mail->Helo = 'Hello smtp.qq.com Server';

    //Set the sender's host domain. Optional. The default is localhost. The content is arbitrary. It is recommended to use your domain name.
    $mail->Hostname = 'https://guanchao.site';

    //Set the encoding of sent emails. Optional GB2312. I like utf-8. It is said that utf8 will be garbled when some clients receive emails.
    $mail->CharSet = 'UTF-8';

    //Set the sender's name (nickname). Any content, the sender's name displayed before the sender's email address of the recipient's email.
    $mail->FromName = 'LSGO Lab';

    //Smtp login account. Just fill in the qq number in string format.
    $mail->Username ='[email protected]';

    //Smtp login password Use the generated authorization code (the latest authorization code I just asked you to save)
    $mail->Password = '****************';

    //Set the sender's email address. Fill in the "sender's email address" mentioned above.
    $mail->From = '[email protected]';

    //Whether the email body is html encoded. Note that this is a method and is no longer an attribute true or false.
    $mail->isHTML(true);

    //Set the recipient's email address This method has two parameters. The first parameter is the recipient's email address and the second parameter is the nickname set for the address. Different email systems will automatically process changes. The meaning of the second parameter here Not big
    $mail->addAddress($to, 'blog online notification in time');

    //To add multiple recipients, just call the method multiple times
    // $mail->addAddress('************@qq.com','Blog online notification during time');

    //Add the subject of the email
    $mail->Subject = $title;

    //Add the email body. If isHTML is set to true above, it can be a complete html string. For example: use the file_get_contents function to read the local html file
    $mail->Body = $content;

    //Add an attachment to the email This method also has two parameters. The first parameter is the directory where the attachment is stored (relative directory or absolute directory is acceptable) The second parameter is the name of the attachment in the email attachment
    // $mail->addAttachment('./d.jpg','mm.jpg');
    //Similarly this method can be called multiple times to upload multiple attachments
    // $mail->addAttachment('./Jlib-1.1.0.js','Jlib.js');

    $status = $mail->send();

    //Simple judgment and prompt information
    if ($status) {
        return true;
    }else{
        return false;
    }
}
Call method:
I’m just making a simple call here. Please decide what content you need based on your own needs.
public function sendEmail()
{
       $flag = sendMail('[email protected]','Time Blog Online Notification','Welcome to Time Blog');
       if ($flag){
              echo true;
       }else{
              echo false;
       }
}
The above is the entire implementation process of sending emails using phpmailer.
Have good suggestions? Please enter your comments below.