Table of Contents
1. Vue routing
1.1 Definition
1.2 Application areas
1.3 Code display
2. Node.js
2.1 Definition
2.2 Features
3.Node.js installation and configuration
3.1.Download
3.2.Installation
3.3.Environment setup
Okay, that’s it for today, I hope it helps you! ! !
一.Vue routing
1.1 Definition
Vue routing refers to the process of using the Vue Router plug-in to manage the navigation and page routing of front-end applications. It allows you to define different routing paths in a single page application (SPA) and map each path to the corresponding component.
By using Vue routing, you can load different components or views based on changes in the URL, and switch between different pages through navigation links (such as clicking a navigation menu or button). The core goal of Vue routing is to provide a good user experience, allowing users to freely navigate within the application and browse content without having to reload the entire page every time.
1.2 Application Field
Vue routing is widely used in the following fields:
- Single Page Application (SPA): The most common scenario for Vue routing is page navigation and routing management in single page applications. SPA refers to an application that does not require refreshing the entire page and loads and displays different page content through routing switching. Vue routing provides a lightweight, fast-response routing solution that allows developers to load corresponding components according to different paths, thereby realizing the routing function of the entire application.
- Multi-page Application (MPA): Although the main application of Vue is in single-page applications, Vue routing can also be used in multi-page applications. In this case, Vue routing can help you create independent routes for each page and control navigation between pages through routing rules.
- Front-end navigation and page jumps: Vue routing can help you manage navigation and jumps between pages. By defining different routing paths and corresponding components, you can navigate to specific pages in your application using navigation links or programmatically. This is useful when building user-friendly front-end navigation and page jump functionality.
- Permission control and routing guards: Vue routing provides navigation guard functions, which can be used to implement permission control and verification of page access permissions. You can use the navigation guard hook function to execute corresponding logic before and after the user switches routes. This way you can decide whether to allow access to a page based on the user’s login status, role, or other criteria.
Vue routing plays a key role in building modern web applications. It allows front-end developers to easily manage page navigation, implement front-end routing and build interactive single-page applications. Whether you are developing a single-page application or a multi-page application, Vue routing can provide powerful routing functions and a good user experience.
1.3 Code Display
code show as below:
<!DOCTYPE html>
<html>
<head>
<meta charset="utf-8">
<!-- 1. Import the js dependencies required for routing -->
<script src="//i2.wp.com/cdn.bootcss.com/vue/2.6.10/vue.js"></script>
<script src="//i2.wp.com/cdn.bootcdn.net/ajax/libs/vue-router/2.6.0/vue-router.js"></script>
<title>Routing</title>
\t\t
</head>
<body>
<div id="app">
{<!-- -->{name}}
<!-- 6. Button that triggers routing events -->
<router-link to="/home">Home</router-link>
<router-link to="/about">About</router-link>
<!-- 7. Define anchor points and routing content -->
<router-view></router-view>
</div>
</body>
<script type="text/javascript">
// 2. Define two components
const Home = Vue.extend({
template:'<div>Website</div>'
});
const About = Vue.extend({
template:'<div>Welcome to my website</div>'
});
// 3. Define the corresponding relationship between components and paths
let routes = [{
component:Home,
path:'/home'
},{
component:About,
path:'/about'
}];
// 4. Obtain the routing object router through the routing relationship
const router = new VueRouter({routes});
//5. Hang the routing object in the vue instance
newVue({
el: '#app',
router,
data() {
return {
name:'horse awesome'
};
}
})
</script>
</html>
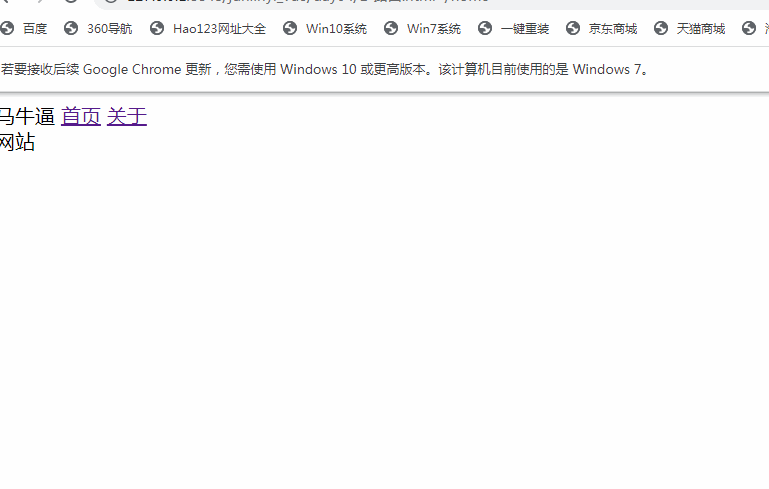
The demonstration effect is as follows:
2. Node.js
Node.js is not a framework or library in the traditional sense, but a runtime environment. It provides a set of core modules, including file system, network, operating system and other modules, to facilitate developers to perform various server-side tasks, such as creating web servers, processing HTTP requests, performing file operations, etc. At the same time, Node.js also supports extending its functions through third-party modules, allowing developers to easily use a variety of feature-rich modules to build complex applications.
2.1 Definition
Node.js is a JavaScript runtime environment based on the Chrome V8 engine that can run JavaScript code on the server side. It uses an event-driven, non-blocking I/O model, allowing it to handle concurrent requests efficiently. Node.js is designed to build scalable network applications that can handle large numbers of concurrent connections and have excellent performance.
2.2 Features
The main features of Node.js include:
- High performance: Node.js uses a non-blocking, event-driven I/O model, allowing it to efficiently handle a large number of concurrent requests and achieve excellent performance.
- Cross-platform: Node.js can run on multiple operating systems, including Windows, MacOS, and Linux, allowing developers to use the same code for development on different platforms.
- JavaScript language: Node.js uses JavaScript as the development language, allowing front-end developers to use the same language for development on the server side, reducing learning costs and technology conversion between development teams.
- Scalability: Node.js supports modular development, and its functions can be easily expanded through third-party modules to meet the needs of various scenarios.
- Community support: Node.js has a large and active community, providing a large number of open source modules to facilitate developers to solve common problems and speed up development.
Node.js is a powerful JavaScript runtime environment that enables developers to build high-performance, scalable web applications on the server side using JavaScript. Its non-blocking I/O model and event-driven mechanism make it very efficient when processing a large number of concurrent requests, and is suitable for building various types of applications such as real-time applications, Web servers, and API services.
3. Node.js installation and configuration
3.1.Download
Download the nodeJS resource package: Download | Node.js

Note 1: Node has two version lines: LTS is a stable version maintained for a long time and Current is a new feature version
3.2.Installation
Unzip the file to the specified location, and create two directories, node_global and node_cache, in the unzipped directory.
node_global: npm global installation location
node_cache: npm cache path
As shown in the picture:

3.3. Environment setup
Open Settings -> System -> System Information -> Advanced System Settings -> Environment Variables -> Click New in System Variables
Add an environment variable
Variable name: NODE_HOME
variable :
The specified directory to be decompressed after downloading, such as (D:\temp\
ode\
ode-v10.15.3-win-x64\
ode-v10.15.3-win-x64)
The operation is as shown in the figure:

Find the variable named : PATH variable name in the system variables. After selecting it, add the following two environment variables
Variable values that need to be added:
%NODE_HOME%
%NODE_HOME%\
ode_globalNote: Depending on your computer, check whether to add a semicolon after the variable value to separate the variable values.
like :
%NODE_HOME%;
%NODE_HOME%\
ode_global;
The operation is as shown in the figure:

Test whether the installation is successful and whether the environment variables are configured.
Win + R, enter cmd, open the cmd window, and output the following command to configure the viewing of environment variables
echo %node_home%
echo %path%
The operation is as shown in the figure:

Win + R, enter cmd, open the cmd window, and output the following command to test whether the installation is successful.
node -v
npm -v
The operation is as shown in the figure:

Configure npm global module path and cache default installation location
Win + R, enter cmd, open the cmd window, and execute the following commands separately:
npm config set cache “D:\temp\
ode\
ode-v10.15.3-win-x64\
ode-v10.15.3-win-x64\
ode_cache”npm config set prefix “D:\temp\
ode\
ode-v10.15.3-win-x64\
ode-v10.15.3-win-x64\
ode_global”Note:
The above path is the local path to download node, and then enter the two newly created file directories
The double quotation marks cannot be missing
If the execution of the command is stuck, you can delete C:\Users\username\.npmrc and execute it again. (Username: is the username of the current computer)
(node_global (npm global installation location) and node_cache (npm cache path) are linked to npm)
The operation is as shown in the figure:

Set up Taobao source:
Modify the npm image to improve download speed (you can use cnpm or set –registry directly, it is recommended to set –registry)
Win + R, enter cmd, open the cmd window, and enter the command:
npm config set registry https://registry.npm.taobao.org/
Note: You can view all the sources you have set by following the command
npm config get registry
The settings are as shown in the figure:

Test whether starting the Node.js project can be used and run
Just install a module globally and you can evaluate it.
Win + R, enter cmd, open the cmd window, and enter the command:
npm install webpack -g

After the command is executed, the (node_modules\webpack) file will be generated under the node_global path.
If it is in your own local path, perform project testing.
Just find a project on your computer and see if you can add Node.js as a dependency
Open a cmd window in the project directory

After the dependencies are added, start the project.
Continue to execute the following command to start the project:
npm rundev

After the execution is started, the project opening instructions are completed;
