iOS13.0 began to support multi-camera preview AVCaptureMultiCamSession, and then iOS15.0 added support for camera picture-in-picture preview. Before using it, we use isMultiCamSupported() to judge whether it supports simultaneous preview of multiple cameras. Let’s see the effect first:

1. Camera Architecture
1. Camera pipeline
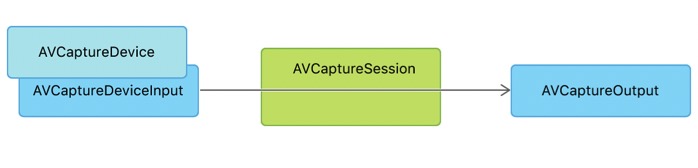
Camera consists of AVCaptureDeviceInput, AVCaptureSession, and AVCaptureOutput. As shown below:
2. Single Camera Architecture
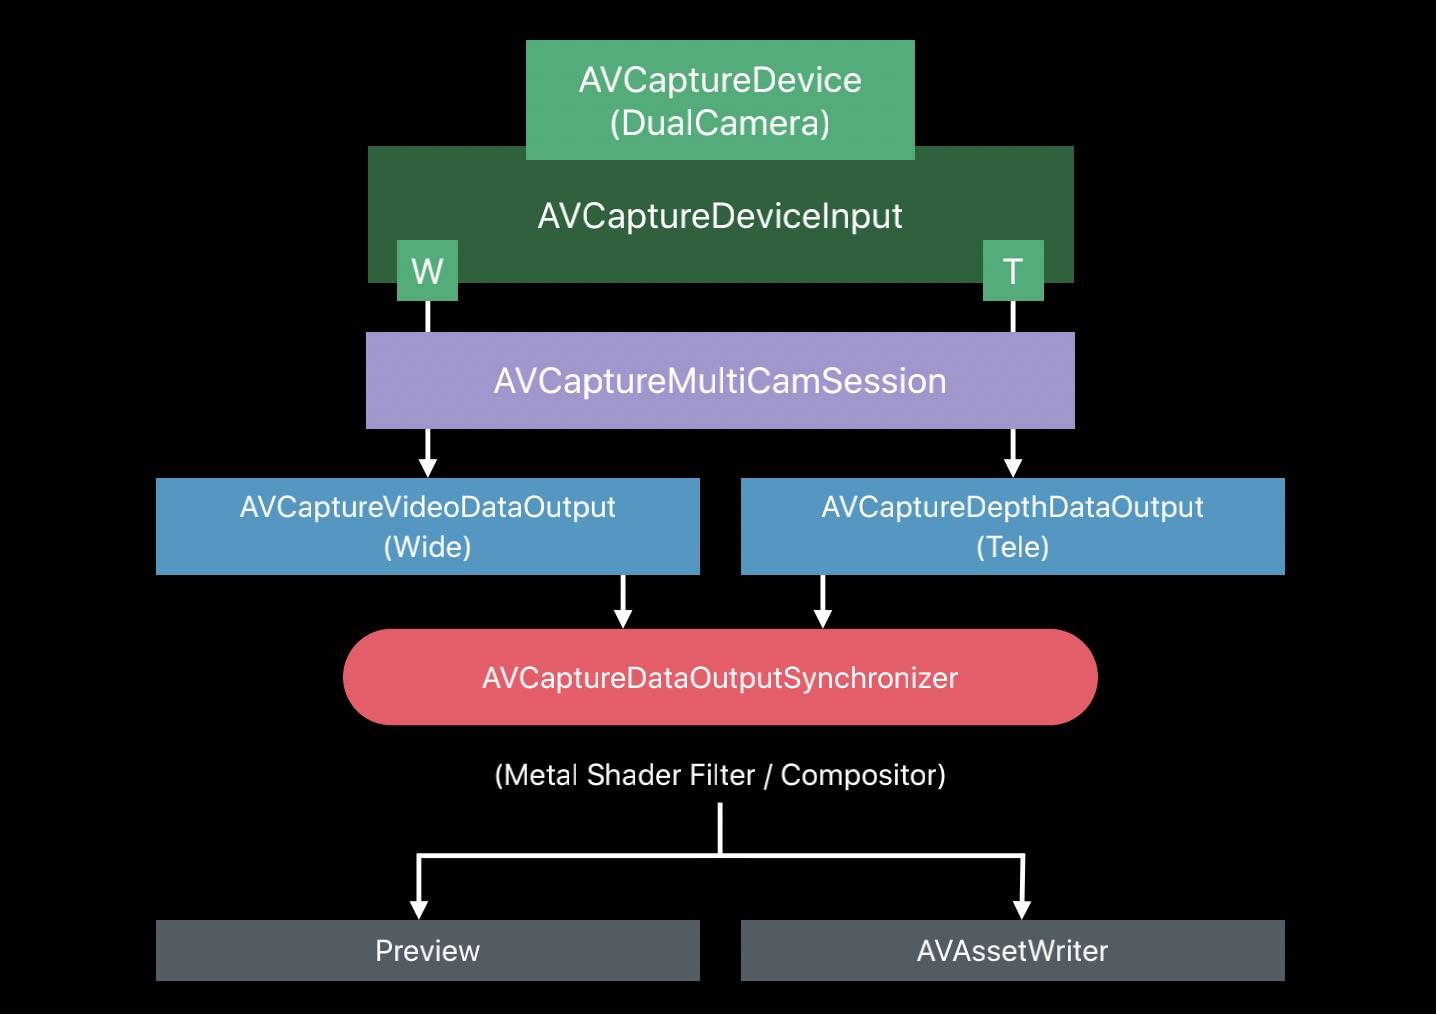
A single Camera architecture means that there is only one AVCaptureDeviceInput, which outputs VideoData and DepthData synchronously, and supports preview and output files. As shown below:
3. Multi-Camera architecture
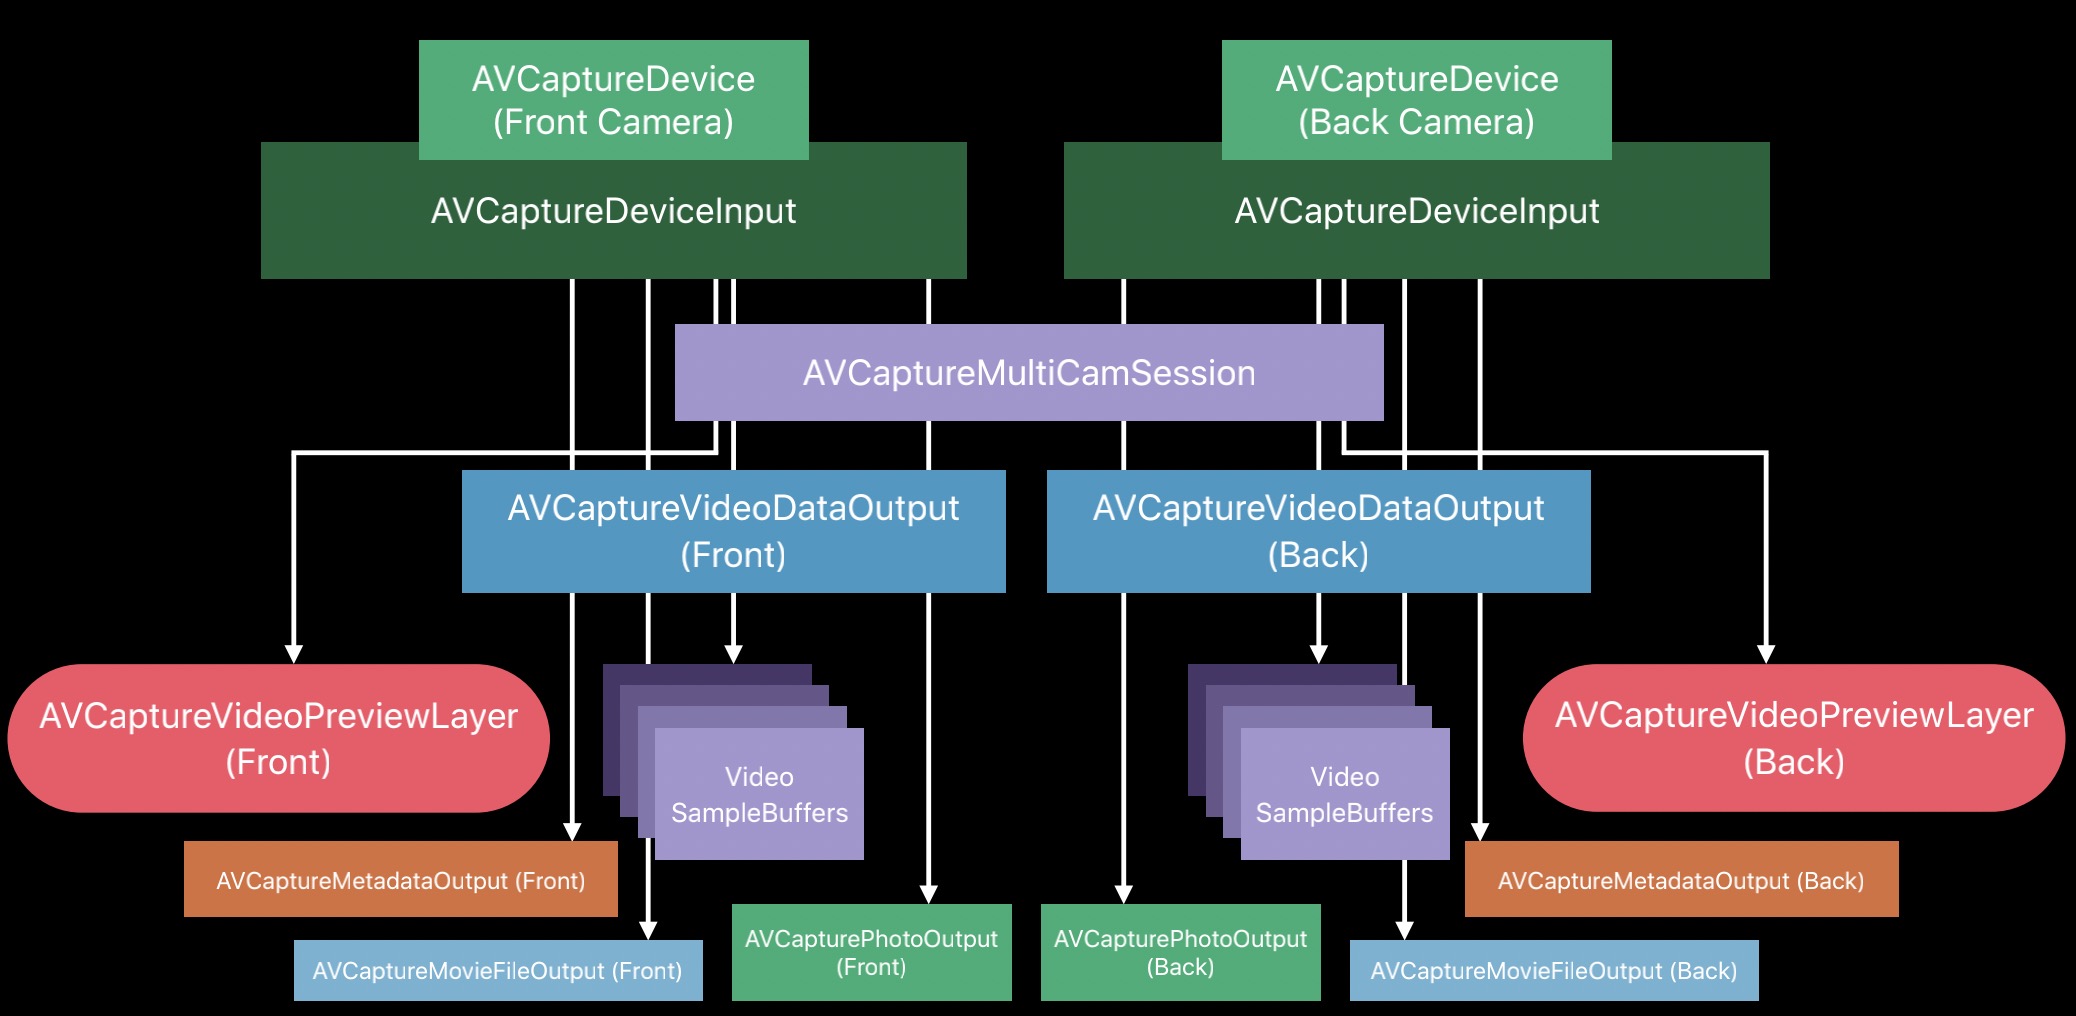
Compared with the single camera architecture, the multi-camera architecture includes multiple input sources AVCaptureDeviceInput, and multiple cameras preview simultaneously, as shown in the following figure:
2. Camera class diagram structure
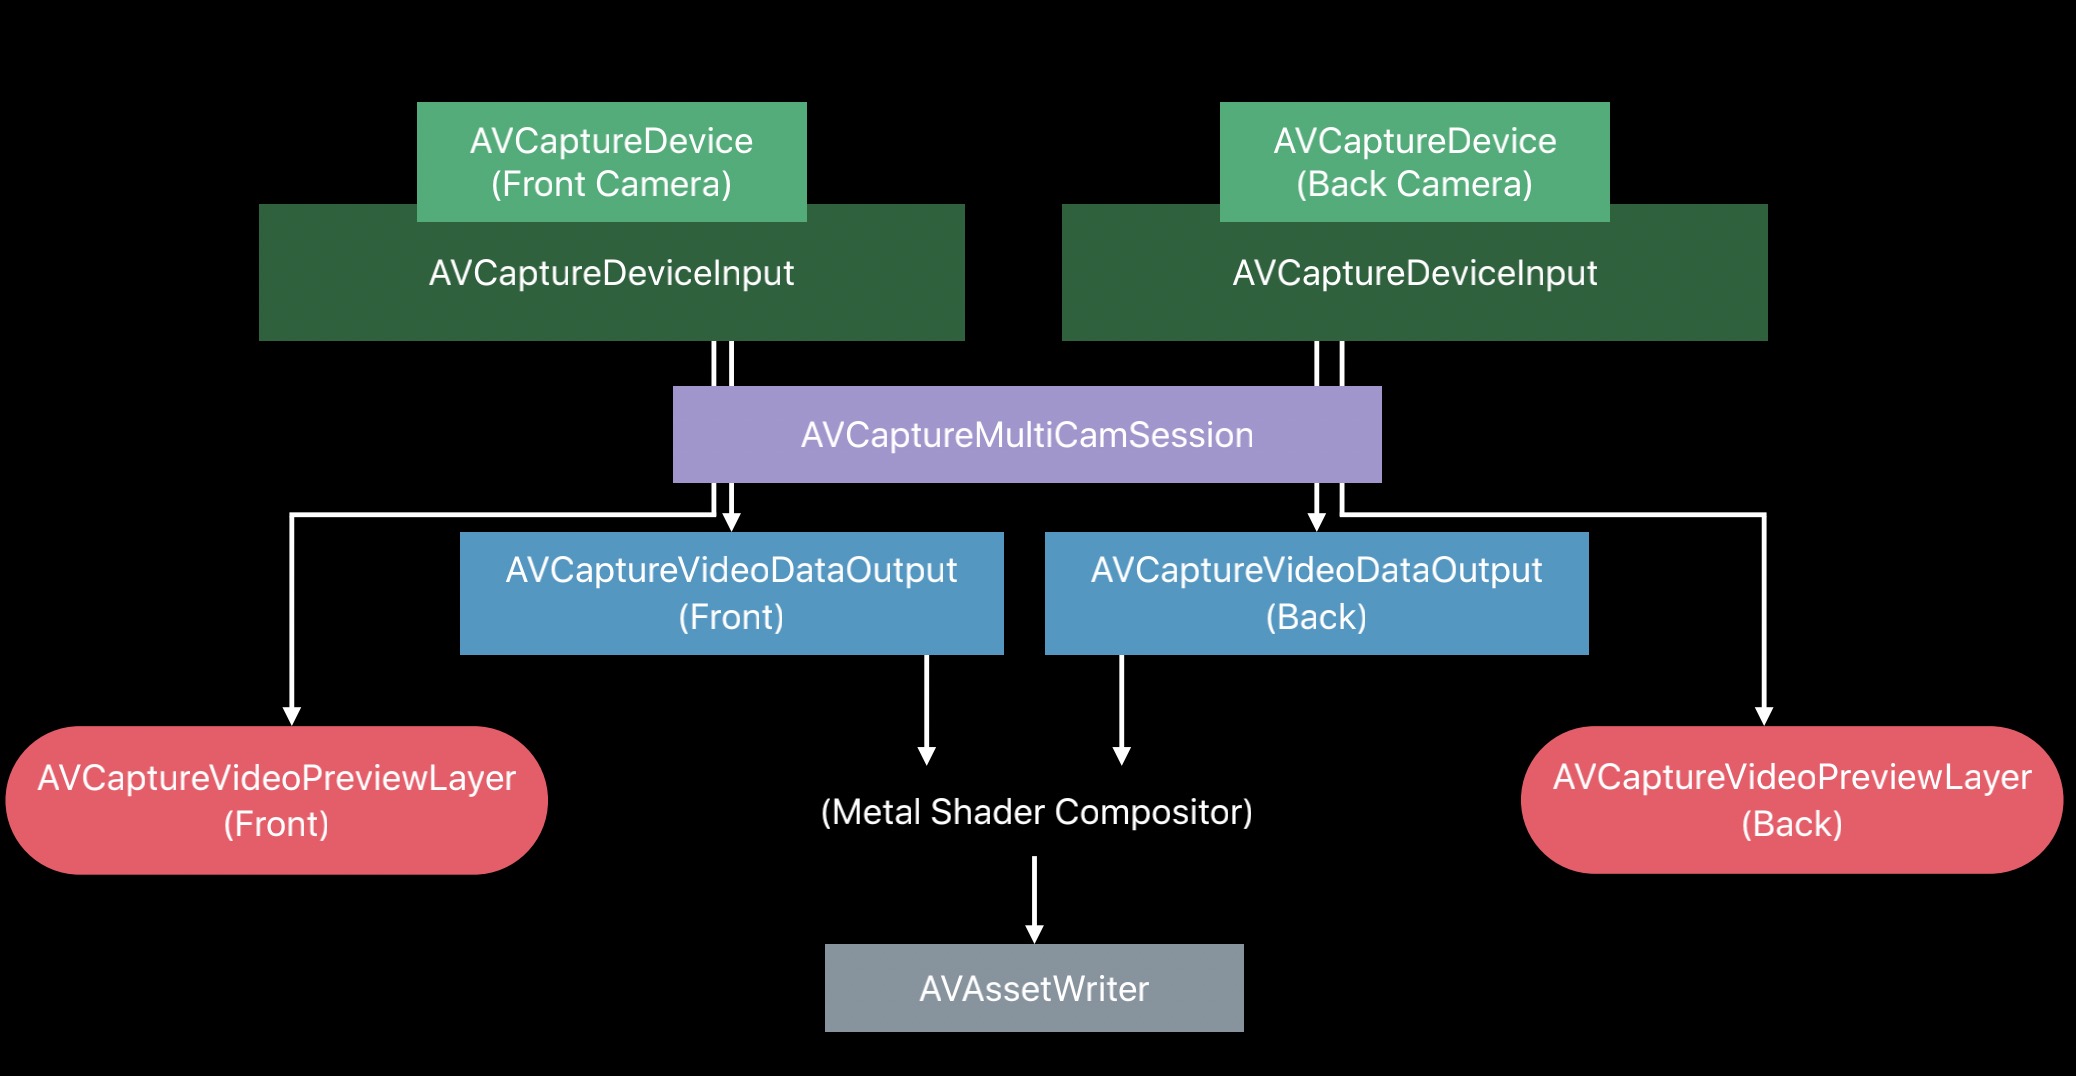
The Camera class diagram includes AVCaptureDeviceInput, AVCaptureMultiCamSession, AVCaptureVideoDataOutput, AVCaptureVideoPreviewLayer, and AVAssetWriter. As shown below:
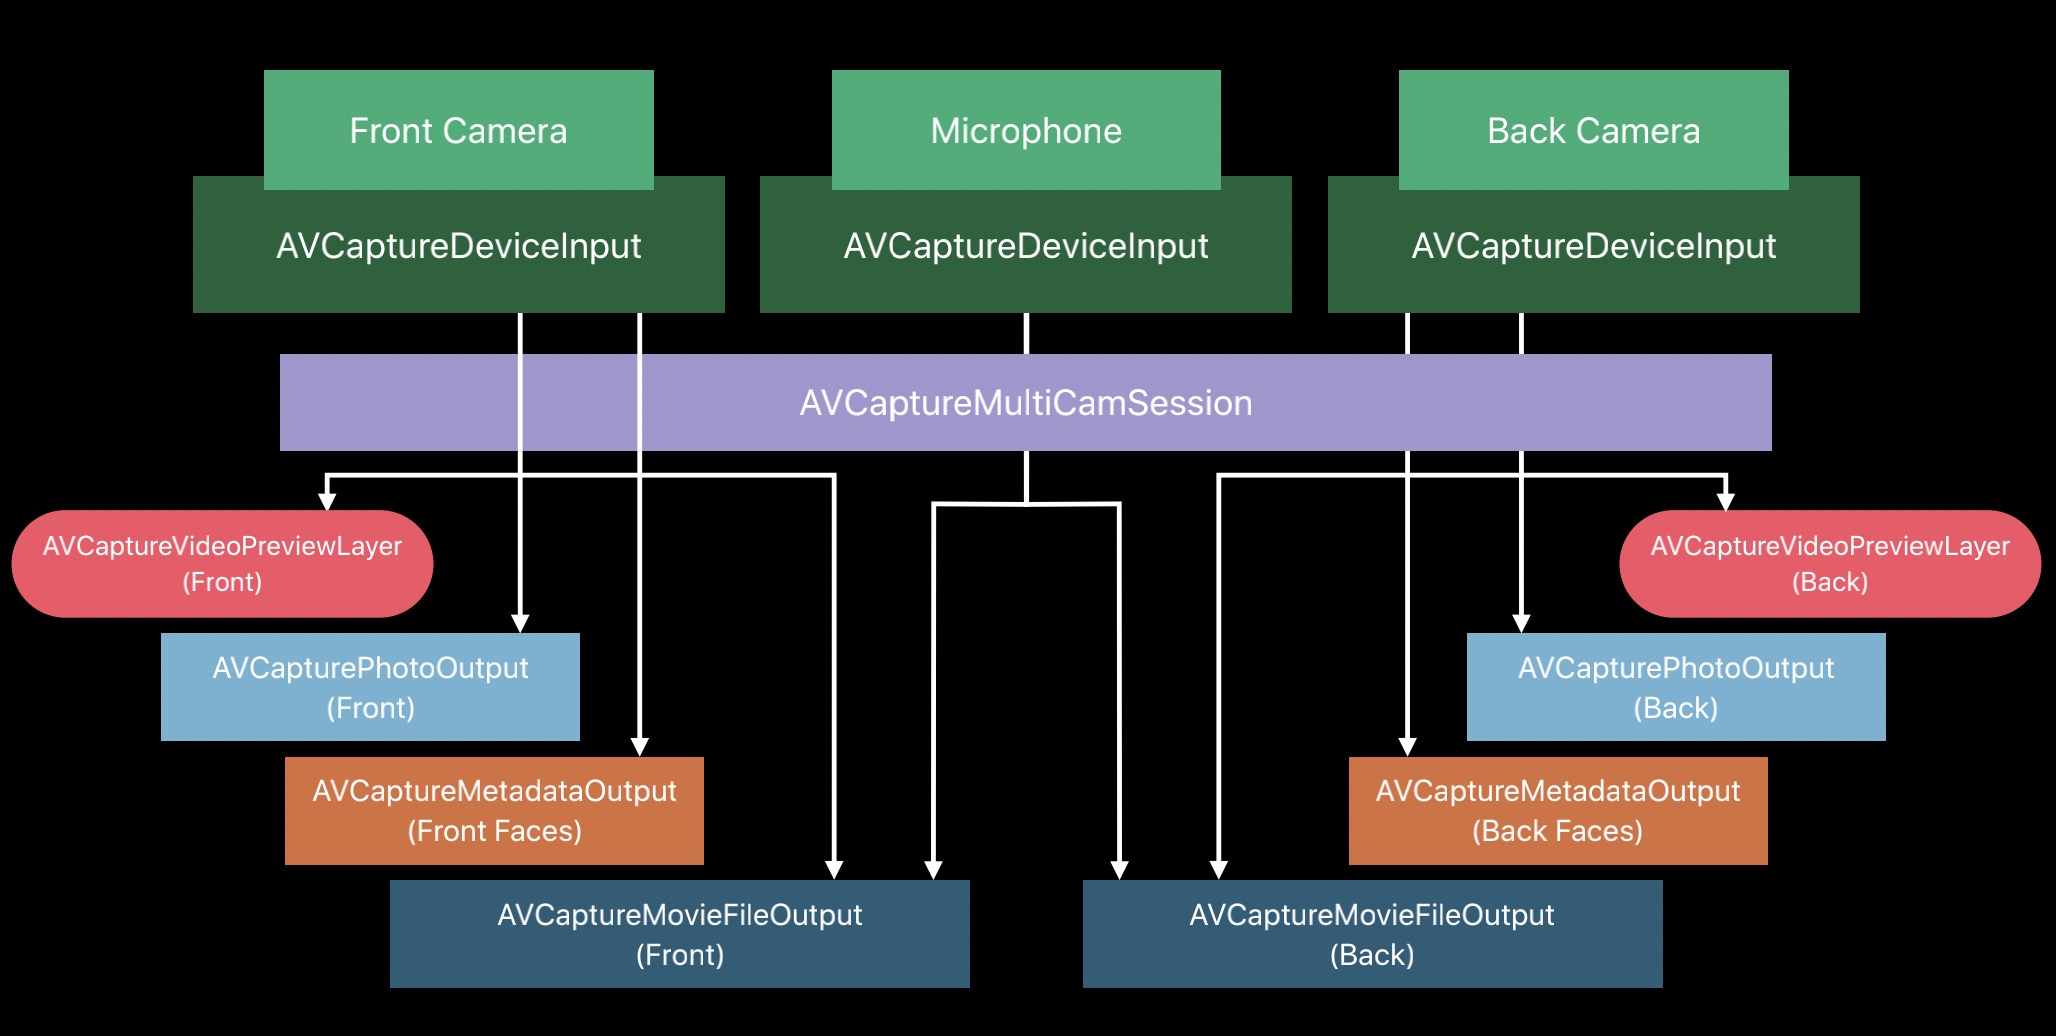
3. Camera input and output
Camera input includes: front camera, rear camera, microphone, output includes: preview data, pictures, files, Metadata, managed by AVCaptureMultiCamSession. As shown below:
4. MultiCamera stream synchronization
Multiple cameras preview at the same time, and they share resolution and frame rate. Stream synchronization is also required, including the following:
- exposure
- focus
- white balance
5. Camera picture-in-picture preview
1. Initialization
In the initialization phase, mainly set the preview layer and configure the capture session. The sample code is as follows:
 override func viewDidLoad() {
super. viewDidLoad()
\t\t
// Set the front and rear camera preview layers
backCameraVideoPreviewView.videoPreviewLayer.setSessionWithNoConnection(session)
frontCameraVideoPreviewView.videoPreviewLayer.setSessionWithNoConnection(session)
\t\t
// configure capture session
sessionQueue. async {
self. configureSession()
}
}
2. Configure session
The sample code for configuring the capture session is as follows:
 private func configureSession() {
guard setupResult == .success else { return }
\t\t
guard AVCaptureMultiCamSession.isMultiCamSupported else {
print("MultiCam not supported on this device")
setupResult = .multiCamNotSupported
return
}

session.beginConfiguration()
defer {
session.commitConfiguration()
if setupResult == .success {
checkSystemCost()
}
}

guard configureBackCamera() else {
setupResult = .configurationFailed
return
}
\t\t
guard configureFrontCamera() else {
setupResult = .configurationFailed
return
}
}
3. Configure rear camera
The configuration process includes: finding the rear camera, adding it to the session, connecting the input device to the output data, connecting the input device to the preview layer, etc. The sample code is as follows:
 private func configureBackCamera() -> Bool {
session.beginConfiguration()
defer {
session.commitConfiguration()
}
\t\t
// Find the rear camera
guard let backCamera = AVCaptureDevice.default(.builtInWideAngleCamera, for: .video, position: .back) else {
print("Could not find the back camera")
return false
}
\t\t
// Add post camera to session
do {
backCameraDeviceInput = try AVCaptureDeviceInput(device: backCamera)
\t\t\t
guard let backCameraDeviceInput = backCameraDeviceInput,
session.canAddInput(backCameraDeviceInput) else {
return false
}
session.addInputWithNoConnections(backCameraDeviceInput)
} catch {
print("Could not create back camera device input: \(error)")
return false
}
\t\t
// Find the rear camera input video port
guard let backCameraDeviceInput = backCameraDeviceInput,
let backCameraVideoPort = backCameraDeviceInput.ports(for: .video,
                                      sourceDeviceType: backCamera.deviceType,
                                      sourceDevicePosition: backCamera. position). first else {
                                        return false
}
\t\t
// Add post camera to output video data
guard session.canAddOutput(backCameraVideoDataOutput) else {
print("Could not add the back camera video data output")
return false
}
session.addOutputWithNoConnections(backCameraVideoDataOutput)

        backCameraVideoDataOutput.videoSettings = [kCVPixelBufferPixelFormatTypeKey as String: Int(kCVPixelFormatType_32BGRA)]
backCameraVideoDataOutput.setSampleBufferDelegate(self, queue: dataOutputQueue)
\t\t
// Connect rear camera input to data output
let backCameraVideoDataOutputConnection = AVCaptureConnection(inputPorts: [backCameraVideoPort],
                                                                      output: backCameraVideoDataOutput)
guard session.canAddConnection(backCameraVideoDataOutputConnection) else {
print("Could not add a connection to the back camera video data output")
return false
}
session.addConnection(backCameraVideoDataOutputConnection)
backCameraVideoDataOutputConnection.videoOrientation = .portrait

// Connect rear camera input to preview layer
guard let backCameraVideoPreviewLayer = backCameraVideoPreviewLayer else {
return false
}
let backCameraVideoPreviewLayerConnection = AVCaptureConnection(inputPort: backCameraVideoPort, videoPreviewLayer: backCameraVideoPreviewLayer)
guard session.canAddConnection(backCameraVideoPreviewLayerConnection) else {
print("Could not add a connection to the back camera video preview layer")
return false
}
session.addConnection(backCameraVideoPreviewLayerConnection)
\t\t
return true
}
4. Configure the front camera
The configuration process of the front camera is similar to that of the rear camera, except that back is replaced by front. In addition, mirroring is enabled on the front camera. The sample code is as follows:
 private func configureFrontCamera() -> Bool {
session.beginConfiguration()
defer {
session.commitConfiguration()
}
\t\t
// Find the front camera
guard let frontCamera = AVCaptureDevice.default(.builtInWideAngleCamera, for: .video, position: .front) else {
print("Could not find the front camera")
return false
}
\t\t
// Add front camera to session
do {
frontCameraDeviceInput = try AVCaptureDeviceInput(device: frontCamera)
\t\t\t
guard let frontCameraDeviceInput = frontCameraDeviceInput,
session.canAddInput(frontCameraDeviceInput) else {
return false
}
session.addInputWithNoConnections(frontCameraDeviceInput)
} catch {
print("Could not create front camera device input: \(error)")
return false
}
\t\t
// Find the front camera input video port
guard let frontCameraDeviceInput = frontCameraDeviceInput,
let frontCameraVideoPort = frontCameraDeviceInput.ports(for: .video,
                                       sourceDeviceType: frontCamera.deviceType,
                                       sourceDevicePosition: frontCamera. position). first else {
                                       return false
}
\t\t
// Add front camera to output video data
guard session.canAddOutput(frontCameraVideoDataOutput) else {
print("Could not add the front camera video data output")
return false
}
session.addOutputWithNoConnections(frontCameraVideoDataOutput)
\t\t
        frontCameraVideoDataOutput.videoSettings = [kCVPixelBufferPixelFormatTypeKey as String: Int(kCVPixelFormatType_32BGRA)]
frontCameraVideoDataOutput.setSampleBufferDelegate(self, queue: dataOutputQueue)
\t\t
// Connect front camera input to data output
let frontCameraVideoDataOutputConnection = AVCaptureConnection(inputPorts: [frontCameraVideoPort],
                                                                       output: frontCameraVideoDataOutput)
guard session.canAddConnection(frontCameraVideoDataOutputConnection) else {
print("Could not add a connection to the front camera video data output")
return false
}
session.addConnection(frontCameraVideoDataOutputConnection)
frontCameraVideoDataOutputConnection.videoOrientation = .portrait

// Connect the front camera input to the preview layer
guard let frontCameraVideoPreviewLayer = frontCameraVideoPreviewLayer else {
return false
}
let frontCameraVideoPreviewLayerConnection = AVCaptureConnection(inputPort: frontCameraVideoPort, videoPreviewLayer: frontCameraVideoPreviewLayer)
guard session.canAddConnection(frontCameraVideoPreviewLayerConnection) else {
print("Could not add a connection to the front camera video preview layer")
return false
}
session.addConnection(frontCameraVideoPreviewLayerConnection)
        // Turn on mirroring with the front camera
frontCameraVideoPreviewLayerConnection.isVideoMirrored = true
        frontCameraVideoPreviewLayerConnection. automaticallyAdjustsVideoMirroring = false
\t\t
return true
}
5. Configure two-way microphone
In addition to providing a picture-in-picture camera, it also provides front and rear two-way microphones. The sample code is as follows:
 private func configureMicrophone() -> Bool {
session.beginConfiguration()
defer {
session.commitConfiguration()
}
\t\t
// find the microphone
guard let microphone = AVCaptureDevice.default(for: .audio) else {
print("Could not find the microphone")
return false
}
\t\t
// add microphone to session
do {
microphoneDeviceInput = try AVCaptureDeviceInput(device: microphone)
\t\t\t
guard let microphoneDeviceInput = microphoneDeviceInput,
session.canAddInput(microphoneDeviceInput) else {
return false
}
session.addInputWithNoConnections(microphoneDeviceInput)
} catch {
print("Could not create microphone input: \(error)")
return false
}
\t\t
// Find the rear audio port of the input device
guard let microphoneDeviceInput = microphoneDeviceInput,
let backMicrophonePort = microphoneDeviceInput.ports(for: .audio,
                                     sourceDeviceType: microphone.deviceType,
                                     sourceDevicePosition: .back).first else {
                                        return false
}
\t\t
// Find the front audio port of the input device
guard let frontMicrophonePort = microphoneDeviceInput.ports(for: .audio,
                                        sourceDeviceType: microphone.deviceType,
                                        sourceDevicePosition:.front).first else {
return false
}
\t\t
// Add rear microphone to output data
guard session.canAddOutput(backMicrophoneAudioDataOutput) else {
print("Could not add the back microphone audio data output")
return false
}
session.addOutputWithNoConnections(backMicrophoneAudioDataOutput)
backMicrophoneAudioDataOutput.setSampleBufferDelegate(self, queue: dataOutputQueue)
\t\t
// add front microphone to output data
guard session.canAddOutput(frontMicrophoneAudioDataOutput) else {
print("Could not add the front microphone audio data output")
return false
}
session.addOutputWithNoConnections(frontMicrophoneAudioDataOutput)
frontMicrophoneAudioDataOutput.setSampleBufferDelegate(self, queue: dataOutputQueue)
\t\t
// connect rear microphone to output data
let backMicrophoneAudioDataOutputConnection = AVCaptureConnection(inputPorts: [backMicrophonePort],
                                                                          output: backMicrophoneAudioDataOutput)
guard session.canAddConnection(backMicrophoneAudioDataOutputConnection) else {
print("Could not add a connection to the back microphone audio data output")
return false
}
session.addConnection(backMicrophoneAudioDataOutputConnection)
\t\t
// connect front microphone to output data
let frontMicrophoneAudioDataOutputConnection = AVCaptureConnection(inputPorts: [frontMicrophonePort],
                                                                           output: frontMicrophoneAudioDataOutput)
guard session.canAddConnection(frontMicrophoneAudioDataOutputConnection) else {
print("Could not add a connection to the front microphone audio data output")
return false
}
session.addConnection(frontMicrophoneAudioDataOutputConnection)
\t\t
return true
}
6. Reduce power consumption
iOS provides API to get hardware power consumption:
var hardwareCost: Float { get } // value [0.0, 1.0]
At the same time, an API is provided to obtain the system pressure power consumption:
var systemPressureCost: Float { get } // value [0.0, 1.0]
Possible solutions for reducing power consumption are as follows:
- Set the maximum frame rate
- Reduce Camera resolution
- Choose a low-resolution pixel format