Component communication
Parent-child component communication
Communication between parent and child components in Vue, parent passes to child: props, child component notifies parent component: this.$emit
In react, parent-child component communication
Pass from parent to child: use props attribute to pass
The child component notifies the parent component to modify the data by calling the function passed by the parent component to perform the modification.
Parent component App.js
import React, {<!-- --> Component } from 'react'
import Child from './components/Child'

export default class App extends Component {<!-- -->

  state = {<!-- -->
    username: 'Zhang San'
  }

  updateName = (name) => {<!-- -->
    this.setState({<!-- -->
      username: name
    })
  }

  render() {<!-- -->
    return (
      <div>
        <Child username={<!-- -->this.state.username} updateName={<!-- -->this.updateName}></Child>
      </div>
    )
  }
}
Child component Child.jsx
import React, {<!-- --> Component } from 'react'

export default class Child extends Component {<!-- -->

    changeName = () => {<!-- -->
        this.props.updateName('王五');
    }

  render() {<!-- -->
    return (
      <div>
        <p>child component</p>
        Name: {<!-- -->this.props.username}
        <button onClick={<!-- -->this.changeName}>Modify name</button>
      </div>
    )
  }
}
Brother component communication
Communication between sibling components is achieved by using the parent component as a transfer station to notify sibling components to modify data.
Parent componentApp.jsx
import React, {<!-- --> Component } from 'react'
import Child from './components/Child'
import ChildTwo from './components/ChildTwo'

export default class App extends Component {<!-- -->

  state = {<!-- -->
    username: 'Zhang San'
  }

  childRef = React.createRef()

  updateName = (name) => {<!-- -->
    this.setState({<!-- -->
      username: name
    })
  }

  changeChildAge = (age) => {<!-- -->
    this.childRef.current.changeAge(age);
  }

  render() {<!-- -->
    return (
      <div>
        <Child ref={<!-- -->this.childRef} username={<!-- -->this.state.username} updateName={<!-- -->this.updateName}></Child >
        <ChildTwo changeChildAge={<!-- -->this.changeChildAge}></ChildTwo>
      </div>
    )
  }
}
Child component Child.jsx
import React, {<!-- --> Component } from 'react'

export default class Child extends Component {<!-- -->

    state = {<!-- -->
        age: 20
    }

    changeAge = (age) => {<!-- -->
        this.setState({<!-- -->
            age
        })
    }

    changeName = () => {<!-- -->
        this.props.updateName('王五');
    }

  render() {<!-- -->
    return (
      <div>
        <p>child component</p>
        Name: {<!-- -->this.props.username}
        <br />
        Age: {<!-- -->this.state.age}
        <button onClick={<!-- -->this.changeName}>Modify name</button>
      </div>
    )
  }
}
Child component ChildTwo.jsx
import React, {<!-- --> Component } from 'react'

export default class ChildTwo extends Component {<!-- -->


    changeChildAge = () => {<!-- -->
        this.props.changeChildAge(30);
    }

  render() {<!-- -->
    return (
      <div>
        <p>ChildTwo</p>
        <button onClick={<!-- -->this.changeChildAge}>Modify the name in child</button>
    </div>
    )
  }
}
This method can realize communication between sibling components, but if the components are nested too deeply, the communication needs to be uploaded layer by layer, and then passed down layer by layer. This process is very cumbersome and will be inconvenient for future maintenance.
Communication based on event bus
The event bus method eventBus is a design pattern called subscription publishing. There are 23 design patterns. They are all a kind of thought. They are a kind of experience and thought summarized by predecessors, which can help We quickly solve problems, such as: singleton mode, strategy mode, subscription publishing, etc.
React itself does not provide a publish-subscribe mode. We need to install a third-party plug-in events:
events API
- Listening for events: addListener(event name’, execution function)
- Trigger event: emit (event name’, parameters)
- Remove event: removeListener(event name’, execution function)
-
Install the
eventsplug-innpm i events #or yarn add events
-
Create eventBus file
utils/eventBus.js
import {<!-- --> EventEmitter } from 'events'; export default new EventEmitter(); // Generate an eventBus -
Listen for events
Child.jsx
import React, {<!-- --> Component } from 'react' import eventBus from '../utils/eventBus' export default class Child extends Component {<!-- --> state = {<!-- --> age: 20 } componentDidMount() {<!-- --> eventBus.addListener('changeAge', this.changeAge) } changeAge = (age) => {<!-- --> console.log(age) this.setState({<!-- --> age }) } } -
trigger event
ChildTwo.jsx
import React, {<!-- --> Component } from 'react' import eventBus from '../utils/eventBus' export default class ChildTwo extends Component {<!-- --> changeChildAge = () => {<!-- --> eventBus.emit('changeAge', 18) } render() {<!-- --> return ( <div> <p>ChildTwo</p> <button onClick={<!-- -->this.changeChildAge}>Modify the name in child</button> </div> ) } } -
Remove event
Child.jsx
import React, {<!-- --> Component } from 'react'
import eventBus from '../utils/eventBus'

export default class Child extends Component {<!-- -->
    componentWillUnmount() {<!-- -->
        eventBus.removeListener('changeAge', this.changeAge)
    }
}
The event bus method allows direct communication between components, but there are problems:
When the event bus is used on a large scale in a project, monitoring and triggering events are very scattered, making it difficult to maintain in the future and not knowing where the monitoring is and where the triggering is.
Suggestion: The event bus can be used less and should not be used in a large area.
It is best to use a state management library, usually redux is used in react.
Three core concepts of redux
React itself does not provide relevant warehouse management plug-ins. The react community is very large. The community provides a warehouse management plug-in redux, which is equivalent to vuex for managing data.
Previously, redux and @reduxjs/toolkit were included, which include the usage of redux.
One of the reasons why the redux official website recommends using @reduxjs/toolkit is because redux is very cumbersome to use and requires splitting and merging files.
There are state management libraries on the market, such as vuex (which draws on the ideas of redux and is developed according to the syntax characteristics of vue to facilitate the use of vue users), redux (can be used by any framework, so it is not so comfortable to use), mbox (The syntax uses decorator syntax), zustand, @reduxjs/toolkit (officially recommended by redux).
This is the difference between using redux and different redux:

vuex diagram

redux diagram
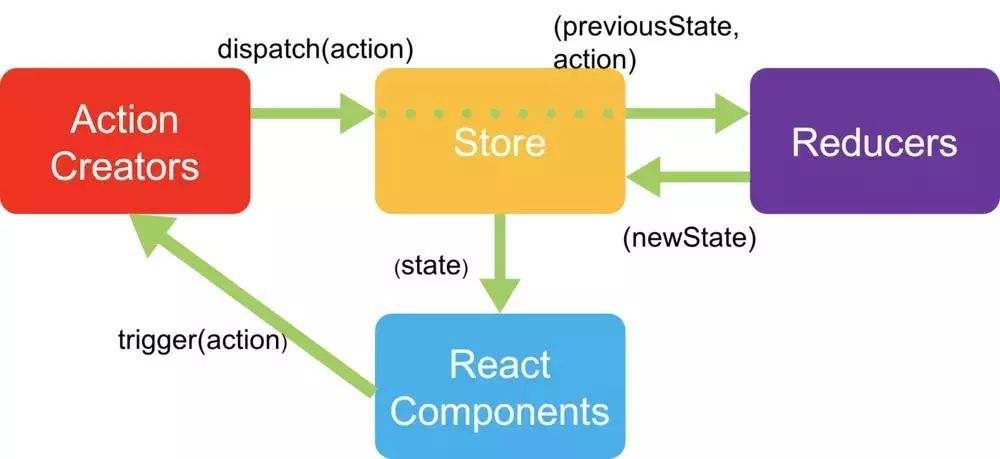
Store: Where the redux warehouse data is stored. Generally, there will only be one store warehouse.
Action: As an action description period, it is an object that describes what this action does and notifies the reducer to update the data.
reducer: equivalent to mutations in vuex, a function or object that updates warehouse data.
store
Where the redux warehouse data is stored, there is generally only one store warehouse.
-
Install
@reduxjs/toolkitnpm i @reduxjs/toolkit # or yarn add @reduxjs/toolkit
-
Create a new store/index.js file
Create warehouse
import {<!-- --> configureStore } from '@reduxjs/toolkit'; let store = configureStore({<!-- --> reducer() {<!-- --> } }); console.log('store', store); -
Introduce the warehouse usage in the index.js file
import './store'
action
As an action description, is an object, and a type attribute must be passed to represent what the action is. Other parameters can be passed arbitrarily. Usually other parameters will be placed in the payload attribute, describes what this action does, and notifies the reducer to update the data.
You can dispatch actions through disaptch to notify the reducer to update data.
Define action
const action = {<!-- -->
    type: 'add', // Action type
    num: 10
}
Dispatch action to notify reducer to update data
store.dispatch(action);
The reducer will match and perform related operations based on the type attribute.
reducer
Equivalent to mutations in vuex, a function or object that updates warehouse data. Initialization data.
Initialization data
import { configureStore } from '@reduxjs/toolkit';

let store = configureStore({
    reducer(state = 0, action) {
        console.log('reducer triggered', action);

        switch (action.type) {
            case 'add':
                state + = action.num;
                return state;
            case 'reduce':
                state -= action.num
                return state;

            default:
                return state;
        }
    }
});

console.log('store', store);
console.log('getState', store.getState());

const action = {<!-- -->
    type: 'add', // Action type
    num: 10
}
store.dispatch(action);

console.log('add', store.getState());

const reduceAction = {
    type: 'reduce',
    num: 1
}
store.dispatch(reduceAction)

console.log('reduce', store.getState());
The first parameter in the reducer function defines the data to achieve the effect of initializing the data, and then returns the state data.
redux object characteristics
In @reduxjs/toolkit, when using the redux warehouse data as before, modifying the data requires returning a new object. Currently, the value in the state cannot be modified directly, otherwise an error message will appear.
store/index.js
import {<!-- --> configureStore } from '@reduxjs/toolkit';

let store = configureStore({<!-- -->
    reducer(state = {<!-- -->count: 0}, action) {<!-- -->
        let count = state.count
        switch (action.type) {<!-- -->
            case 'add':
                // state.count + = action.num
                count + = action.num;
                return {<!-- -->
                    count
                };
            case 'reduce':
                // state -= action.num
                count -= action.num
                return {<!-- -->
                    count
                };

            default:
                return state;
        }
    }
});

export default store;
Pitfall 1: Incomplete returned state data leads to data loss
When there is multiple data in the state object, after modifying some of the data, all data needs to be returned, otherwise data loss will occur.
import {<!-- --> configureStore } from '@reduxjs/toolkit';

let store = configureStore({<!-- -->
    reducer(state = {<!-- -->count: 0, name: 'Awang', age: 18}, action) {<!-- -->
        let count = state.count
        switch (action.type) {<!-- -->
            case 'add':
                count + = action.num;
                return {<!-- -->
                    count
                };
            case 'reduce':
                count -= action.num
                return {<!-- -->
                    count
                };

            default:
                return state;
        }
    }
});

export default store;
At this time, after updating the data, the name and age attributes will be lost, because only the count value is returned when returning.
Correct way to handle it:
Make a copy of the entire state object and overwrite the original data with the modified data. The data will not be lost.
import {<!-- --> configureStore } from '@reduxjs/toolkit';

let store = configureStore({<!-- -->
    reducer(state = {<!-- -->count: 0, name: 'Awang', age: 18}, action) {<!-- -->
        let count = state.count
        switch (action.type) {<!-- -->
            case 'add':
                count + = action.num;
                return {<!-- -->
                    ...state,
                    count
                };
            case 'reduce':
                count -= action.num
                return {<!-- -->
                    ...state,
                    count
                };

            default:
                return state;
        }
    }
});

export default store;
Pit 2: If there is a nested object in the state, after modifying the object, a new object address needs to be returned, otherwise the component rendering update cannot be caused
Error case:
import {<!-- --> configureStore } from '@reduxjs/toolkit';

let store = configureStore({<!-- -->
    reducer(state = {<!-- -->count: 0, name: 'Awang', age: 18, user: {<!-- -->address: 'Shanghai'}}, action ) {<!-- -->
        let user = state.user;
        switch (action.type) {<!-- -->
            case 'changeAdress':
                user.address = 'Jing'an District';
                return {<!-- -->
                    ...state,
                    user
                }
            default:
                return state;
        }
    }
});

export default store;
Modifying the user address at this time will not cause component rendering, because the user object is an address reference, not a new object.
Correct approach:
Deep copy the user object:
1) Structure expansion (not deep copy, valid for first-level objects)
import {<!-- --> configureStore } from '@reduxjs/toolkit';

let store = configureStore({<!-- -->
    reducer(state = {<!-- -->count: 0, name: 'Awang', age: 18, user: {<!-- -->address: 'Beijing'}}, action ) {<!-- -->
        let user = state.user;
        switch (action.type) {<!-- -->
            case 'changeAdress':
                user.address = 'Chaoyang District';
                return {<!-- -->
                    ...state,
                    user: {<!-- -->
                        ...user
                    }
                }
            default:
                return state;
        }
    }
});

export default store;
2) Deep copy or recursive implementation of JSON.parse and JSON.stringify
import {<!-- --> configureStore } from '@reduxjs/toolkit';

let store = configureStore({<!-- -->
    reducer(state = {<!-- -->count: 0, name: 'Awang', age: 18, user: {<!-- -->address: 'Guangzhou'}}, action ) {<!-- -->
        let user = state.user;
        switch (action.type) {<!-- -->
            case 'changeAdress':
                user.address = 'Tianhe District';
                return {<!-- -->
                    ...state,
                    user: JSON.parse(JSON.stringify(user))
                }
            default:
                return state;
        }
    }
});

export default store;
3) Deep copy the object as soon as it is opened
import {<!-- --> configureStore } from '@reduxjs/toolkit';

let store = configureStore({<!-- -->
    reducer(state = {<!-- -->count: 0, name: 'Awang', age: 18, user: {<!-- -->address: 'Shenzhen'}}, action ) {<!-- -->
        // Deep copy the object as soon as it is opened
        let user = {<!-- -->...state.user};
        switch (action.type) {<!-- -->
            case 'changeAdress':
                console.log('changeAdress triggered');
                user.address = 'Nanshan';
                return {<!-- -->
                    ...state,
                    user
                }
            default:
                return state;
        }
    }
});

export default store;
Important: state must be a completely new address object to cause component rendering updates.
createSlice modular
createSlice is a function provided by @reduxjs/toolkit, through which modules can be created, which is equivalent to the modules submodule function in vuex.
Initialization
1) Create a new store warehouse
store/index.js
import {<!-- --> configureStore } from '@reduxjs/toolkit';

let store = configureStore({<!-- -->
    reducer() {<!-- -->

    }
});

export default store;
2) Create modules through createSlice
Create a new counter.js file
store/counter.js
import {<!-- --> createSlice } from '@reduxjs/toolkit';

//Create module
let counterSlice = createSlice({<!-- -->
    name: 'counter', // Equivalent to the namespace of the vue submodule
    initialState: {<!-- --> // Initialization data
        count: 0
    },
    reducers: {<!-- --> // Equivalent to the mutations object in vuex, used to modify data synchronously

    }
});

export default counterSlice;
createSlice: After creating a module, a module will be generated. This module contains reducer and action creator creator.
name: Equivalent to the namespace of the vue submodule, this name must be unique
initialState: initialization data
reducers: equivalent to the mutations object in vuex, used to modify data synchronously
3) Bind reducer
Bind reducer initialization data in store/index.js
import {<!-- --> configureStore } from '@reduxjs/toolkit';
import counterSlice from './counter';

let store = configureStore({<!-- -->
    reducer: {<!-- -->
        counterRd: counterSlice.reducer
    }
});

export default store;
reducer: It is an object. The key in the object is the dividing module. When accessing data, you need to install the module name to access the data.
4) Bind the store warehouse through Provider
The components of react are UI components. If the UI component wants to use redux data, it needs to become a container component.
import React from 'react';
import ReactDOM from 'react-dom/client';
import './index.css';
import App from './App';
import reportWebVitals from './reportWebVitals';
// The components of react are UI components. If the UI component wants to use redux data, it needs to become a container component.
import {<!-- --> Provider } from 'react-redux'
import store from './store';

const root = ReactDOM.createRoot(document.getElementById('root'));
root.render(
  <Provider store={<!-- -->store}>
    <App />
  </Provider>
);
Pass the store warehouse data into Provider, and subsequent components will be eligible to obtain redux warehouse data.
5) Obtain data in redux through connect high-order components
function mapStateToProps(state) {<!-- -->
  console.log('mapStateToProps', state);
  return {<!-- -->
    count: state.counterRd.count
  }
}

export default connect(mapStateToProps)(App);
When accessing data in mapStateToProps, you need to pay attention to accessing data through the key when dividing modules.
Modify data
1) Write reducer
import {<!-- --> createSlice } from '@reduxjs/toolkit';

//Create module
let counterSlice = createSlice({<!-- -->
    name: 'counter', // Equivalent to the namespace of the vue submodule
    initialState: {<!-- --> // Initialization data
        count: 0
    },
    reducers: {<!-- --> // Equivalent to the mutations object in vuex, used to modify data synchronously
        addCountRd(state, action) {<!-- -->
            //The state data proxy here is proxy
            console.log(state, action);
            state.count + = action.num;
        }
    }
});

export default counterSlice;
Note: The state in the reducer is accompanied by the proxy. Directly modifying the data in the state can cause the rendering update of the page.
2) Dispatch action to notify reducer to update data
There are two ways to dispatch actions:
-
dispatch an object
this.props.dispatch({<!-- --> type: 'counter/addCountRd', num: 10 });type: is a string consisting of two parts. The first part is the value of the namespacenamewhencreateSlicecreates the module. The second part Is the name of the correspondingreducerfunction. -
Generate
actionobjects by dispatching theaction creatorcreator function generated by the modulethis.props.dispatch(counterSlice.actions.addCountRd(10));
counterSlice.actions.addCountRd(10): It is theaction creatorcreator function generated after modularization. After running, it will return anactionobject. By default,payloadis used as the parameter carrier in the object to pass parameters.
createAsyncThunk asynchronous processing
In the warehouse knowledge learned so far, if you want to process asynchronous data, you may consider writing like this:
componentDidMount() {<!-- -->
    getUserList().then(res => {<!-- -->
this.props.dispatch({<!-- -->})
    })
}
Writing in this way can achieve functions, but it does not have encapsulation. @reduxjs/toolkit provides a way for us to encapsulate asynchronous code.
createAsyncThunk asynchronous processing
Similar to actions in vuex encapsulating asynchronous requests.
Thunk: It is a plug-in that performs asynchronous processing to obtain data. Currently, @reduxjs/toolkit integrates this asynchronous processing plug-in, and we can use it directly.
1) Install axios
npm i axios
2) Encapsulating api interface
import axios from "axios";

const token = 'eyJhbGciOiJIUzI1NiIsInR5cCI6IkpXVCJ9.eyJhY2NvdW50IjoieGlhb2ZlaSIsInJvbGUiOnsibWVudXMiOlsiL2hvbWUiLCIvdXNlciIsIi9yb2xlIiwiL3Byb2R1Y3QiLCIvcH JvZHVjdC9saXN0IiwiL3Byb2R1Y3QvY2F0ZWdvcnkiLCIvY2hhcnQiLCIvY2hhcnQvYmFyIiwiL2NoYXJ0L2xpbmUiLCIvY2hhcnQvcGllIl0sIl9pZCI6IjVmYzc4NDJkMjY0Mj AwMDBkYzAwNTAzYyIsImF1dGhUaW1lIjoiMjAyMS0wMy0xN1QxMzowMDozMC41MDJaIiwiYXV0aFVzZXIiOiJ4aWFvZmVpIiwiY3JlYXRlRGF0ZSI6bnVsbCwiY3JlYXRlVGltZSI6IjIwM jAtMTItMDIiLCJuYW1lIjoi6LaF57qn566h55CG5ZGYIiwic3RhdGUiOjEsInVwZGF0ZURhdGUiOiIyMDIxLTAzLTE3VDEzOjAwOjMwLjUwOVoifSwiX2lkIjoiNWZiNjY1ZjEyMjViMDAwMDM2MDA0 ZGY1IiwiZXhwIjoxNjc3ODk4MTA1LjU0MywiaWF0IjoxNjc3ODExNzA1fQ.B3BqHeY3sfKLjywFN34PaIbLumnCCanfdhePXGiUzHQ'

export function getAccountList() {<!-- -->
    return axios.post('http://localhost:8002/users/getAccountList', {<!-- -->}, {<!-- -->
        headers: {<!-- -->
            token
        }
    })
}
3) Create an asynchronous thunk
Use createAsyncThunk to create an asynchronous thunk and encapsulate asynchronous requests. Will return a thunk creator function, including three states: pending, fulfiled, rejected. We need to monitor these three states to execute accordingly. reducer function operation.
store/user.js
// is a function that generates thunk for asynchronous dispatch, and a thunk generator for dispatch dispatch.
export let getUserListThunk = createAsyncThunk('user/getUserList', async () => {<!-- -->
    //Here you can call the interface for asynchronous processing
    let res = await getAccountList();
    return res.data.data;
});
createAsyncThunk: The data needs to be returned, and there is no need to modify the data here.
4) Configure additional reducers through extraReducers
Here you can monitor the status of the asynchronous thunk creator function and process the reducer function accordingly.
First configuration method:
Monitor the status through the addCase function built by the builder.
let userSlice = createSlice({<!-- -->
    name: 'user',
    initialState: {<!-- -->
        userList: []
    },
    reducers: {<!-- -->},
    extraReducers(builder) {<!-- -->
        // Monitor the status of the calling interface and execute the corresponding reducer function to modify the data
        builder.addCase(getUserListThunk.fulfilled, (state, action) => {<!-- -->
            console.log('Success');
            console.log(state, action);
            state.userList = action.payload;
        }).addCase(getUserListThunk.pending, () => {<!-- -->
            console.log('hang');
        }).addCase(getUserListThunk.rejected, () => {<!-- -->
            console.log('Failure');
        })
    }
});
Second configuration method:
Configure using objects:
let userSlice = createSlice({<!-- -->
    name: 'user',
    initialState: {<!-- -->
        userList: []
    },
    reducers: {<!-- -->},
    extraReducers: {<!-- -->
        [getUserListThunk.fulfilled](state, action) {<!-- -->
            console.log('Success');
            state.userList = action.payload;
        },
        [getUserListThunk.pending]() {<!-- -->
            console.log('hang');
        },
        [getUserListThunk.rejected]() {<!-- -->
            console.log('Failure');
        }
    }
});
Explanation: This is equivalent to writing the key in the object as a variable:
var k = 'name';

var obj = {<!-- -->
    [k]: 'xxx'
}

obj[k] = 'xxx'
obj.name = 'xxx'
5) Dispatch asynchronous thunk to execute asynchronous interface call
App.js
import {<!-- --> getUserListThunk } from './store/user'

this.props.dispatch(getUserListThunk());
getUserListThunk: It is a thunk creator. After execution, a thunk function will be obtained. After dispatch, an asynchronous interface call will be executed to obtain data. Automatically trigger extraReducers to monitor the corresponding status and execute the reducer function.