Article directory
-
- I. Introduction
- 2. Installation
- Create a new input asset
- Three InputActions panel
-
- Area 1 Toolbar
-
- controlSchemes control schemes
- saveAsset and Auto-Save
- Area 2 actionMaps action map set
- Area 3 actions Area 4 Properties panel
-
- 1 Creation and deletion of actions and bingdings
- 2 attributes of action
- 3 Binding properties
- 4 Example demonstration, create a jumping action
- Four C# calls InputsSystem
-
- Method 1: Traditional high coupling method calling
- Method 2 Use PlayerInput component
- Method 3 Create C# script
- Switch input control set
- Rebind keys and restore default keys
-
- Reassign keys to actions
- Save and load modified keybindings
- Restore default keys
- Get the action and the button whose name is bound to the action
1 Preface
The name of the new input system is called InputSystem. The new one is relative to the old InputManager.
The core idea is to add the concept of an action. The code only listens to the triggering of the action, and the action binds the physical input. In this way, no matter what the platform is, no matter how the physical input is re-specified, we do not need to modify the code.
At the same time, you can also bind the same physical input to different input action sets at the same time, and switch the input action set at any time. For example, after getting in a car, switch from the walking action set to the driving action set.
In addition, it also provides some convenient functions, such as using codes to rebind keys, screen keys, etc., detecting device access and removal, key combinations, secondary binding, etc.
2 Installation
InputSystem is not installed by default, we need to use packagemanager to install it.
It is recommended to use versions after 2019
Open packageManager, search in unityRegistery, and then install it. Your editor will need to be restarted during the installation process.
If the package does not appear when you open the package manager, you need to exit the editor, refresh the pass, and reopen it.

Create a new input asset
There are two ways to create input
1 Create a new input asset through the Project panel right-click menu Create/InputAction, which will create a brand new asset.
2. Add a PlayerInput component to an object and click the create button. This will create an asset with a default input.

When creating a new input asset, you must name it carefully. Don’t give it a random name, because the C# script with input actions created later will be called this name. If you name it blindly, you will get yourself into trouble
Three InputActions Panel
The function of this panel is to manage the actions and corresponding mappings of an InputActionAssets.
Double-click an input asset to open this panel.

The following is a detailed explanation
Area 1 Toolbar
controlSchemes control schemes

The default is only AllControlSchemes. You can use AddControlScheme to create a new input scheme. Then you can specify your own input method for a physical input of action. When we switch the input scheme, we can filter the input scheme under this scheme. Action, please note that the plan is just a name and has no actual meaning. You can completely name a plan called gamepad, but specify this plan for keyboard action.
When deleting the control scheme, if the physical input is used, we will be asked to choose whether to delete it together with the bound physical input. Selecting yes will delete all physical input bindings specified as the current scheme. Selecting no will only delete the control scheme and retain it. Bind physical input

saveAsset and Auto-Save
It is not recommended to use Auto-Save because we need to create a c# file for aciton to call it in the script. When using Auto-Save, if we have already created this script, every time we make changes, the script will be recompiled. This will be very painful
Area 2 actionMaps action mapping set
We can define different mapping sets here, such as walking action mapping set, driving action mapping set, UI action set, etc.
Click the + sign to create a new action set
Area 3 actions Area 4 Property panel
Watch these two together
actions: all actions in an actionMaps, used to create actions and bind physical buttons to actions
Properties: properties of action or binding
1 Creation and deletion of actions and bingding
Click the plus sign of atcions to create a new action (green). The new action comes with a binding (blue) by default, but currently this binding is not bound to any physical keys.

Right click on the action to delete the action
Click the + sign after action and select a binding type to create a new bingding (blue)
Right click on binding and select delete
2 Action attributes
Action This is the first attribute in the action attribute column
After creating the aciton, our first step is to determine the type of action. Select an action (green). The properties panel on the right will display the options for this action.
There are three types: value, button and Pass Through.
- value: The input can be converted into a value. You can select a specific type in the ControlType attribute. Axis (one-dimensional), Vector2, and Vector3 are usually used. They are usually used to make movements, perspective rotations, and read joystick input values, etc.
- button: press to trigger, nothing to say
- Pass Through: For example, if you plug in multiple handles, then all handles will affect the action at the same time. In the above two methods, only the handle with current input will affect the action, unless you want your action to be affected by multiple physics at the same time. Device Control, otherwise do not use this option
Note that modifying the type of aciton will affect the physical input options that can be created by action

Interactions How to interact
You can specify how this action interacts
Click the + sign to add a new interaction method
Commonly used interactions include Hold, which is triggered after pressing for a period of time, MultiTop, multiple clicks, etc. They are well-known and understandable, so there is no nonsense.
If nothing is added, it is the default interaction mode.
Processors define how to process the obtained values
The options are
- Axis Deadzone: When the joystick input is less than Min, the joystick will not be triggered. It is usually used to prevent joystick drift problems. If the input is greater than Max, it is considered to be 1. Interpolate between Min and Max
- Clamp: Clamp input value, cannot be less than Min, cannot be greater than Max
- Invert: Invert the input value. For example, if the input value is 1, the actual value obtained is -1.
- Normalize: Normalize the value, you always get 1 0 -1, usually used for joysticks
- Scale: Scale the input value
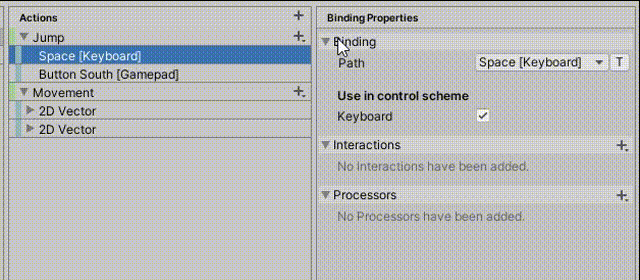
3 Bindin attribute
Notes on creating bindings
Click the + sign after an action and select a specific type to create a binding
Depending on the type of action, different binding types can be selected.
When the ActionType of action is Button, the types we can create include
- Binding: Ordinary button, can only bind one button
- Positive/Negative:, you need to bind two buttons to Positive and Negative respectively.
- Binding With Modifier: Key combination
When the action is of Value type, the types we can create usually include Binding and Up/Down/Left/Right, which are obviously used to control the direction with the keyboard.

There are too many binding types here to list them all, but the most commonly used ones are the axis input of Button and keyboard joystick.
Bind a physical input
The newly created binding has no key binding and requires us to bind it manually.
Select a binding, click the Binding category in its property bar, then click Path/Listen, then press the button or move the joystick, and then click the input we need from the monitored list.


For example, if I press the space key, I select the space key in the list. Note that you can press multiple keys.
For joysticks, for example, if you tighten the XBOX joystick, you can choose whether this action is only for Xbox or universal. If it is universal, using other brands of joysticks to press the corresponding keys will also work, otherwise it will only It will correspond to the Xbox joystick, as shown below. The first option is universal input, and the second option is only the Xbox joystick.

Choose a ControlSchemes for the binding
If we have established a control scheme before, we can specify the control scheme to which this Binding belongs, which facilitates our filtering.
For how to create a new control scheme, please refer to the “Area 1” section of this chapter.
Interactions and Processors
Same as action, except that the two options of banding will override action.
4 Example demonstration, creating a jumping action
Four C# calls InputsSystem
Here are three ways to monitor input, but only the third is important. Just know the first two.
Method 1 Traditional high coupling method call
Although inputSystem provides the concept of acion, we can also directly access keyboard keys.
First introduce nameSpace
using UnityEngine.InputSystem;
//Keyboard
if (Keyboard.current.aKey.wasPressedThisFrame)
{<!-- -->
     print("A key pressed");
}
//Mouse input
print(Mouse.current.delta.ReadValue());
//mouse pressed
if(Mouse.current.leftButton.wasPressedThisFrame)
{<!-- -->

}
It is best to use this method only for testing and not to actually use it for projects, because it is not as easy to use as InputManager, at least InputManagerAPI is easier to find.
Method 2 Using PlayerInput component
Attach a PlayerInput component to an object and select an InputActionAssets.

Use DefaultMap to select acitonMaps.
Use Behavior to choose a messaging method. It is recommended to use the 3rd and 4th modes here. The two modes are introduced below.
InokeUnityEvnets:
The advantage of this mode is that you can drag events directly

After switching to the third mode of Behavior, the Events option will appear. Player and UI are the two actionMaps I created. Jump and Movement are the two actions in the actionMaps of Player. How do we just bind UIButton to it? The same as setting events, just drag the event for action.
We can declare the event like this:
//With parameters
 public void Jump(InputAction.CallbackContext context)
    {<!-- -->
        //Debug.Log(context);
        //context.performed||context.started||context.canceled Press Start Press Release
        if (context.performed)//Only triggered when pressed
        {<!-- -->
            rig.AddForce(Vector3.up * 5f, ForceMode.Impulse);
        }
    }
    //No parameters
    public void Jump()
    {<!-- -->
        rig.AddForce(Vector3.up * 5f, ForceMode.Impulse);
    }
It should be noted that when a button is pressed, it will trigger three events, because a button contains three stages, start pressing/pressing/releasing, so we’d better use parameters. The method binds the event and determines the stage in the method by itself
Inoke CSharp Evnets

This method requires us to find the inputManager component in the script and bind the delegate, similar to using a script to bind events to UIButton.
 private Rigidbody rig;
    private PlayerInput playerInput;
    private void Start()
    {<!-- -->
        playerInput = GetComponent<PlayerInput>();
        //The way to find components switches input control sets
        playerInput.SwitchCurrentActionMap("Player");
        playerInput.onActionTriggered + = PlayerInput_onActionTriggered;
    }
    private void PlayerInput_onActionTriggered(InputAction.CallbackContext obj)//Use InvokeCSharpEvents mode to listen for events
    {<!-- -->
        Debug.Log(obj);
    }
Method 3 Create C# script
This is the only recommended way
First we need to generate the c# file
Find the InputActionAssets and check Generate C# class to automatically generate the C# class. At this time, it is best to turn off the Auto-Save option of the InputActions panel, otherwise this class will be regenerated immediately every time I adjust the input.

The name of the generated C# class is the same as the name of InputAcionsAssets, which is why you don’t want to mess with the name.
Listen to the action key input in the code and obtain the value of value type
Current input asset

Script
 PlayerInputActions playerInputActions;
    private void Start()
    {<!-- -->
        playerInputActions = new PlayerInputActions(); Note that it is a new object, not a search component
        playerInputActions.Player.Enable();//Activate a control set. Note that an acitonMaps must be activated.
        playerInputActions.Player.Jump.performed + = Jump;//Binding event
        playerInputActions.Player.Movement.performed + = Movement_performed;//Click once to move. To make movement input, follow the method in FixedUpdate below. This is just a demonstration of how to do value type input monitoring.
    }
    private void FixedUpdate()
    {<!-- -->
    //Directly monitor the input of value type action
        Vector2 inputVector = playerInputActions.Player.Movement.ReadValue<Vector2>();
     Debug.Log(inputVector);
    }

//Register jump method
    public void Jump(InputAction.CallbackContext context)
    {<!-- -->
        Debug.Log(context);
    }
    //Method to register movement
    public void Movement_performed(InputAction.CallbackContext context)
    {<!-- -->
        Vector2 inputVector = context.ReadValue<Vector2>();//Read the action of value type. Note that the generic type must use a type that matches the input.
        float speed = 5f;
        rig.AddForce(new Vector3(inputVector.x, 0, inputVector.y) * speed, ForceMode.Force);
    }
very simple
Switch input control set
 playerInputActions = new PlayerInputActions();
        //C# way to switch input control set
        playerInputActions.UI.Disable();//Disable an actionMaps
        playerInputActions.Player.Enable();//Enable an actionMaps
Rebind keys and restore default keys
Reassign the button for action
//Rebind keys. Before rebinding keys, you need to make sure that all input action sets have been closed. Otherwise, once monitoring is turned on, the current input value will be bound immediately. There must be something we don’t want. Values, such as mouse position, sliding joystick, etc.
            playerInputActions.Player.Disable();
            playerInputActions.UI.Disable();
            playerInputActions.Player.Jump.PerformInteractiveRebinding(0)//Parameter 0 Modifies the primary binding 1 Modifies the secondary binding Default is 0
                .WithCancelingThrough(Keyboard.current.escapeKey)//Specify a key for canceling rebinding
                .OnCancel(callBack =>
                {<!-- -->
                    print("Unbind");
                    callBack.Dispose();//Unbinding requires releasing resources
                    playerInputActions.Player.Enable();//Reactivate the input action
                })
                .WithControlsExcluding("Mouse")//Prohibit binding mouse buttons. The value of the parameter can be viewed from the binding interface to see what input categories there are.
                .OnComplete(callback =>
                {<!-- -->
                    Debug.Log("End binding");
                    callback.Dispose();//The object needs to be released after rebinding is completed
                    playerInputActions.Player.Enable();//Reactivate the input action
                })
                .Start();//Start listening for rebound keys
Save and load modified key bindings
If we do not manually save the rebound keys, the original keys will still be used the next time we start up.
After we manually save the keys, we need to read them every time we start them and reassign them to the input system.
Add save in the bound OnComplete()
.OnComplete(callback =>
                {<!-- -->
                    Debug.Log("End binding");
                    Debug.Log(callback);

                    //Save and rebind method after inputSystem1.1 version
                    string rebinds = callback.action.SaveBindingOverridesAsJson();
                    PlayerPrefs.SetString("rebinds", rebinds);//Static method, parameter 1 is a fixed string, indicating rebinding
                    print("Rebind content" + rebinds);

                    callback.Dispose();//The object needs to be released after rebinding is completed
                    playerInputActions.Player.Enable();//Reactivate the input action
                })
``
Read last saved rebind json on game launch

```csharp
        playerInputActions = new PlayerInputActions();
        //C# way to switch input control set
        playerInputActions.Player.Enable();
        string rebinds = PlayerPrefs.GetString("rebinds");
        playerInputActions.LoadBindingOverridesFromJson(rebinds);
Restore default keys
playerInputActions.Player.Jump.RemoveBindingOverride();
Get the action and the button whose name is bound to the action
 playerInputActions = new PlayerInputActions();
        playerInputActions.Player.Enable();

        print(playerInputActions.Player.Jump.name);//The name of the action
        print(playerInputActions.Player.Jump.GetBindingDisplayString(1));//List secondary bindings. The parameter 0 is the primary binding.
        print(playerInputActions.Player.Jump.GetBindingDisplayString());//List the primary and secondary bindings of action