
|
Hello, I am safe and sound. |
Article directory
- Table: How to create and modify data tables?
-
- 1. How to create a data table?
- 2. What are the constraints?
- 3. How to modify the table?
-
- Add field
- Modify fields
Table: How to create and modify data tables?
Creating and modifying data tables is an important part of the data storage process. We not only need to create the table, but also set the constraints correctly to ensure the consistency and integrity of the data.
At the same time, the data in the table will change as business needs change, and adding and modifying corresponding fields are also common operations.
In a simple supermarket project, customers often need to purchase goods, which requires creating a table in the MySQL database to manage purchase-related data. Assume that this table is called the import head table (importhead), as shown in the figure below:

1, 2, and 3 here represent the three purchase methods of the store, namely distribution center distribution, store purchase, and direct supply from suppliers.
Among them, 1 (delivery by distribution center) is the standard purchase method. Because supermarkets are chain operations, in order to ensure product quality and category consistency, more than 90% of stores purchase goods through distribution centers. Therefore, we hope that the value of this field can default to 1. In this way, unless otherwise specified, the purchase method of the store purchase order will be automatically set to 1.
Therefore, now the customer needs a similar table to store purchase data, and there are three possible value ranges for the purchase method. The default value needs to be set, and then look down:
1. How to create a data table?
First, we need to know the syntax structure of MySQL table creation:
CREATE TABLE <table name>
(
Field name 1 data type [field level constraint] [default value],
Field name 2 data type [field level constraint] [default value],
...
[Table level constraints]
);
In the syntax structure of MySQL table creation, there is something called a constraint. Constraints define the conditions that the data in the table should meet.
MySQL will monitor the data in the table based on these constraints, prevent operations that violate the constraints, and prompt errors to ensure the uniqueness, legality, and integrity of the data in the table.
Next we create the purchase order table mentioned above:
The creation code is as follows:
create table demo.importhead
(
listnumber int,
  supplierid int,
  stocknumber int,
  \t
  -- After defining the field importtype as int type, we added a default value of 1 according to the syntax of creating a table in MySQL.

  importtype int, default 1,
  quantity decimal(10,3),
  importvalue decimal(10,2),
  recorder int,
  recodingdate datetime
);
Note that when creating a table, field names should avoid MySQL system keywords because the keywords reserved by the MySQL system have specific meanings.
OK, next we try to insert a record into the table just now to verify whether the default value constraint defined on the field importtype works.
insert into demo.importhead
(
listnumber,
supplierid,
stocknumber,

-- Here we do not insert the value of the field importtype

quantity,
importvalue,
recorder,
recodingdate
)
values
(
3456,
1,
1,
10,
100,
1,
'2020-12-10'
);
After the insertion is completed, let’s query the contents of the table:
select * from demo.importhead;
The running results are as follows:
mysql> select * from demo.importhead;
 + ------------ + ------------ + ------------- + --------- --- + ---------- + ------------- + ---------- + ---------- ---------- +
| listnumber | supplierid | stocknumber | importtype | quantity | importvalue | recorder | recordingdate |
 + ------------ + ------------ + ------------- + --------- --- + ---------- + ------------- + ---------- + ---------- ----------+
| 1234 | 1 | 1 | 1 | 10.000 | 100.00 | 1 | 2020-12-10 00:00:00 |
| 2345 | 1 | 1 | 2 | 20.000 | 2000.00 | 1 | 2020-12-10 00:00:00 |
| 3456 | 1 | 1 | 1 | 20.000 | 2000.00 | 1 | 2020-12-10 00:00:00 |
 + ------------ + ------------ + ------------- + --------- --- + ---------- + ------------- + ---------- + ---------- ---------- +
3 rows in set (0.00 sec)
We found that the value of the field importtype is already 1. In this way, by setting the default value when creating the table, we achieve the purpose of defining the default value of this field to 1.
2. What are the constraints?
The method of setting default values for fields just now is the default constraint. Set default constraints. When inserting data, if you do not explicitly assign a value to the field, the system will automatically assign the set default value to the field.
In addition to default constraints, there are also primary key constraints, foreign key constraints, non-null constraints, unique constraints and auto-increment constraints.
Here, we temporarily focus on non-null constraints, uniqueness constraints and auto-increment constraints.
1. Non-empty constraints
The non-null constraint means that the field value cannot be null. If a field is specified to be non-null when creating a table, then when adding data, this field must have a value, otherwise the system will prompt an error.
2. Uniqueness constraints
The unique constraint means that the value of this field cannot be repeated, otherwise the system may prompt an error. Compared with primary key constraints, unique constraints are weaker.
In a table, we can specify multiple fields to satisfy unique constraints, but there can only be one primary key constraint, which is also determined by the MySQL system. In addition, fields that satisfy the primary key constraint automatically satisfy the non-null constraint, but fields that satisfy the uniqueness constraint can be null.
In order to facilitate understanding, we take the product information table goodsmaster as an example:
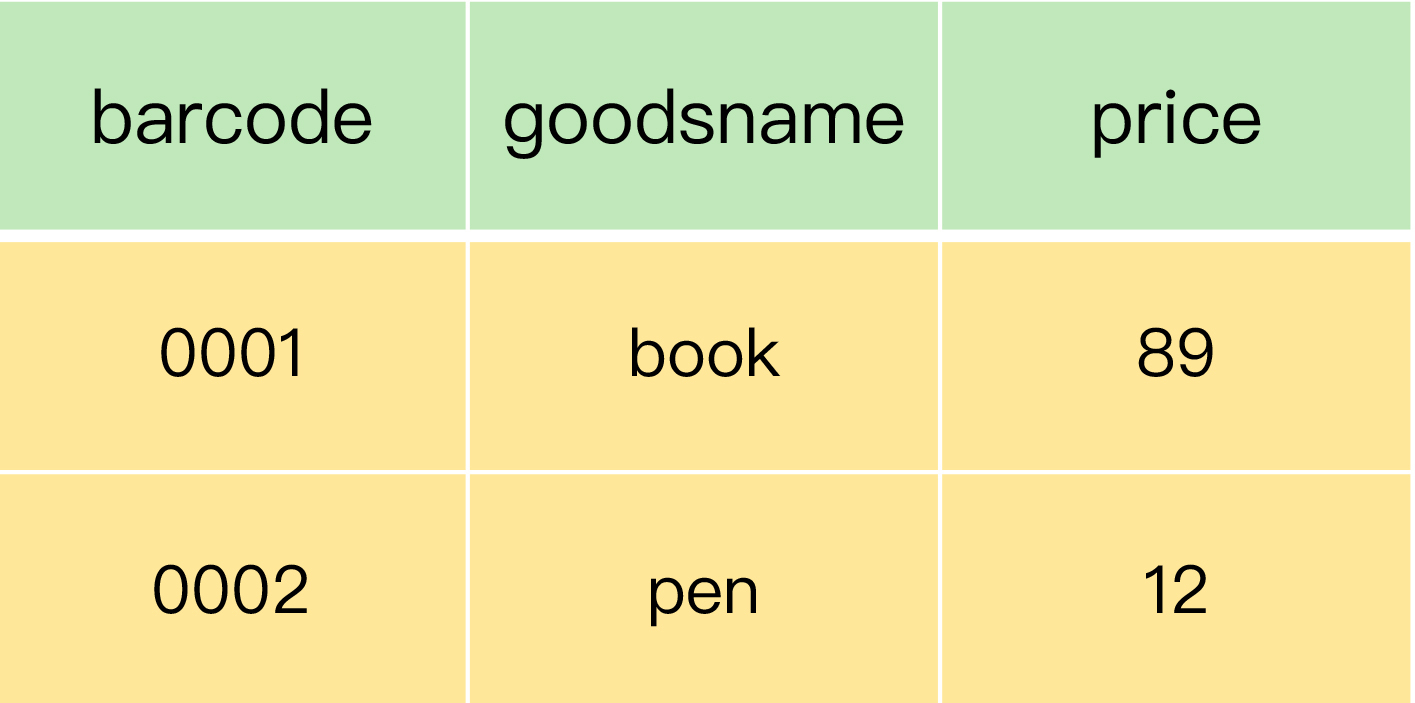
barcode represents the barcode, and goodsname represents the name. In order to prevent barcode duplication, we can define the field barcode to satisfy the uniqueness constraint. In this case, the barcode cannot be repeated, but it can be empty.
Similarly, in order to prevent name duplication, we can define the field goodsname to satisfy the uniqueness constraint. However, both the barcode and the name may be reused or may be empty, so they are not suitable for primary keys. Therefore, for this table, a new field that meets the uniqueness requirements can be added as the primary key.
3. Self-increasing constraints
Auto-increment constraints allow MySQL to automatically assign values to fields and ensure that they are not repeated. It is very useful, but it is not easy to use well.
Let’s use the product information table to explain:
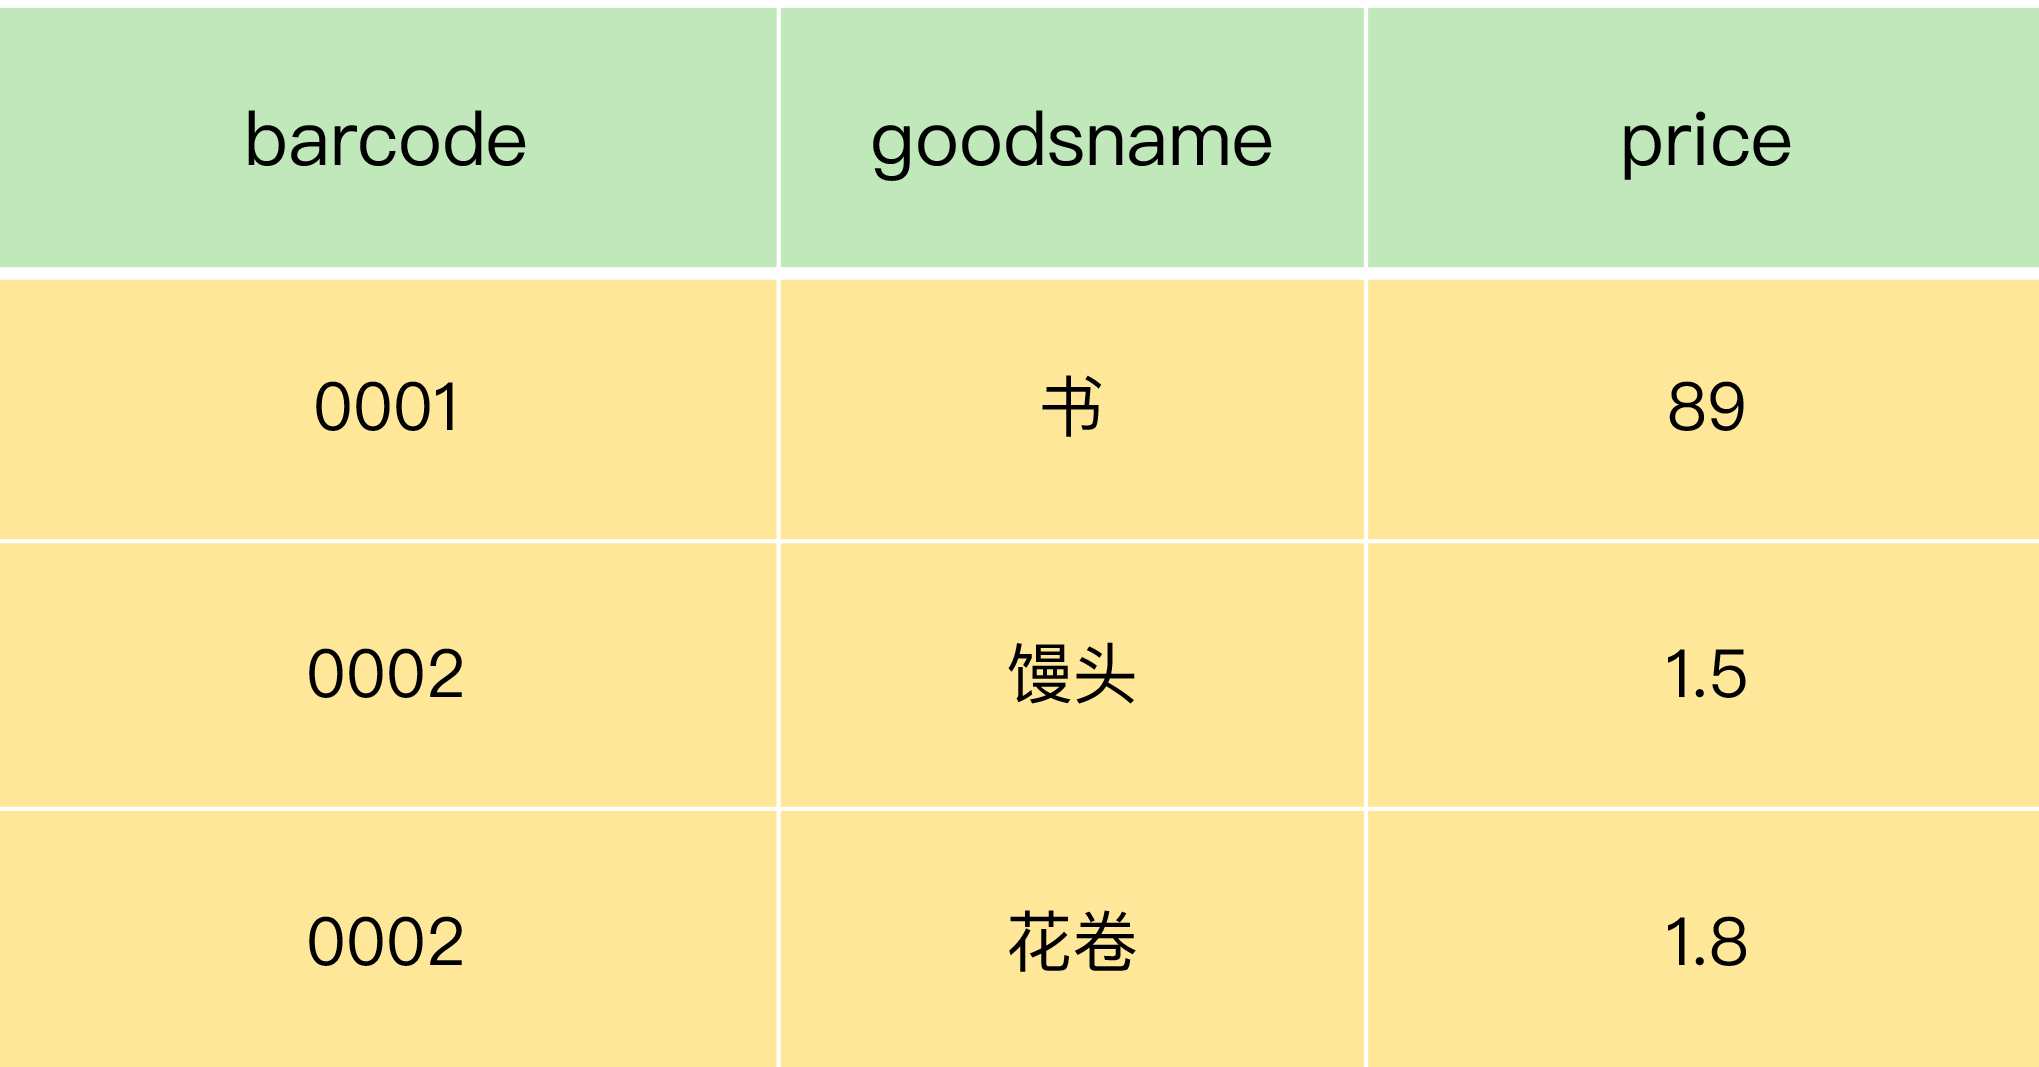
From this table, we can see that none of these three fields can satisfy uniqueness, so no field can be used as the primary key. Therefore, we need to add a field itemnumber ourselves, and every time we add a piece of data, we need to give a value Increase by 1.
How to achieve this? We can define auto-increment constraints and let the system assign values for us to satisfy uniqueness, so that we can use them as primary keys.

There are two points to note:
In the data table, only integer type fields can have auto-increment constraints. For fields with self-increasing constraints, each time a piece of data is added, it will only automatically increase by 1;- We can assign a value to the field of the auto-increment constraint. At this time, MySQL will reset the auto-increment base of the auto-increment constraint field. The next time it is added,
will automatically add 1 to the maximum value of the auto-increment constraint field as the new field. value.
OK, let’s test it next:
insert into demo.goodsmaster
(
itemnumber,
barcode,
goodsname,
specifications,
unit,
price
)
VALUES
(
-- Specify the product number as 100:
100,
'0003',
'Test 1',
'',
'indivual',
10
);
The result seen when executing this SQL is:
mysql> select * from demo.goodsmaster;
 + ------------ + --------- + ------------ + ------------- - + ------ + ---- +
| itemnumber | barcode | goodsname | specification | unit | price |
 + ------------ + --------- + ------------ + ------------- - + ------ + ------- +
| 1 | 0001 | Book | 16K | Edition | 89.00 |
| 2 | 0002 | Map | NULL | Zhang | 9.90 |
| 3 | 0003 | Pen | 10 pieces | Bag | 3.00 |
| 100 | 0003 | Test 1 | | pieces | 10.00 |
 + ------------ + --------- + ------------ + ------------- - + ------ + ------- +
4 rows in set (0.02 sec)
We found that the value of item number is not continuous at this time, and the maximum value is the 100 we just inserted.
Next, we insert a piece of data:
insert into demo.goodsmaster
(
-- Do not specify the value of the auto-increment field itemnumber
barcode,
goodsname,
specifications,
unit,
price
)
VALUES
(
'0004',
'Test 2',
'',
'indivual',
20
);
Executing this SQL statement, the result is:
mysql> select * from demo.goodsmaster;
 + ------------ + --------- + ------------ + ------------- - + ------ + ------- +
| itemnumber | barcode | goodsname | specification | unit | price |
 + ------------ + --------- + ------------ + ------------- - + ------ + ------- +
| 1 | 0001 | Book | 16K | Edition | 89.00 |
| 2 | 0002 | Map | NULL | Zhang | 9.90 |
| 3 | 0003 | Pen | 10 pieces | Bag | 3.00 |
| 100 | 0003 | Test 1 | | pieces | 10.00 |
| 101 | 0004 | Test 2 | | pieces | 20.00 |
 + ------------ + --------- + ------------ + ------------- - + ------ + ------- +
5 rows in set (0.00 sec)
We can see that the system automatically adds 1 to the maximum value of the self-increasing field itemnumber, and assigns a value of 101.
3. How to modify the table?
After creating the table, we often need to modify the table. Let’s talk about it in detail below:
In the supermarket project, when we create a new table, something like this will happen: the purchase order table we created earlier is used to store purchase data. However, we also need to create a purchase order history table (importheadhist) to store the accepted purchase data. The structure of this table is similar to that of the delivery order table, except that there are two more fields, namely the confirmer and the confirmation date. In response to this situation, it is easy to think that we can create a new table by copying the table structure and then modifying the table structure on this basis. How to implement it specifically? Please read on:
First, let’s copy the original table structure. The code is as follows:
create table demo.importheadhist
like demo.importhead;
After executing this SQL, an empty table demo.importheadhist with the same structure as demo.importhead is created.
We also need to modify this newly created table to obtain the “Purchase Order History Table” we need.
Add fields
Now we need to add 2 fields to this new table: confirmer and confirmdate. Please see the following code:
mysql> alter table demo.importheadhist
-> add confirmer int; -- Add a field confirmer, the type is int
\t\t
mysql> alter table demo.importheadhist
-> add confirmdate datetime; -- Add a field confirmdate, the type is datetime
Let’s take a look at the table structure:
mysql> DESCRIBE demo.importheadhist;
 +---------------- + --------------- + ------ + ----- + --- ------ + ------- +
| Field | Type | Null | Key | Default | Extra |
 +---------------- + --------------- + ------ + ----- + --- ------ + ------- +
| listnumber | int | NO | PRI | NULL | |
| supplierid | int | NO | | NULL | |
| stocknumber | int | NO | | NULL | |
| importtype | int | YES | | 1 | |
| quantity | decimal(10,3) | YES | | NULL | |
| importvalue | decimal(10,2) | YES | | NULL | |
| recorder | int | YES | | NULL | |
| recordingdate | datetime | YES | | NULL | |
| confirmer | int | YES | | NULL | |
| confirmdate | datetime | YES | | NULL | |
 +---------------- + --------------- + ------ + ----- + --- ------ + ------- +
10 rows in set (0.02 sec)
Modify fields
In addition to adding fields, we may also need to modify fields. For example, we need to change the field quantity to importquantity and change the field type to double. The specific operations are as follows:
alter table demo.importheadhist
change quantity importquantity double;
Execute this SQL and view the table structure:
mysql> desc demo.importheadhist;
 +---------------- + --------------- + ------ + ----- + --- ------ + ------- +
| Field | Type | Null | Key | Default | Extra |
 +---------------- + --------------- + ------ + ----- + --- ------ + ------- +
| listnumber | int | NO | PRI | NULL | |
| supplierid | int | NO | | NULL | |
| stocknumber | int | NO | | NULL | |
| importtype | int | YES | | 1 | |
| importquantity | double | YES | | NULL | |
| importvalue | decimal(10,2) | YES | | NULL | |
| recorder | int | YES | | NULL | |
| recordingdate | datetime | YES | | NULL | |
| confirmer | int | YES | | NULL | |
| confirmdate | datetime | YES | | NULL | |
 +---------------- + --------------- + ------ + ----- + --- ------ + ------- +
10 rows in set (0.02 sec)
As you can see, the field names and field types have been changed.
If we don’t want to change the field name, but just want to change the field type, for example, to change the field importquantity type to decimal(10,3), we can write:
alter table demo.importheadhist
modify importquantity decimal(10,3);
Run the SQL statement and view the table structure:
mysql> desc demo.importheadhist;
 +---------------- + --------------- + ------ + ----- + --- ------ + ------- +
| Field | Type | Null | Key | Default | Extra |
 +---------------- + --------------- + ------ + ----- + --- ------ + ------- +
| listnumber | int | NO | PRI | NULL | |
| supplierid | int | NO | | NULL | |
| stocknumber | int | NO | | NULL | |
| importtype | int | YES | | 1 | |
| importquantity | decimal(10,3) | YES | | NULL | |
| importvalue | decimal(10,2) | YES | | NULL | |
| recorder | int | YES | | NULL | |
| recordingdate | datetime | YES | | NULL | |
| confirmer | int | YES | | NULL | |
| confirmdate | datetime | YES | | NULL | |
 +---------------- + --------------- + ------ + ----- + --- ------ + ------- +
10 rows in set (0.02 sec)
We can also add a field to the table through SQL statements, and we can even specify the location of the added field in the table.
For example, after the field supplierid, add a field suppliername, the data type is text:
alter table demo.importheadhist
add suppliername text after supplierid;
Run this SQL statement to view the table structure:
mysql> desc demo.importheadhist;
 +---------------- + --------------- + ------ + ----- + --- ------ + ------- +
| Field | Type | Null | Key | Default | Extra |
 +---------------- + --------------- + ------ + ----- + --- ------ + ------- +
| listnumber | int | NO | PRI | NULL | |
| supplierid | int | NO | | NULL | |
| suppliername | text | YES | | NULL | |
| stocknumber | int | NO | | NULL | |
| importtype | int | YES | | 1 | |
| importquantity | decimal(10,3) | YES | | NULL | |
| importvalue | decimal(10,2) | YES | | NULL | |
| recorder | int | YES | | NULL | |
| recordingdate | datetime | YES | | NULL | |
| confirmer | int | YES | | NULL | |
| confirmdate | datetime | YES | | NULL | |
 +---------------- + --------------- + ------ + ----- + --- ------ + ------- +
11 rows in set (0.02 sec)