1. Basic concepts
1. What is authentication
Entering the era of mobile Internet, everyone uses their mobile phones every day. Commonly used software include WeChat, Alipay, Toutiao, etc. Let’s take WeChat as an example to illustrate the basic concepts related to authentication. Before using WeChat for the first time, you need to register as a WeChat user and enter your account number. and password to log in to WeChat. The process of logging in to WeChat by entering your account number and password is authentication.
Why does the system need to be authenticated?
Authentication is to protect the privacy data and resources of the system. Only users with legal identities can access the resources of the system.
Authentication: User authentication is the process of determining whether a user’s identity is legal. When a user accesses system resources, the system requires verification of the user’s identity information. Only if the identity is legal can the user continue to access, otherwise access will be denied if it is illegal. Common user identity authentication methods include: username and password login, QR code login, mobile phone SMS login, fingerprint authentication, etc.
2. What is a session
After the user is authenticated, the user’s information can be guaranteed to be in the session in order to avoid authentication for every operation of the user. Session is the mechanism provided by the system to maintain the login status of the current user. Common ones include session-based method, token-based method, etc.
The session-based authentication method is as shown below:

Its interaction process is that after the user authentication is successful, user-related data is generated on the server and stored in the session (current session), and the session_id sent to the client is stored in the cookie, so that the user can verify the session_id when the client requests it. Whether there is session data on the server side to complete the user’s legal verification. When the user exits the system or the session expires and is destroyed, the client’s session_id will be invalid.
The token-based method is as shown below:

Its interaction process is that after the user authentication is successful, the server generates a token and sends it to the client. The client can put it in a cookie or localStorage storage, and bring the token with each request. The server receives the token and passes the verification. User identity can be confirmed.
The session-based authentication method is customized by the Servlet specification. The server needs to occupy memory resources to store session information, and the client needs to support cookies. The token-based method generally does not require the server to store tokens, and does not limit the client’s storage method. In today’s mobile Internet era, more types of clients need to access the system. The system is mostly implemented using a front-end and back-end separation architecture, so the token-based approach is more suitable.
3. What is authorization
Let’s take WeChat as an example. After successfully logging in to WeChat, users can use WeChat functions, such as sending red envelopes, sending to Moments, adding friends, etc. Users who have not bound a bank card cannot send red envelopes, and those who have bound a bank card cannot send red envelopes. Only users can send red envelopes. The red envelope sending function and the friend circle function are WeChat resources, that is, functional resources. Only users who have the authority to send red envelopes can use the red envelope function normally, and only those who have the authority to send friends can use the friend sending function. Circle function, this process of controlling the user’s use of resources based on the user’s permissions is authorization.
Why authorize?
Authentication is to ensure the legitimacy of the user’s identity, and authorization is to divide private data in a more fine-grained manner. Authorization occurs after the authentication is passed, and controls different users’ ability to access different resources.
Authorization: Authorization is the process of user authentication to control user access to resources based on the user’s permissions. If you have access permissions to resources, you will have normal access, and if you don’t have permissions, you will deny access.
4. Authorized data model
How to authorize, that is, how to control user access to resources, first requires learning the authorization-related data model.
Authorization can be simply understood as Who performs How operations on What (which), including the following:
Who, that is, Subject, generally refers to a user or a program that needs to access resources in the system. What refers to resources, such as system menus, pages, buttons, code methods, system product information, system order information, etc. System menus, pages, buttons, and code methods all belong to system functional resources. For web systems, each functional resource usually corresponds to a URL; system product information and system order information all belong to entity resources (data resources). Entity resources consist of resource types and resources. Instance composition, for example, product information is a resource type, and the product with product number 001 is a resource instance. How, permission/permission (Permission), stipulates the user’s permission to operate the resource. Permissions have no meaning without the resource, such as user query permission, user addition permission, calling permission of a certain code method, modification permission of the user numbered 001, etc. , through permissions, you can know what operation permissions the user has for which resources.

The data models related to subjects, resources, and permissions are as follows:
Subject (user id, account number, password,…)
Permissions (permission id, permission identification, permission name, resource name, resource access address,…)
Role (role id, role name,…)
Role and permission relationship (role id, permission id,…)
Subject (user) and role relationship (user id, role id,…)

2. SpringSecurity
Spring is a very popular and successful Java application development framework, and Spring Security is a member of the Spring family. Spring Security is based on the Spring framework and provides a complete solution for web application security.
1.Core functions of SpringSecurity
User authentication (Authentication): The system determines whether the user can log in
User authorization (Authorization): The system determines whether the user has the authority to do certain things
2.SpringSecurity features
Part of the Spring technology stack, seamlessly integrated with Spring.
Comprehensive permission control, providing complete and scalable authentication and authorization support protection
Specifically designed for web development.
Heavyweight, requiring the introduction of various family components and dependencies
3. SpringSecurity Quick Start
1. Create springboot project
Add the core jar to the corresponding pom file
<dependency>
    <groupId>org.springframework.boot</groupId>
    <artifactId>spring-boot-starter-security</artifactId>
</dependency>
2. The page displayed when running the project

3. Log in
When logging in to this page, the default username is user and the password is displayed on the console.

After entering your username and password, you can access successfully.
4. Custom username and password
1. Setting through configuration file

At this point, run it again to use your custom username and password.
2. Configuration through configuration class
Spring Security without the WebSecurityConfigurerAdapter


Both of the above configuration classes are available
3. Customize the implementation class to complete user login
form login
Form Login::Spring Security
UserDetailsService interface explanation:
In actual projects, the account number and password are queried from the database. So we have to control the authentication logic through custom logic. If you need custom logic, you only need to implement the UserDetailsService interface.


User is the UserDetails implementation class. We can also use the User entity class:

Write an implementation class to implement the UserDetailsService interface:
@Service
public class MyUserService implements UserDetailsService {
    /**
     * Return user information based on user name
     * @param s
     * @return
     * @throws UsernameNotFoundException
     */
    @Override
    public UserDetails loadUserByUsername(String s) throws UsernameNotFoundException {
        // Get the entered username s
        System.out.println("The entered user name is ============:" + s);
        List<GrantedAuthority> roles = new ArrayList<>();
        roles.add(new SimpleGrantedAuthority("admin"));
        User user = new User("yyl",new BCryptPasswordEncoder().encode("123456"),roles);
        return user;
    }
}
Modify configuration class:
SecurityConfig
@Configuration
public class SecurityConfig extends WebSecurityConfigurerAdapter {
    // Need to inject userDetailService
    @Resource
    private UserDetailsService userDetailsService;
    @Override
    protected void configure(AuthenticationManagerBuilder auth) throws Exception {
       // super.configure(auth);
        auth.userDetailsService(userDetailsService).passwordEncoder(getPassword());
    }
    //Inject the password bean
    public PasswordEncoder getPassword(){
        return new BCryptPasswordEncoder();
    }
    }
5. Custom page and permission control
1. Customized login page
1.1 Create an html file
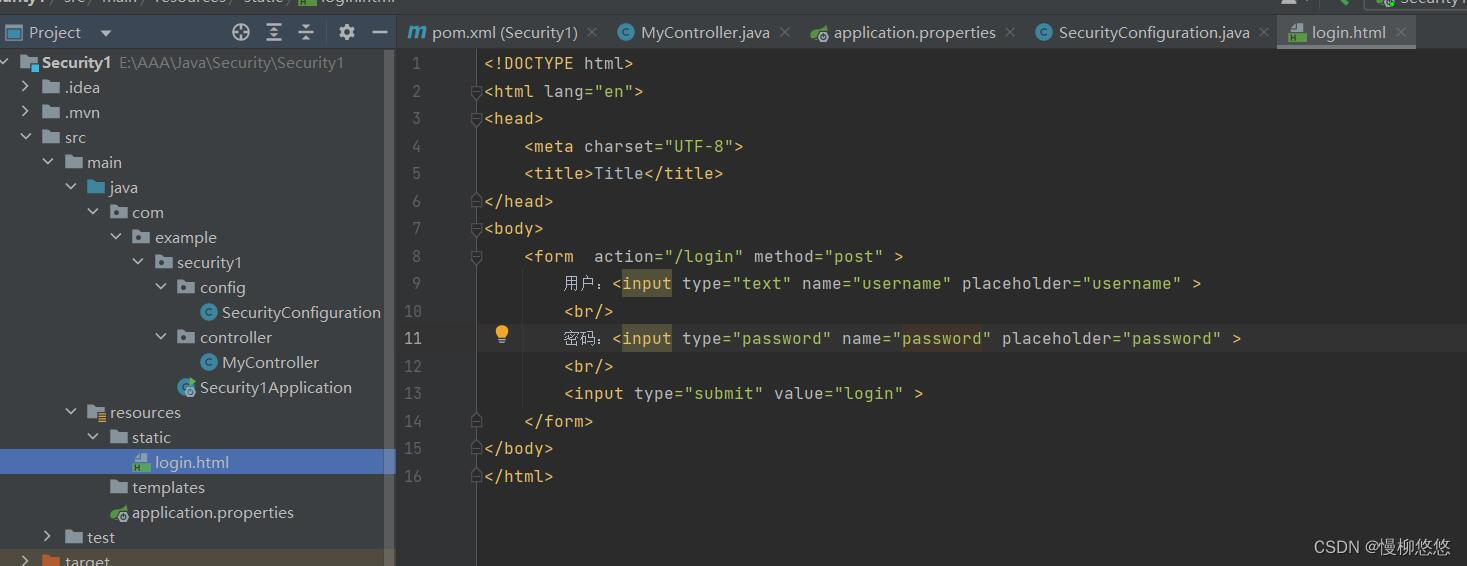
1.2 Configure in config

1.3 Notes


2. Customize login success page
2.1 Create a new SuccessController

2.2 Add default path in config

When logging in from login.html, if the login is successful, it will jump to the /success path.
3. User permissions
3.1 Add designated user access to the web page

3.2 Add second user ADMIN

3.3 Test
Access path http://localhost:8080/test jump to login test


Visit the path http://localhost:8080/test again and jump to log in test2


4. Resource permissions
4.1 Only specified resources can be used to access web pages

4.2 Specify resources for users

4.3 Test
Access path http://localhost:8080/test jump to login test

Visit the path http://localhost:8080/test again and jump to log in test2


5. Use resources to add role permissions
5.1 Only specified resources can be used to access web pages

5.2 Use resources to add roles and users get roles

5.3 Test
Access path http://localhost:8080/test jump to login test


Visit the path http://localhost:8080/test again and jump to log in test2


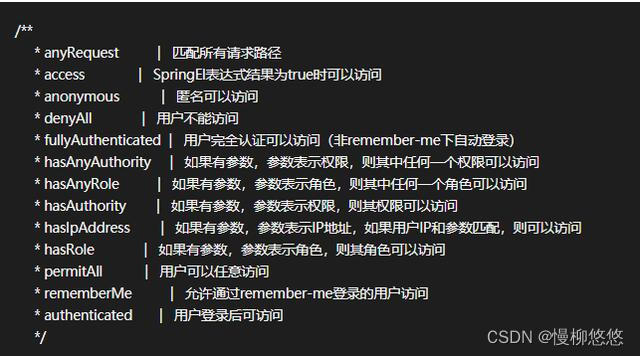
6. Other related methods
7.Customized 403 page
Page content written by yourself
Need to be added in the configuration file
http.exceptionHandling().accessDeniedPage("/403.html")
6. Using annotations
1. Before using annotations
Before using annotations, you need to add annotations to the starter or configuration class:
@EnableGlobalMethodSecurity(securedEnabled=true,prePostEnabled = true,jsr250Enabled=true)

2.@Secured: Determine whether it has a role
Specify roles to access web pages
Note: When using this annotation, the corresponding role information must appear in the form of ROLE_**, otherwise it will not be recognized.
@Secured({"ROLE_admin"})
@RequestMapping("testSecured")
public String testSecured() {
    return "testSecured";
}

Assign roles to users

test
Access path http://localhost:8080/testSecured jump to login test


Access path http://localhost:8080/testSecured jumps to login test2


3.@RolesAllowed: Determine whether there is a role
Specify roles to access web pages
Note: This annotation does not need to be prefixed with ROLE_
@RolesAllowed({"ADMIN"})
    @RequestMapping("testSecured")
    public String testSecured() {
        return "testSecured";
    }

Assign roles to users

The test access result is the same as 1
4.@RolesAllowed: Determine whether there is a role
Note: This annotation does not need to be prefixed with ROLE_
@RolesAllowed({"admin"})
@RequestMapping("testSecured")
public String testSecured() {
    return "testSecured";
}
5.@PreAuthorize: Perform permission verification before entering the method
@PreAuthorize can pass the permission parameters of the logged in user into the method.
 @RequestMapping("/preAuthorize")
//@PreAuthorize("hasRole('ROLE_admin')")
    @PreAuthorize("hasAnyAuthority('findAll')")
    public String preAuthorize(){
        System.out.println("preAuthorize");
        return "preAuthorize";
    }
@PostAuthorize: Permission verification is performed after the method is executed, suitable for verifying permissions with return values:
The knowledge points of the article match the official knowledge files, and you can further learn related knowledge. Java Skill TreeHomepageOverview 139134 people are learning the system