AutoX.js – openCV multi-resolution image search
1. Cause
There are two methods related to finding images in AutoXjs, findImage and matchTemplate. I have never found any problems before. However, when I tested the image search recently, the outlines of the large image and the template image were clear, but I could not find the image. This reduced the problem. The results found after setting the threshold parameter were messy. After carefully comparing the images, I found the reason. It turned out that the large image was 1.2 times smaller than the image when cutting out the template. The overall pixel difference was only 0.2 times, causing the image search to fail.
So I went through the specific implementation code of AutoX and found that this part of the code was inherited from autojs 5 years ago. The specific code file is: TemplateMatching.java
The implementation principle is to use the Imgproc.matchTemplate method of opencv. The following is part of the code document:
/**
 * Use image pyramid algorithm to quickly find images
 *
 * @param img picture
 * @param template template picture
 * @param matchMethod matching algorithm
 * @param weakThreshold weak threshold. This value is used to check whether to continue matching in each round of template matching. If the similarity is less than this value, matching will not continue.
 * @param strictThreshold strong threshold. This value is used to check the final matching result, and in each round of matching, if the similarity is greater than this value, the matching result is returned directly.
 * @param maxLevel The number of layers of the image pyramid
 * @return
 */
public static List<Match> fastTemplateMatching(Mat img, Mat template, int matchMethod, float weakThreshold, float strictThreshold, int maxLevel, int limit) {<!-- -->
    TimingLogger logger = new TimingLogger(LOG_TAG, "fast_tm");
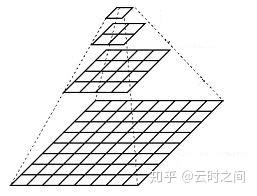
From this we can learn that it uses the “Image Pyramid Algorithm to quickly find images” processing method. The general process is as follows. First, both the large image and the template image are scaled proportionally. For example, the width and height are reduced to 1/4 of the original size. 2. If the point P1 that meets the threshold can be found at this time, then the point P1 in the large image with richer image details must also meet the threshold. If the image is scaled down first, the size of the matrix representing the image will also become smaller. In this way, when performing image search, the overall calculation amount will be reduced, and the image search efficiency will be greatly improved.
The pyramid algorithm used here quickly finds images. The image size transformation is like a pyramid. Every time you raise a layer, the image changes and the width and height are reduced by half. The level parameter in the method controls the starting level of image search. Search images from top to bottom starting from the level layer, level=0, That is, the bottom layer of the pyramid is a one-to-one comparison between the original image and the template. For example: level=2 means starting from the 3rd layer and looking downwards for the image. First find the matching point >=threshold threshold on the 3rd layer and add it to the final result. The remaining
I originally thought that by increasing the level parameter, I could ignore the problem of finding images when the large image is enlarged 1.2 times, but if the level is too high, the image will be crowded into a ball. I then tried to lower the threshold. Although I got several results, they were all irrelevant. The location is completely unusable. If you think about it carefully, the level parameter only controls the efficiency of image finding. This method of quickly finding images is not suitable for image finding scenarios after the resolution of large images or template images changes. This situation is very common, such as in The script developed on your mobile phone is placed on a tablet or other mobile phone models, resulting in failure to find images. Another example is the picture change caused by two-finger zooming in the game scene.
In order to adapt to image-finding scenarios where the resolution of large images may change, I referred to the image-finding code in AutoX and re-implemented a version using js. Since I have only looked at the relevant source code of the picture-finding part and am not familiar with other codes of the project, I do not plan to contribute to the project by submitting PR for the time being. Friends who are capable can improve this part of the function.
2. Specific implementation
I have added documentation and comments to the key parts. It doesn’t matter if you don’t have time to read them. Just look at the examples in the main() method and it will work out of the box.
importClass(org.opencv.imgproc.Imgproc);
importClass(org.opencv.core.Core);
importClass(org.opencv.core.Rect);
importClass(org.opencv.core.Mat);
importClass(org.opencv.core.Point);
importClass(org.opencv.core.Size);
importClass(org.opencv.core.CvType);
importClass(org.opencv.core.Scalar);
importClass(org.opencv.imgcodecs.Imgcodecs);

/**
 * @param {number[]} region is an array of two or four elements.
 * (region[0], region[1]) represents the upper left corner of the color-finding area; region[2]*region[3] represents the width and height of the color-finding area. If there are only two elements in the region, the color search area is (region[0], region[1]) to the lower right corner of the screen.
 * If the region option is not specified, the color-finding area is the entire image.
 * @param {*} img
 * @returns {org.opencv.core.Rect}
 */
function buildRegion(region, img) {<!-- -->
  if (region == undefined) {<!-- -->
    region = [];
  }
  let x = region[0] === undefined ? 0 : region[0];
  let y = region[1] === undefined ? 0 : region[1];
  let width = region[2] === undefined ? img.getWidth() - x : region[2];
  let height = region[3] === undefined ? img.getHeight() - y : region[3];
  if (x < 0 || y < 0 || x + width > img.width || y + height > img.height) {<!-- -->
    throw new Error(
      'out of region: region = [' + [x, y, width, height] + '], image.size = [' + [img.width, img.height] + ']'
    );
  }
  return new Rect(x, y, width, height);
}

/**
 * @param {number} threshold Image similarity. A floating point number with a value ranging from 0 to 1. The default value is 0.9
 * @param {number[]} region Find image area
 * @param {number[]} scaleFactors The width and height scaling factors of the large image, the default is [1, 0.9, 1.1, 0.8, 1.2]
 * @param {number} max The maximum number of image search results, the default is 5
 * @param {boolean} grayTransform Whether to perform grayscale preprocessing, the default is true.
 * Normally converting the image to grayscale can simplify the matching process and improve the accuracy of matching. Of course, if the color information in your matching task is important to the matching result,
 * You can skip the grayscale step and perform template matching directly on color images.
 */
function MatchOptions(threshold, region, scaleFactors, max, grayTransform) {<!-- -->
  this.threshold = threshold;
  this.region = region;
  this.scaleFactors = scaleFactors;
  this.max = max;
  this.grayTransform = grayTransform;
}

const defaultMatchOptions = new MatchOptions(
  0.9,
  undefined,
  [
    [1, 1],
    [0.9, 0.9],
    [1.1, 1.1],
    [0.8, 0.8],
    [1.2, 1.2]
  ],
  5,
  true
);
//Verify parameters
MatchOptions.check = function (options) {<!-- -->
  if (options == undefined) {<!-- -->
    return defaultMatchOptions;
  }
  // deep copy
  let newOptions = JSON.parse(JSON.stringify(options));
  if (newOptions.threshold == undefined) {<!-- -->
    newOptions.threshold = defaultMatchOptions.threshold;
  }
  if (newOptions.region & amp; & amp; !Array.isArray(newOptions.region)) {<!-- -->
    throw new TypeError('region type is number[]');
  }
  if (newOptions.max == undefined) {<!-- -->
    newOptions.max = defaultMatchOptions.max;
  }
  if (newOptions.scaleFactors == undefined) {<!-- -->
    newOptions.scaleFactors = defaultMatchOptions.scaleFactors;
  } else if (!Array.isArray(newOptions.scaleFactors)) {<!-- -->
    throw new TypeError('scaleFactors');
  }
  for (let index = 0; index < newOptions.scaleFactors.length; index + + ) {<!-- -->
    let factor = newOptions.scaleFactors[index];
    if (Array.isArray(factor) & amp; & amp; factor[0] > 0 & amp; & amp; factor[1] > 0) {<!-- -->
      // nothing
    } else if (typeof factor === 'number') {<!-- -->
      newOptions.scaleFactors[index] = [factor, factor];
    } else {<!-- -->
      throw new TypeError('scaleFactors');
    }
  }
  if (newOptions.grayTransform === undefined) {<!-- -->
    newOptions.grayTransform = defaultMatchOptions.grayTransform;
  }

  return newOptions;
};

function Match(point, similarity, scaleX, scaleY) {<!-- -->
  this.point = point;
  this.similarity = similarity;
  this.scaleX = scaleX;
  this.scaleY = scaleY;
}

/**
 * Find the picture and find all matching positions in the picture
 * @param {Image} img
 * @param {Image} template
 * @param {MatchOptions} options parameters are defined above
 * @returns {Match[]}
 */
function matchTemplate(img, template, options) {<!-- -->
  if (img == null || template == null) {<!-- -->
    throw new Error('ParamError');
  }
  options = MatchOptions.check(options);
  console.log('Parameters:', options);

  let largeMat = img.mat;
  let templateMat = template.mat;
  let largeGrayMat;
  let templateGrayMat;
  if (options.region) {<!-- -->
    options.region = buildRegion(options.region, img);
    largeMat = new Mat(largeMat, options.region);
  }
  //Grayscale processing
  if (options.grayTransform) {<!-- -->
    largeGrayMat = new Mat();
    Imgproc.cvtColor(largeMat, largeGrayMat, Imgproc.COLOR_BGR2GRAY);
    templateGrayMat = new Mat();
    Imgproc.cvtColor(templateMat, templateGrayMat, Imgproc.COLOR_BGR2GRAY);
  }
  // ================================================ =
  let finalMatches = [];
  for (let factor of options.scaleFactors) {<!-- -->
    let [fx, fy] = factor;
    let resizedTemplate = new Mat();
    Imgproc.resize(templateGrayMat || templateMat, resizedTemplate, new Size(), fx, fy, Imgproc.INTER_LINEAR);
    //Perform template matching, standardized correlation coefficient matching method
    let matchMat = new Mat();
    Imgproc.matchTemplate(largeGrayMat || largeMat, resizedTemplate, matchMat, Imgproc.TM_CCOEFF_NORMED);

    let currentMatches = _getAllMatch(matchMat, resizedTemplate, options.threshold, factor, options.region);
    console.log('Scale ratio:', factor, 'Number of suspicious targets:', currentMatches.length);
    for (let match of currentMatches) {<!-- -->
      if (finalMatches.length === 0) {<!-- -->
        finalMatches = currentMatches.slice(0, options.max);
        break;
      }
      if (!isOverlapping(finalMatches, match)) {<!-- -->
        finalMatches.push(match);
      }
      if (finalMatches.length >= options.max) {<!-- -->
        break;
      }
    }
    resizedTemplate.release();
    matchMat.release();
    if (finalMatches.length >= options.max) {<!-- -->
      break;
    }
  }
  largeMat !== img.mat & amp; & amp; largeMat.release();
  largeGrayMat & amp; & amp; largeGrayMat.release();
  templateGrayMat & amp; & amp; templateGrayMat.release();

  return finalMatches;
}

function _getAllMatch(tmResult, templateMat, threshold, factor, rect) {<!-- -->
  let currentMatches = [];
  let mmr = Core.minMaxLoc(tmResult);

  while (mmr.maxVal >= threshold) {<!-- -->
    // Take the maximum value and position in the matching results each time, so that the results are sorted from high to low by similarity index
    let pos = mmr.maxLoc; // Point
    let value = mmr.maxVal;

    let start = new Point(Math.max(0, pos.x - templateMat.width() / 2), Math.max(0, pos.y - templateMat.height() / 2));
    let end = new Point(
      Math.min(tmResult.width() - 1, pos.x + templateMat.width() / 2),
      Math.min(tmResult.height() - 1, pos.y + templateMat.height() / 2)
    );
    // Block the matched area
    Imgproc.rectangle(tmResult, start, end, new Scalar(0), -1);
    mmr = Core.minMaxLoc(tmResult);

    if (rect) {<!-- -->
      pos.x + = rect.x;
      pos.y + = rect.y;
      start.x + = rect.x;
      start.y + = rect.y;
      end.x + = rect.x;
      end.y + = rect.y;
    }
    let match = new Match(pos, value, factor[0], factor[1]);
    //Save the approximate range of matching points for subsequent deduplication. Setting enumerable to false is equivalent to declaring it a private property
    Object.defineProperty(match, 'matchAroundRect', {<!-- --> value: new Rect(start, end), writable: true, enumerable: false });
    currentMatches.push(match);
  }

  return currentMatches;
}

/**
 * Determine whether the newly detected point coincides with a previous point.
 * @param {Match[]} matches
 * @param {Match} newMatch
 * @returns {boolean}
 */
function isOverlapping(matches, newMatch) {<!-- -->
  for (let existingMatch of matches) {<!-- -->
    // The distance between two points can also be determined, but square and square root operations are not as simple and efficient as comparing ranges.
    if (existingMatch.matchAroundRect.contains(newMatch.point)) {<!-- -->
      if (newMatch.similarity > existingMatch.similarity) {<!-- -->
        existingMatch.point = newMatch.point;
        existingMatch.similarity = newMatch.similarity;
        existingMatch.scaleX = newMatch.scaleX;
        existingMatch.scaleY = newMatch.scaleY;
        existingMatch.matchAroundRect = newMatch.matchAroundRect;
      }
      return true;
    }
  }
  return false;
}
/**
 * Draw a frame on the original image based on the image search results
 * @param {Match[]} matches
 * @param {*} srcMat
 * @param {*} templateMat
 */
function showMatchRectangle(matches, srcMat, templateMat) {<!-- -->
  for (let match of matches) {<!-- -->
    let start = match.point;
    let end = new Point(
      match.point.x + templateMat.width() * match.scaleX,
      match.point.y + templateMat.height() * match.scaleY
    );
    Imgproc.rectangle(srcMat, start, end, new Scalar(0, 0, 255), 3);
  }

  const saveName = '/sdcard/Download/temp.jpg';
  let img2 = images.matToImage(srcMat);
  images.save(img2, saveName);
  app.viewFile(saveName);
  img2.recycle();
}

function main() {<!-- -->
  let largeImage = images.read('/sdcard/Download/large.jpg');
  let template = images.read('/sdcard/Download/template.jpg');

  console.log('Large image size:', [largeImage.getWidth(), largeImage.getHeight()]);
  console.log('Template size:', [template.getWidth(), template.getHeight()]);

  let startTs = Date.now();
  let result = matchTemplate(largeImage, template, {<!-- -->
    threshold: 0.85,
    region: [100, 100],
    grayTransform: false,
    scaleFactors: [1, 0.9, 1.1, 0.8, 1.2],
    max: 6
  });
  console.log('Time to find pictures:', (Date.now() - startTs) / 1000);
  console.log(result);
  // Display the result frame
  showMatchRectangle(result, largeImage.mat, template.mat);
  template.recycle();
  largeImage.recycle();
}

//Initialize openCV
runtime.getImages().initOpenCvIfNeeded();
main();
Remarks
-
The parameters
threhold,region, andmaxare the same as those in AutoX. -
grayTransform: Whether to perform grayscale preprocessing on the image. Turning it on can greatly improve the efficiency of image finding. The default is true.
For template matching tasks, it is usually the texture and brightness changes of the image that are of interest, rather than color differences. Therefore, converting images into grayscale images can reduce computational complexity, reduce noise interference in the template matching process, and improve the stability and accuracy of matching. Especially for some image search scenes where the color around the target pattern is uncertain, after grayscale processing is turned on, a matching point with higher accuracy will be found regardless of how the color around the target changes. If the texture in your template image is not obvious, or it is a group of color blocks with similar colors, you must turn off this function. -
scaleFactors: It is the scaling factor for small picture template, array type, the default is
[1, 0.9, 1.1, 0.8, 1.2]. Each item can be a number, indicating the proportional scaling of width and height, or an array of length 2, indicating the scaling ratio corresponding to width and height, for example:[0.9, 1, [1.1, 1.2]]It is important to emphasize here that I have not found any image search method in openCV that can be used directly to ignore the difference in image proportions. I can only manually specify the possible zoom range, scale the small image template in turn, and then search for images. Theoretically, as long as you set enough (non-repetitive) scaling factors, you will be able to find the target, unless there is no in the picture.
-
The wonderful use of the max parameter: During the image search process, by default it will exit when the first max matching points that meet the threshold are found, but there may be a situation, for example, it is found first when the zoom ratio is 1.1 For point P1 with a similarity of 0.8, if max matching points have not been found at this time, when the subsequent ratio is 1.2 and the similarity at point P1 is detected to be increased to 0.9, the information of the original point P1 is updated to More accurate information. Understand this, if you set max to a very large value, my image search algorithm will detect all the scaling factors set in
scaleFactorsand will not end early. Then all the final results will be The Match object stores information about the best matching points. You can rely on the scaleX and scaleY information in the final result to dynamically adjust thescaleFactorsparameters to prioritize matching the best scaling ratio and improve subsequent The picture-finding efficiency.
3. Test results display
The following is a test data. The template image is a nearly white light group. When using 5 scaling factors, comparing the conditions where the grayTransform parameter is turned on and off, the execution efficiency is quite different. times, and the image search results are also different.
I hope everyone will understand the effects of changing each parameter when using it.
-
Template thumbnail

-
Image finding results under 5 zoom factors

-
Turn on grayscale processing

-
Grayscale processing is not enabled


Continuously updated link: Android automation-AutoX multi-resolution image search