The price of orangepi Zero3 is very affordable recently, so it is more cost-effective to do projects.
Since the previous Nanopi NEO3 development board was a plastic box and the CPU had integrated aluminum alloy heat dissipation, they did not have a fan to cool down, resulting in frequent crashes as the temperature soared to 80-90 degrees.
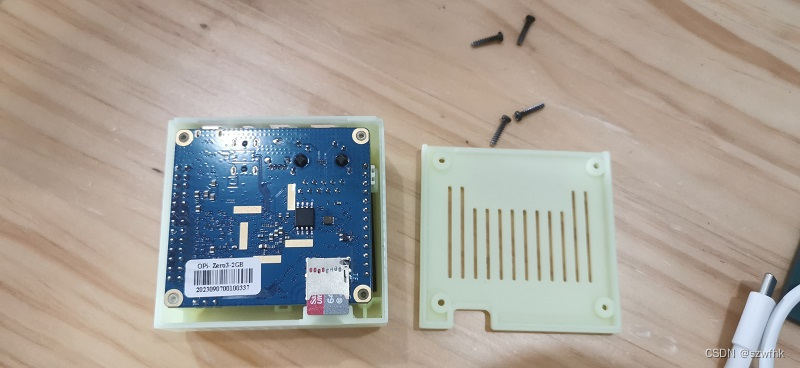
One, materials:
1. Zero3 (2G) separate motherboard + heat sink + 32G-TF card.
2. The plastic casing + fan + built-in antenna purchased from a certain website.
3. S8050 transistor + 100 ohm resistor + some heat shrink tubes.
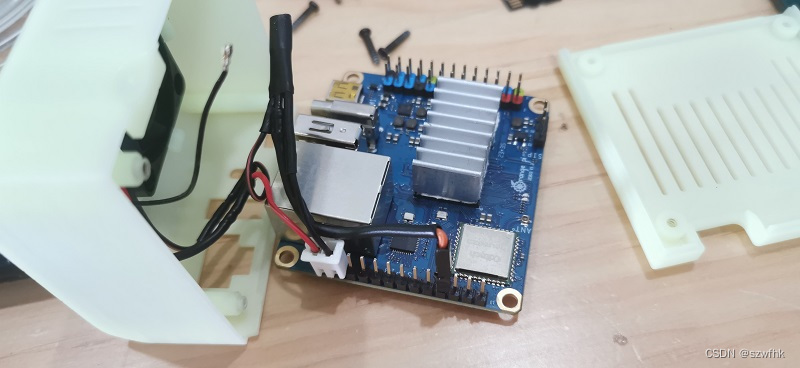
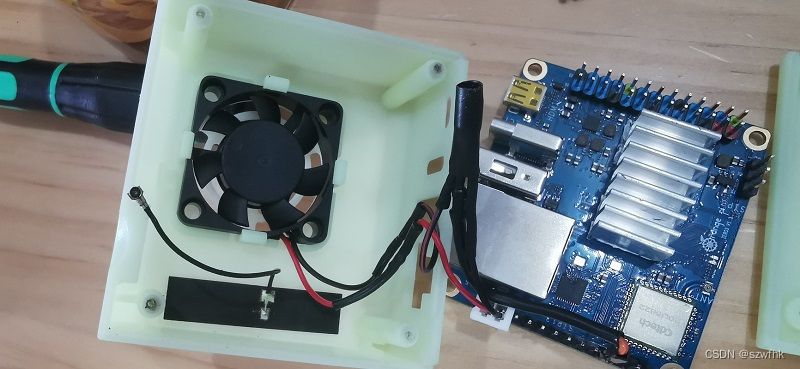
Wiring diagram:


Two, flash the machine,
Download from the official website/: Orange Pi Zero3
Follow the instructions to flash the machine: I flashed: Orangepizero3_1.0.0_debian_bookworm_server_linux6.1.31.
You can flash other systems, Ubuntu mirrors, Debian mirrors, etc. according to the actual situation.
Three, install wiringOP-Python according to the user manual.
Quoting the content of the OrangePi_Zero3_H618_User Manual_v1.1.pdf user manual is as follows:
3.19. How to install and use wiringOP-Python
wiringOP-Python is the Python language version of wiringOP, used in Python programs
Operate hardware resources such as GPIO, I2C, SPI and UART of the development board.
Also please note that all the following commands are operated under the root user.
3.19.1. Installation method of wiringOP-Python
1) First install dependency packages
root@orangepi:~# sudo apt-get update
root@orangepi:~# sudo apt-get -y install git swig python3-dev python3-setuptools
2) Then use the following command to download the source code of wiringOP-Python
Note that the following git clone–recursive command will automatically download the source code of wiringOP because
wiringOP-Python is dependent on wiringOP. Please make sure there are no errors during the download process due to network problems.
If there is a problem downloading the code from GitHub, you can directly use the one that comes with the Linux image.
wiringOP-Python source code, storage location: /usr/src/wiringOP-Python.
root@orangepi:~# git clone –recursive https://github.com/orangepi-xunlong/wiringOP-Python -b next
root@orangepi:~# cd wiringOP-Python
root@orangepi:~/wiringOP-Python# git submodule update –init –remote
3) Then use the following command to compile wiringOP-Python and install it into the Linux system of the development board
root@orangepi:~# cd wiringOP-Python
root@orangepi:~/wiringOP-Python# python3 generate-bindings.py > bindings.i
root@orangepi:~/wiringOP-Python# sudo python3 setup.py install
4) Then enter the following command. If helpful information is output, wiringOP-Python is installed successfully.
Press the q key to exit the help information interface
root@orangepi:~/wiringOP-Python# python3 -c “import wiringpi; help(wiringpi)”
Help on module wiringpi:
NAME
wiringpi
2) The steps to test directly with commands are as follows:
a. First set the GPIO port to output mode, where the first parameter of the pinMode function is the pin pair
The corresponding wPi serial number, the second parameter is the GPIO mode
root@orangepi:~/wiringOP-Python# python3 -c “import wiringpi; \
from wiringpi import GPIO; wiringpi.wiringPiSetup() ; \
wiringpi.pinMode(2, GPIO.OUTPUT); “
b. Then set the GPIO port to output a low level. After setting, you can use a multimeter to measure the voltage of the pin.
Value, if it is 0v, it means setting low level successfully
root@orangepi:~/wiringOP-Python# python3 -c “import wiringpi; \
from wiringpi import GPIO; wiringpi.wiringPiSetup() ;\
wiringpi.digitalWrite(2, GPIO.LOW)”
c. Then set the GPIO port to output a high level. After setting, you can use a multimeter to measure the voltage of the pin.
Value, if it is 3.3v, it means setting high level successfully
root@orangepi:~/wiringOP-Python# python3 -c “import wiringpi; \
from wiringpi import GPIO; wiringpi.wiringPiSetup() ;\
wiringpi.digitalWrite(2, GPIO.HIGH)”
3) The steps for testing in the command line of python3 are as follows:
a. First use the python3 command to enter the command line mode of python3
root@orangepi:~# python3
b. Then import the python module of wiringpi
>>> import wiringpi
>>> from wiringpi import GPIO
c. Then set the GPIO port to output mode, where the first parameter of the pinMode function is the pin pair
The corresponding wPi serial number, the second parameter is the GPIO mode
>>> wiringpi.wiringPiSetup()
0
>>> wiringpi.pinMode(2, GPIO.OUTPUT)
d. Then set the GPIO port to output low level. After setting, you can use a multimeter to measure the voltage of the pin.
Value, if it is 0v, it means setting low level successfully
>>> wiringpi.digitalWrite(2, GPIO.LOW)
e. Then set the GPIO port to output a high level. After setting, you can use a multimeter to measure the voltage of the pin.
Value, if it is 3.3v, it means setting high level successfully
>>> wiringpi.digitalWrite(2, GPIO.HIGH)
The test code is as follows.
import wiringpi
from wiringpi import GPIO
wiringpi.wiringPiSetup()
wiringpi.pinMode(17, GPIO.OUTPUT)
wiringpi.digitalWrite(17, GPIO.LOW)
wiringpi.digitalWrite(17, GPIO.HIGH)
Note: 17 corresponds to the fourth pin of GPIO. Other pins can also be used as GPIO pins. You can select according to the instructions.
root@orangepizero3:~# gpio readall # to query the foot status.

Four, pictures of my actual wiring locations.


5. Python program running code for cooling fan:
# -*- coding:utf-8 -*-

"""
Turn the fan on and off based on Orange-Pi CPU temperature
"""

import time,os
import wiringpi
from wiringpi import GPIO
import logging

GPIO_OUT = 17
START_TEMP = 60
CLOSE_TEMP = 45
DELAY_TIME = 5
LOG_PATH = '/var/log/fan_control.log'

logging.basicConfig(level=logging.DEBUG,
                    format='%(asctime)s %(filename)s[line:%(lineno)d] %(levelname)s %(message)s', # Log format
                    datefmt='%Y-%m-%d %H:%M:%S', # Time format
                    filename=LOG_PATH, # Log output path
                    filemode='a') # Append mode

def get_cpu_temperature():
    """
    Get the CPU temperature, read the contents of /sys/class/thermal/thermal_zone0/temp, divide by 1000 to get the temperature
    :return: float
    """
    with open("/sys/class/thermal/thermal_zone0/temp", 'r') as f:
        temperature = float(f.read()) / 1000
    return temperature


def start_fan(temp):
    """
    Turn on the fan
    :param temp: CPU temperature
    :return:
    """
    logging.info('power on fan, temp is %s' % temp)
    # The circuit is turned on when a low level is applied to the base of the PNP transistor. The opposite is true for the NPN transistor.
    wiringpi.digitalWrite(GPIO_OUT, GPIO.HIGH)


def stop_fan(temp):
    """
    Turn off the fan
    :param temp: CPU temperature
    :return:
    """
    logging.info('power off fan, temp is %s' % temp)
    # Apply high level to the base level
    wiringpi.digitalWrite(GPIO_OUT, GPIO.LOW)


def setup_GPIO():
    """
    GPIO initialization
    Fan set to off
    :return:
    """
    wiringpi.wiringPiSetup()
    wiringpi.pinMode(GPIO_OUT, GPIO.OUTPUT)


def control_fan():
    is_closed = True
    try:
        while True:
            temp = get_cpu_temperature()
            logging.debug("temperature: %s" % temp)
            # Turn on the fan when the temperature is greater than START_TEMP, turn off the fan when it is less than CLOSE_TEMP
            if (temp > START_TEMP and is_closed):
                start_fan(temp)
                is_closed = False
            elif (temp < CLOSE_TEMP and not is_closed):
                stop_fan(temp)
                is_closed = True
            else:
                pass
            time.sleep(DELAY_TIME)
    except Exception as e:
        GPIO.cleanup()
        logging.error(e)

if __name__ == '__main__':
    os.environ["TZ"] = 'Asia/Shanghai'
    time.tzset()
    logging.info('started control fan...')
    setup_GPIO()
    control_fan()
    logging.info('quit started control fan...')
Reference links:
Raspberry Pi realizes temperature control fan_Raspberry Pi fan pin-CSDN Blog
Sixth, add python script and automatically run the program at startup.
1, add python program.
root@orangepizero3:~# sudo vim smartfan.py
Run the above cooling fan python program code: copy it inside, then Esc to exit: wq to save.
2, run and debug it first.
sudo python -u /root/smartfan.py & amp;

After running and confirming that the code output is correct, proceed to the next step.
2, Let the Python script start automatically at boot
If the Python self-starting script is smartfan.py. Then edit the following files with root privileges:
sudo vim /etc/rc.local

Add the command to start the script above exit 0
nohup python -u /root/smartfan.py > /root/smartfan.log 2> & amp;1 & amp;
Then Esc to exit :wq to save.

Finally, restart Linux and the script will run automatically and print the log.
Seven, debugging status:
1. Check the temperature.
cat /sys/devices/virtual/thermal/thermal_zone0/temp

2. Run Pi and the CPU stress test to cause the CPU to heat up quickly.
root@orangepizero3:~# echo "scale=50000; 4*a(1)" | bc -l -q

3. Real-time query log records.
root@orangepizero3:~# tail -f /var/log/fan_control.log

4. When the temperature exceeds 60 degrees, the fan rotates. When the temperature is lower than 45 degrees, the fan stops rotating.

5. After running for a few days, I made a chart using Jupyter Notebook python. The CPU temperature has been fluctuating steadily between 45 degrees and 60 degrees.

Eight, the official Linux system comes with Docker.

Nine, end:
After adding heat dissipation and fans, it can be used for more purposes:
Linux desktop computer.
Linux web server.
openwrt routing box.
Print server.
Set up your own blog server.
Android TV TV box.
Orange Pi zero 3 plastic shell OrangePi Zero3 H618 development board shell heat dissipation shell
The knowledge points of the article match the official knowledge files, and you can further learn relevant knowledge. Python entry skill treeHomepageOverview 378316 people are learning the system