Service current limiting refers to the purpose of protecting services by controlling the rate or number of requests. In microservices, we usually use it together with fuses and downgrades to avoid loads on the system caused by a large number of instantaneous requests. To achieve the purpose of protecting the smooth operation of the service. Let’s take a look at the 6 common current limiting methods, as well as their implementation and use.
Fixed window algorithm
The fixed window algorithm maintains a counter within a unit of time, which can limit the number of requests passed in each fixed time period, so as to achieve the effect of current limiting.

The algorithm is also relatively simple to implement. You can specify the time window size and the number of requests allowed to pass through the parameters in the construction method. When a request enters, first compare whether the current time exceeds the upper boundary of the window. If it does not exceed the upper limit of the counter, the request can be released. .
@Slf4j
public class FixedWindowRateLimiter {
    // Time window size in milliseconds
    private long windowSize;
    // number of requests allowed
    private int maxRequestCount;

    // The count of requests passed by the current window
    private AtomicInteger count=new AtomicInteger(0);
    // window right border
    private long window Border;

    public FixedWindowRateLimiter(long windowSize, int maxRequestCount){
        this. windowSize = windowSize;
        this.maxRequestCount = maxRequestCount;
        windowBorder = System. currentTimeMillis() + windowSize;
    }

    public synchronized boolean tryAcquire(){
        long currentTime = System. currentTimeMillis();
        if (windowBorder < currentTime){
            log.info("window reset");
            do {
                windowBorder += windowSize;
            }while(windowBorder < currentTime);
            count=new AtomicInteger(0);
        }

        if (count.intValue() < maxRequestCount){
            count. incrementAndGet();
            log.info("tryAcquire success");
            return true;
        } else {
            log.info("tryAcquire fail");
            return false;
        }
    }
}
Run a test that allows 5 requests to go through in 1000ms:
void test() throws InterruptedException {
    FixedWindowRateLimiter fixedWindowRateLimiter
            = new FixedWindowRateLimiter(1000, 5);

    for (int i = 0; i < 10; i ++ ) {
        if (fixedWindowRateLimiter. tryAcquire()) {
            System.out.println("execute task");
        }else{
            System.out.println("Limited flow");
            TimeUnit. MILLISECONDS. sleep(300);
        }
    }
}
operation result:

The advantage of the fixed window algorithm is that it is simple to implement, but it may not be able to cope with burst traffic. For example, 100 requests are allowed to be released per second, but no requests come in before 0.9 seconds, which results in a period of 0.9 seconds to 1 second. 100 requests need to be processed within a certain period of time, and another 100 requests may be entered between 1 second and 1.1 seconds, which causes 200 requests to be processed within 0.2 seconds. This surge in traffic may cause abnormalities in backend services .

Sliding window algorithm
The sliding window algorithm has been upgraded to a certain extent on the basis of the fixed window. The core of its algorithm is to divide the time window into finer slices, divide the fixed window into multiple small blocks, and only slide a small block of time each time.

And a separate counter is maintained in each time period. Every time you slide, the number of requests in the previous time block is subtracted, and a new time block is added to the end. When all small time blocks in the time window When the sum of the counters exceeds the request threshold, the current limiting operation will be triggered.
Take a look at the implementation of the algorithm. The core is to maintain an independent counter in each time slice by recycling an array of type int:
@Slf4j
public class SlidingWindowRateLimiter {
    // Time window size in milliseconds
    private long windowSize;
    // Number of slice windows
    private int shardNum;
    // number of requests allowed
    private int maxRequestCount;
    // request count in each window
    private int[] shardRequestCount;
    // total number of requests
    private int totalCount;
    // Current window subscript
    private int shardId;
    // The size of each small window, in milliseconds
    private long tinyWindowSize;
    // window right border
    private long window Border;

    public SlidingWindowRateLimiter(long windowSize, int shardNum, int maxRequestCount) {
        this. windowSize = windowSize;
        this.shardNum = shardNum;
        this.maxRequestCount = maxRequestCount;
        shardRequestCount = new int[shardNum];
        tinyWindowSize = windowSize/ shardNum;
        windowBorder = System. currentTimeMillis();
    }

    public synchronized boolean tryAcquire() {
        long currentTime = System. currentTimeMillis();
        if (currentTime > windowBorder){
            do {
                shardId = ( + + shardId) % shardNum;
                totalCount -= shardRequestCount[shardId];
                shardRequestCount[shardId]=0;
                windowBorder += tinyWindowSize;
            }while (windowBorder < currentTime);
        }

        if (totalCount < maxRequestCount){
            log.info("tryAcquire success,{}",shardId);
            shardRequestCount[shardId] + + ;
            totalCount++;
            return true;
        }else{
            log.info("tryAcquire fail,{}",shardId);
            return false;
        }
    }

}
Conduct a test and modify the rules in the first example to allow 100 requests to pass through unchanged every 1 second. On this basis, divide each 1 second into 10 windows of 0.1 seconds.
void test() throws InterruptedException {
    SlidingWindowRateLimiterSlidingWindowRateLimiter
            = new SlidingWindowRateLimiter(1000, 10, 10);
    TimeUnit. MILLISECONDS. sleep(800);

    for (int i = 0; i < 15; i ++ ) {
        boolean acquire = slidingWindowRateLimiter. tryAcquire();
        if (acquire){
            System.out.println("execute task");
        }else{
            System.out.println("Limited flow");
        }
        TimeUnit. MILLISECONDS. sleep(10);
    }
}
Check the running results:

After the program starts, it sleeps for a period of time before initiating a request. It can be seen that 6 requests are released within the time window of 0.9 seconds to 1 second, and 4 requests are released within 1 second to 1.1 seconds, and then proceed In addition to current limiting, it solves the problem of allowing a large number of requests in adjacent time windows in the fixed window algorithm.
The sliding window algorithm can control the flow more finely by dividing the time slice into slices, but correspondingly wastes some storage space to maintain a separate count for each block of time, and has not solved the problem that may occur in the fixed window Traffic surge problem.
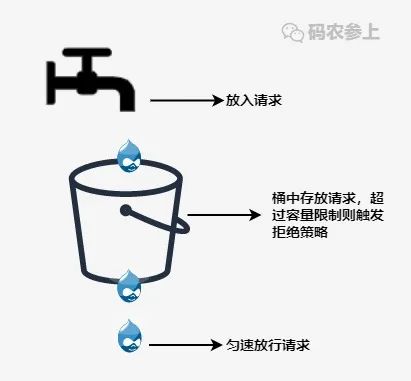
Leaky bucket algorithm
In order to deal with the problem of traffic surge, the leaky bucket algorithm was subsequently derived. In more professional terms, the leaky bucket algorithm can perform traffic shaping and traffic control.
A leaky bucket is a very vivid metaphor. External requests are continuously poured into the bucket like water, and the bucket has set a maximum water output rate. The leaky bucket will release the request at a constant speed at this rate. When the water exceeds the maximum capacity of the bucket is discarded.
Take a look at the code implementation:
@Slf4j
public class LeakyBucketRateLimiter {
    // bucket capacity
    private int capacity;
    // the amount of water in the bucket
    private AtomicInteger water=new AtomicInteger(0);
    // start leaking time
    private long leakTimeStamp;
    // The rate at which water flows out, that is, the number of requests allowed per second
    private int leakRate;

    public LeakyBucketRateLimiter(int capacity, int leakRate){
        this.capacity=capacity;
        this. leakRate = leakRate;
    }

    public synchronized boolean tryAcquire(){
        // There is no water in the bucket, restart the calculation
        if (water. get()==0){
            log.info("start leaking");
            leakTimeStamp = System. currentTimeMillis();
            water. incrementAndGet();
            return water. get() < capacity;
        }

        // Leak first, calculate the remaining water
        long currentTime = System. currentTimeMillis();
        int leakedWater= (int) ((currentTime-leakTimeStamp)/1000 * leakRate);
        log.info("lastTime:{}, currentTime:{}. LeakedWater:{}", leakTimeStamp, currentTime, leakedWater);

        // Maybe there is not enough time, so don't leak water first
        if (leakedWater != 0){
            int leftWater = water. get() - leakedWater;
            // Maybe the water has leaked, set it to 0
            water.set(Math.max(0,leftWater));
            leakTimeStamp = System. currentTimeMillis();
        }
        log.info("Remaining capacity: {}", capacity-water.get());

        if (water. get() < capacity){
            log.info("tryAcquire success");
            water. incrementAndGet();
            return true;
        } else {
            log.info("tryAcquire fail");
            return false;
        }
    }
}
Do a test, first initialize a leaky bucket, set the capacity of the bucket to 3, release 1 request per second, and try to request 1 request every 500 milliseconds in the code:
void test() throws InterruptedException {
    LeakyBucketRateLimiter leakyBucketRateLimiter
   =new LeakyBucketRateLimiter(3,1);
    for (int i = 0; i < 15; i ++ ) {
        if (leakyBucketRateLimiter. tryAcquire()) {
            System.out.println("execute task");
        } else {
            System.out.println("Limited flow");
        }
        TimeUnit. MILLISECONDS. sleep(500);
    }
}
Check the running results and release according to the rules:

However, the leaky bucket algorithm also has disadvantages. Regardless of the current system load pressure, all requests must be queued, even if the server load is relatively idle at this time, which will cause a waste of system resources. Due to the obvious defects of leaky buckets, they are rarely used in actual business scenarios.
Token Bucket Algorithm
The token bucket algorithm is an improvement based on the leaky bucket algorithm. The main reason is that the token bucket algorithm can limit the average rate of service calls while allowing burst calls to a certain extent.
Its main idea is that the system generates tokens at a constant speed and puts tokens into the token bucket. When the token bucket is full, the tokens put into it will be discarded. And every time a request comes in, a token must be obtained from the token bucket. If the token is not obtained, it will be rejected by the current limit.
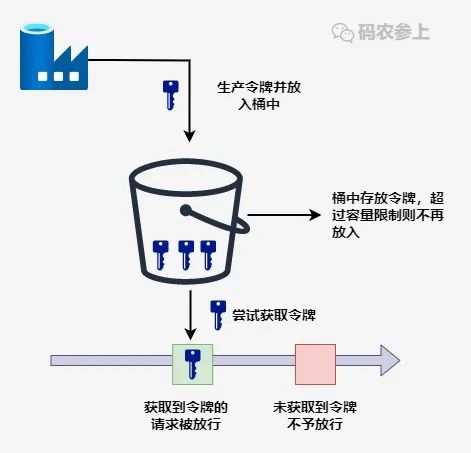
Suppose the token generation rate is 100 per second, and only 70 tokens are used in the first second, then the number of tokens available in the second second becomes 130, within the upper limit of the allowed request range, expand requested rate. Of course, the upper limit of the bucket capacity should be set here to avoid exceeding the maximum number of requests that the system can carry.
The RateLimiter in Guava is implemented based on the token bucket and can be used directly. First, introduce dependencies:
<dependency>
    <groupId>com.google.guava</groupId>
    <artifactId>guava</artifactId>
    <version>29.0-jre</version>
</dependency>
For testing, set to generate 5 tokens per second:
void acquireTest(){
    RateLimiter rateLimiter = RateLimiter. create(5);
    for (int i = 0; i < 10; i ++ ) {
        double time = rateLimiter. acquire();
        log.info("Waiting time: {}s", time);
    }
}
operation result:

It can be seen that a token is generated every 200ms and the request is released, that is, 5 requests are released in 1 second. Using RateLimiter can well realize the current limit of a single machine.
So back to the sudden traffic situation we mentioned earlier, how does the token bucket solve it? RateLimiter introduces a concept of pre-consumption. In the source code, there is such a comment:
 * <p>It is important to note that the number of permits requested <i>never</i> affects the
 * throttling of the request itself (an invocation to {@code acquire(1)} and an invocation to {@code
 * acquire(1000)} will result in exactly the same throttling, if any), but it affects the throttling
 * of the <i>next</i> request. I.e., if an expensive task arrives at an idle RateLimiter, it will be
 * granted immediately, but it is the <i>next</i> request that will experience extra throttling,
 * thus paying for the cost of the expensive task.
The general idea is that the quantity of the request token will not affect the response time of the request token action itself, acquire(1) and acquire(1000) These two requests will take the same time to return the result, but will affect the response time of the next request.
If a task that consumes a lot of tokens reaches the idle RateLimiter, it will be approved for execution immediately, but when the next request comes in, it will wait for an extra period of time to pay The time cost of the previous request.
As for why this is done, let me give an example. When a system is in an idle state, a task that consumes 100 tokens comes suddenly, so waiting for 100 seconds is a meaningless waste of resources, so you can allow it to execute first, and limit the flow of subsequent requests The time is extended to achieve an effect of dealing with sudden traffic.
Take a look at a concrete code example:
void acquireMultiTest(){
    RateLimiter rateLimiter = RateLimiter. create(1);

    for (int i = 0; i <3; i ++ ) {
        int num = 2 * i + 1;
        log.info("Get {} tokens", num);
        double cost = rateLimiter. acquire(num);
        log.info("End of obtaining {} tokens, time-consuming {}ms", num, cost);
    }
}
operation result:

It can be seen that 3 tokens are required in the second request, but it is not obtained after waiting for 3 seconds, but is obtained immediately after waiting for the 1 second required for the first 1 token to be repaid. 3 tokens were released. Similarly, the 3 seconds of waiting for the third acquisition of 5 tokens is the time for the second acquisition of tokens for repayment, and 5 new tokens are acquired immediately after the repayment is completed, without waiting for all regeneration to complete.
In addition, RateLimiter also has a smooth warm-up function. The following code realizes the function of smoothly increasing the token issuance rate to 5 per second within 3 seconds of startup:
void acquireSmoothly(){
    RateLimiter rateLimiter=RateLimiter.create(5,3, TimeUnit.SECONDS);
    long startTimeStamp = System. currentTimeMillis();
    for (int i = 0; i < 15; i ++ ) {
        double time = rateLimiter. acquire();
        log.info("Waiting time: {}s, total time: {}ms"
                , time, System.currentTimeMillis()-startTimeStamp);
    }
}
Check the running results:

It can be seen that the token issuing time has gradually shortened from the initial 500ms, and reached a uniform rate of about 200ms after 3 seconds.
In general, the RateLimiter function implemented based on the token bucket is still very powerful. On the basis of current limiting, requests can be evenly distributed in various time periods, so it is a Use a wide range of current limiting components.
Middleware current limit
The four methods discussed above are all aimed at the monolithic architecture, which cannot limit the flow across JVMs. However, in the distributed and micro-service architecture, some middleware can be used to limit the flow. Sentinel is a commonly used fuse and current limiting component in Spring Cloud Alibaba, which provides us with an out-of-the-box current limiting method.
It is also very simple to use. Add the @SentinelResource annotation to the method of the service layer, specify the resource name by value, and specify a method by blockHandler. The method will be called when the original method is limited, downgraded, or system protected.
@Service
public class QueryService {
    public static final String KEY="query";

    @SentinelResource(value = KEY,
            blockHandler="blockHandlerMethod")
    public String query(String name){
        return "begin query,name=" + name;
    }

    public String blockHandlerMethod(String name, BlockException e){
        e.printStackTrace();
        return "blockHandlerMethod for Query : " + name;
    }
}
Configure the current limiting rules, here use the direct encoding method to configure, and specify the current limiting when the QPS reaches 1:
@Component
public class SentinelConfig {
    @PostConstruct
    private void init(){
        List<FlowRule> rules = new ArrayList<>();
        FlowRule rule = new FlowRule(QueryService. KEY);
        rule. setCount(1);
        rule.setGrade(RuleConstant.FLOW_GRADE_QPS);
        rule.setLimitApp("default");
        rules. add(rule);
        FlowRuleManager. loadRules(rules);
    }
}
Configure sentinel port and dashboard address in application.yml:
spring:
  application:
    name: sentinel-test
  cloud:
    sentinel:
      transport:
        port: 8719
        dashboard: localhost:8088
After starting the project, start sentinel-dashboard:
java -Dserver.port=8088 -jar sentinel-dashboard-1.8.0.jar
Open the dashboard in the browser to see the flow control rules we set:

For interface testing, after the limit specified by QPS is exceeded, the logic in the blockHandler() method will be executed:

Sentinel is widely used under the microservice architecture and can provide functions such as reliable cluster flow control and service disconnection. In use, current limiting can be used in combination with fuses and downgrades to become a three-axe to effectively deal with the three-high system to ensure service stability.
Gateway current limit
Gateway current limiting is also a popular method at present. Here we introduce the method of using Spring Cloud’s gateway component for current limiting.
Introduce dependencies in the project. The gateway’s current limit actually uses the token bucket implemented by Redis plus lua scripts, so it is also necessary to introduce redis-related dependencies:
<dependency>
    <groupId>org.springframework.cloud</groupId>
    <artifactId>spring-cloud-starter-gateway</artifactId>
</dependency>
<dependency>
    <groupId>org.springframework.boot</groupId>
    <artifactId>spring-boot-starter-data-redis-reactive</artifactId>
</dependency>
Configuring the gateway is mainly to configure the token generation rate, the upper limit of the storage capacity of the token bucket, and the parser for the key used for current limiting. The upper limit of the bucket set here is 2, and 1 token is filled per second:
spring:
  application:
    name: gateway-test
  cloud:
    gateway:
      routes:
        - id: limit_route
          uri: lb://sentinel-test
          predicates:
          -Path=/sentinel-test/**
          filters:
            - name: RequestRateLimiter
              args:
                # Token bucket filling average rate per second
                redis-rate-limiter.replenishRate: 1
                # token bucket limit
                redis-rate-limiter.burstCapacity: 2
                # Specify the parser, use the spEl expression to get it from the spring container by beanName
                key-resolver: "#{@pathKeyResolver}"
            - StripPrefix=1
  redis:
    host: 127.0.0.1
    port: 6379
We use the requested path as the key for current limiting, and write the corresponding parser:
@Slf4j
@Component
public class PathKeyResolver implements KeyResolver {
    public Mono<String> resolve(ServerWebExchange exchange) {
        String path = exchange. getRequest(). getPath(). toString();
        log.info("Request path: {}",path);
        return Mono. just(path);
    }
}
Start the gateway, use jmeter to test, and set the request interval to 500ms. Because one token is generated every second, the current limiting effect of releasing one for every two requests is achieved later. When the current is limited, the http request will return 429 status code.

In addition to the above current limiting based on the request path, we can also flexibly set various dimensions of current limiting, for example, according to the user information carried in the request header, or the parameters carried, and so on. Of course, if we don’t want to use the Redis current limiter that comes with the gateway, we can also implement the RateLimiter interface to implement our own current limiting tool.
The key to the gateway to achieve current limiting is the RedisRateLimiter class in the spring-cloud-gateway-core package, and the RedisRateLimiter in META-INF/scripts code>request-rate-limiter.lua This script, if you are interested, you can take a look at how it is implemented.
Summary
In general, to ensure the system’s ability to resist pressure, current limiting is an essential link. Although some user requests may be discarded, compared to system downtime caused by burst traffic, These losses are generally within an acceptable range. As mentioned earlier, current limiting can be used in conjunction with circuit breakers and downgrades to ensure the availability and robustness of services.