STM32 based on HAL library running water lamp experiment
- 1. Set up the STM32 development environment
- 2. Periodic flashing of three LED traffic lights on the GPIO port of the HEL library
- 3. External interrupt mode control light turns on and off
- 4. Summary
1. Build a development environment for STM32
(1) Install jdk
Since STM32CubeMX is implemented in Java, a jdk environment needs to be installed.
jdk official website download link:
https://www.oracle.com/java/technologies/javase-downloads.html
(2) Install STM32CubeMX
1. Download address:
https://www.st.com/en/development-tools/stm32cubemx.html
I won’t go into details about the installation process, there are many online tutorials.
2. Periodic flashing of three LED traffic lights on the GPIO port of the HEL library
(1) New cubeMX project
1. Create new File->Project

2. Enter the following interface and search for the chip model we are using. I am using the STM32103C8T6 chip, so we search for STM32F103C8T6 here and select the chip.

3. Enter the following interface, and we start to configure the control and clock we need to use. Here, if we click on the water lamp, select PA4, PB9 and the PC13 pin that comes with the system board, and configure them to OUTPUT push-pull output mode.
Let’s configure sys and rcc first
Here sys selects sw mode

rcc chooses this way

4. Select port output settings, select the required port, and click to set GPIO_OUTPUT. I chose PC13, PA4, PB9

5.Clock Configuration setting

6.Project Manager settings

7. The creation is completed and opened with keil

2. Running water lamp code
Enter the following programming page of KEIL software, find the main function in main.c, and add the following code in the while loop
 HAL_GPIO_WritePin(GPIOB, GPIO_PIN_0, GPIO_PIN_RESET); // Light 1 is on
HAL_Delay(1000); // Delay 1s
HAL_GPIO_WritePin(GPIOB, GPIO_PIN_0, GPIO_PIN_SET); // Light 1 is off
\t
HAL_GPIO_WritePin(GPIOA, GPIO_PIN_15, GPIO_PIN_RESET); // Light 2 is on
HAL_Delay(1000); // Delay 1s
HAL_GPIO_WritePin(GPIOA, GPIO_PIN_15, GPIO_PIN_SET); // Light 2 is off
\t
HAL_GPIO_WritePin(GPIOC, GPIO_PIN_13, GPIO_PIN_RESET); // Light 3 is on
HAL_Delay(1000); // Delay 1s
HAL_GPIO_WritePin(GPIOC, GPIO_PIN_13, GPIO_PIN_SET); // Light 3 is off
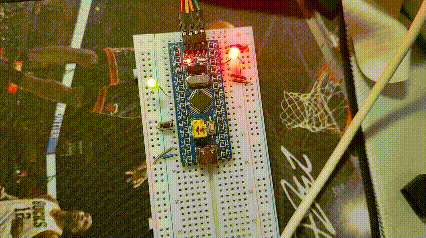
Compiling and burning can complete our running water lamp program.
3. External interrupt mode control light turns on and off
(1) External interrupt
STM32 interrupts are caused by hardware and are used to handle specific events. When these events occur, the processor suspends current program execution and instead handles these interrupts. After processing is complete, program execution resumes where it was paused.
The STM32 interrupt system includes multiple interrupt sources, such as:
GPIO interrupt: When the level of the GPIO pin changes, a GPIO interrupt is generated.
Timer interrupt: The STM32 timer can generate a scheduled interrupt.
UART, I2C or SPI communication interrupt: When these communication interfaces receive or send data, an interrupt will be generated.
ADC, DAC or RTC interrupt: These components will generate an interrupt when completing a conversion or reaching a preset time point.
DMA interrupt: When DMA (Direct Memory Access) transfer is completed, an interrupt will be generated.
Cortex-M3 core interrupts: including system, debugging and memory protection interrupts.
When programming, you need to configure and enable these interrupt sources. You can use the STM32 HAL library or directly use the Cortex-M interrupt handling API for programming. In the STM32CubeMX tool, you can also use the graphical interface to configure and enable interrupts.
Here are the basic steps to enable and handle interrupts:
1. Configure interrupt sources: In the corresponding initialization function, you need to enable the interrupt source you want. For example, if you want to use a timer interrupt, you need to enable the timer interrupt in the timer’s initialization function.
2. Set interrupt priority: You can use NVIC (Nested Vectored Interrupt Controller) to set the priority of each interrupt. The STM32CubeMX tool can help you set these priorities.
3. Write an interrupt service function: You need to write an interrupt service function (Interrupt Service Routine, ISR) for each interrupt source. This function will be called when the corresponding interrupt occurs. This function needs to execute as quickly as possible to avoid blocking other interrupts.
4. Enable interrupts: In the main program, you need to enable all interrupts you configure. You can use the HAL_NVIC_EnableIRQ function to enable a specific interrupt.
5. Handle interrupts in ISR: When an interrupt occurs, the processor will jump to the corresponding ISR for execution. In this function you can handle this interrupt. For example, if you are waiting for an external event, when the event occurs (for example, the level of a GPIO pin changes), you can read the status of this pin in the ISR and handle the event.
6. Exit the ISR: At the end of the ISR, you should use the __NOPUSH macro to ensure that you do not push the current stack frame onto the stack. This prevents the program from jumping back to the code in the middle of the ISR after exiting the ISR.
Handling interrupts in the main program: When an interrupt occurs, the main program will pause execution and jump to the corresponding ISR for execution. When the ISR execution is completed, the main program will continue execution from where it was paused.
(2) STMCube configuration project
Here we use the GPIO interrupt. When the level of pin PB1 changes high or low, our GPIO interrupt is triggered, the program is interrupted, the interrupt event is processed, and the main program continues after completion.
So before programming, we need to configure our pins in STM32CubeMX
Enter the following interface and select the PB5 pin as our key switch pin.

Select the mode as GPIO_EXIT, that is, GPIO interrupt, then we configure NVIC, click GPIO, and enter the following interface

Click on NVIC, we enable interrupts and set priorities

After that, we configure the trigger mode on GPIO and set it to falling edge trigger.

After the configuration is completed, the project creation can be completed and the code can be generated.
We can see in the generated code that our interrupt service routine can be found in stm32f1xx_it.c, click to jump
 Go down and find the HAL_GPIO_EXTI_Callback function
This function is rewritten for users to perform different processing based on different interrupts. Here we need to realize the on and off of A4 according to different interrupts of B5.

function code
 void HAL_GPIO_EXTI_Callback(uint16_t GPIO_Pin){<!-- -->
      if(GPIO_Pin == SWITCH_Pin){<!-- -->
        //Get the potential of B5
        GPIO_PinState pinState = HAL_GPIO_ReadPin(SWITCH_GPIO_Port,SWITCH_Pin);

        //low potential
        if(pinState==GPIO_PIN_RESET)
        HAL_GPIO_WritePin(LED_A4_GPIO_Port,LED_A4_Pin,GPIO_PIN_RESET);//Change A4 to low level
        //high potential
        else
            HAL_GPIO_WritePin(LED_A4_GPIO_Port,LED_A4_Pin,GPIO_PIN_SET);//Change A4 to high potential
        }
    }
After we compile and burn it, we can use the key interrupt to control the extinguishing of the LED running light.
4. Summary
This running water lamp experiment clarified the principle of the running water lamp, which first includes GPIO configuration, setting the default level of a GPIOx pin, configuring the GPIOx pin number, input/output mode, output speed/input type. To achieve the pipeline effect (main function), a while loop is required to keep the program running, call the delay function HAL_Delay(1000), and delay 1000s to achieve the pipeline effect. Using the STM32 HAL library can simplify GPIO operations and achieve convenient, fast and stable LED control. By initializing the GPIO port and setting the pin mode to output mode, you can use the HAL_GPIO_WritePin function to control the lighting and extinguishing of the LED light. In interrupt mode, by configuring the interrupt line and associating the interrupt processing function, the status of the LED light can be changed in real time when the button is pressed. Experiments show that the STM32 HAL library provides developers with an efficient and stable hardware operation solution.