————Produced by HOOK team
1. Import the required python libraries
from collections import Counter
import torch
import torch.nn as nn
import torch.optim as optim
import torch.utils.data
import torchvision
from torch.utils.data import WeightedRandomSampler
from torchvision import transforms
from tqdm import tqdm
2. Setting of hyperparameters
# Super parameters
DEVICE = torch.device('cuda' if torch.cuda.is_available() else "cpu")
LR = 0.005
EPOCH = 50
BTACH_SIZE = 32
train_root="you_train_path"
batch_size = 8
3. Data loading and processing
# Data loading and processing
train_transform = transforms.Compose([
    transforms.Resize(256),
    transforms.RandomResizedCrop(224, scale=(0.6, 1.0), ratio=(0.8, 1.0)),
    transforms.RandomHorizontalFlip(),
    torchvision.transforms.ColorJitter(brightness=0.5, contrast=0, saturation=0, hue=0),
    torchvision.transforms.ColorJitter(brightness=0, contrast=0.5, saturation=0, hue=0),
    transforms.ToTensor(),
    transforms.Normalize(mean=[.5, .5, .5], std=[.5, .5, .5])
])

#Image reading conversion
all_data = torchvision.datasets.ImageFolder(
    root=train_root,
    transform=train_transform
)

#print(all_data.class_to_idx)

# Calculate the number of samples for each category
class_counts = Counter(all_data.targets) # Assume that the category information is in all_data.targets

# Calculate the sample weight of each category
weights = [1.0 / class_counts[class_idx] for class_idx in all_data.targets]

# Created a WeightedRandomSampler object. This object is a function in PyTorch's data loading tool and can be used to sample from a list with weights
# replacement=True means sampling with replacement can be performed
sampler = WeightedRandomSampler(weights, len(all_data), replacement=True)

# Use the sampler to divide the data set, select part of the data from the overall data set all_data according to the sampling results of the sampler, and obtain the training set train_data.
train_data = torch.utils.data.Subset(all_data, list(sampler))

# Convert the sampler into a list, where the elements are the sample indexes obtained by sampling.
sampler_indices = list(sampler)

# Generate a list of unsampled sample indices valid_indices.
valid_indices = [idx for idx in range(len(all_data)) if idx not in sampler_indices]

# Use the unsampled sample index to generate the validation set valid_data.
valid_data = torch.utils.data.Subset(all_data, valid_indices)


#Load training data set
train_set = torch.utils.data.DataLoader(
    train_data,
    batch_size=BTACH_SIZE,
    shuffle=True
)

# Test set loading
test_set = torch.utils.data.DataLoader(
    valid_data,
    batch_size=BTACH_SIZE,
    shuffle=True
)
4. Model training and prediction
# Training
def train(model1, device, dataset, optimizer1, epoch1):
    global loss
    model1.train()

    correct = 0
    all_len = 0
    # 'tqdm' is a library for displaying progress bars. It accepts any iterable object and displays a progress bar while traversing the iterable object.
    for i, (x, y) in tqdm(enumerate(dataset)):
        x, y = x.to(device), y.to(device)
        optimizer1.zero_grad()
        output = model1(x)
        pred = output.max(1, keepdim=True)[1]
        correct + = pred.eq(y.view_as(pred)).sum().item()
        all_len + = len(x)
        loss = nn.CrossEntropyLoss()(output, y)
        loss.backward()
        optimizer1.step()


    print(f"The actual Train of the {epoch1}th training: {100. * correct / all_len:.2f}%")

# Test machine verification
def vaild(model, device, dataset):
    model.eval()
    global loss
    correct = 0
    test_loss = 0
    all_len = 0
    with torch.no_grad():
        for i, (x, target) in enumerate(dataset):
            x, target = x.to(device), target.to(device)

            output = model(x)
            loss = nn.CrossEntropyLoss()(output, target)
            test_loss + = loss.item()
            pred = output.argmax(dim=1, keepdim=True)
            correct + = pred.eq(target.view_as(pred)).sum().item()
            all_len + = len(x)
    print(f"Test true: {100. * correct / all_len:.2f}%")
    return 100. * correct / all_len
5.ResNet50 transfer learning
Use pretrain = True to get the pre-trained model and change the output dimension of the fully connected layer.
or weights=’ResNet50_Weights.DEFAULT’
The difference between the two is: the difference lies in whether to use the default pre-trained weights. resnet50(pretrained=True) uses the default weights trained on the ImageNet data set, while weights='ResNet50_Weights.DEFAULT' uses the default weights trained on the ImageNet data set. The resulting custom weight.
model_1 = torchvision.models.resnet50(pretrained=True) #weights='ResNet50_Weights.DEFAULT'
model_1.fc = nn.Sequential(
    nn.Linear(2048, 12)
)

model_1.to(DEVICE)
optimizer = optim.SGD(model_1.parameters(), lr=LR, momentum=0.09)
Model training and saving
max_accuracy = 90.0 # Set the threshold for saving the model
best_model = None

for epoch in range(1, EPOCH + 1):
    train(model_1, DEVICE, train_set, optimizer, epoch)
    accu = vaild(model_1, DEVICE, test_set)
    if accu > max_accuracy:
        max_accuracy = accu
        best_model = model_1.state_dict() # Or use torch.save() to save the entire model

#Save the optimal model
torch.save(best_model, r"E:\Daily Practice\pytorch_Project\best_model_train1.pth")
UI interface based on gradient
1. Required python library
# Import necessary libraries
import torch
import torchvision
import torchvision.transforms as transforms
from PIL import Image
importgradioasgr
importtempfile
from torch import nn
2. Model loading
#Load model
def load_pretrained_resnet():
    # Determine which device to use: GPU (if available) or CPU
    device = torch.device('cuda' if torch.cuda.is_available() else "cpu")
    model_1 = torchvision.models.resnet50(pretrained=True)
    model_1.fc = nn.Sequential(nn.Linear(2048, 12))
    # model_1.load_state_dict(torch.load(r'E:\Daily Exercises\pytorch_Project\best_model_train.pth'))
    model_1.to(device)
    model_1.load_state_dict(torch.load(r"C:\Users\Acer\Desktop\Cat-12\best_model_train99.71.pth"))
    # Make sure the model is in evaluation mode
    model_1.eval()
    return model_1
3. Model prediction results
#Model prediction results
def load_imagenet_labels(filename=r"C:\Users\Acer\Desktop\Cat-12\cat12.txt"):
    """Read ImageNet tags from the given file name"""
    with open(filename, 'r',encoding="utf-8") as f:
        labels = [line.strip() for line in f.readlines()]
    return labels


def serve_chicken(image_path):
    """
    Receives an image path, predicts it using the ResNet model, and returns the prediction result.

    parameter:
    - image_path: the path of the input image

    return:
    - prediction: predicted category name
    """
    # Determine which device to use: GPU (if available) or CPU
    device = torch.device("cuda" if torch.cuda.is_available() else "cpu")

    model = load_pretrained_resnet()

    # (transforms)
    preprocess = transforms.Compose([
        transforms.Resize(256),
        transforms.CenterCrop(256),
        transforms.ToTensor(),
        transforms.Normalize(mean=[0.485, 0.456, 0.406], std=[0.229, 0.224, 0.225]),
    ])

    #Open image file
    image = Image.open(image_path).convert("RGB")
    image = preprocess(image).unsqueeze(0).to(device) # Make sure the image is on the same device

    #predict image)
    with torch.no_grad():
        outputs = model(image)
        _, predicted = outputs.max(1)
        # Assume you have a mapping of tags to names, here is just an example
        labels = load_imagenet_labels()
        prediction = labels[predicted[0]]

    return prediction
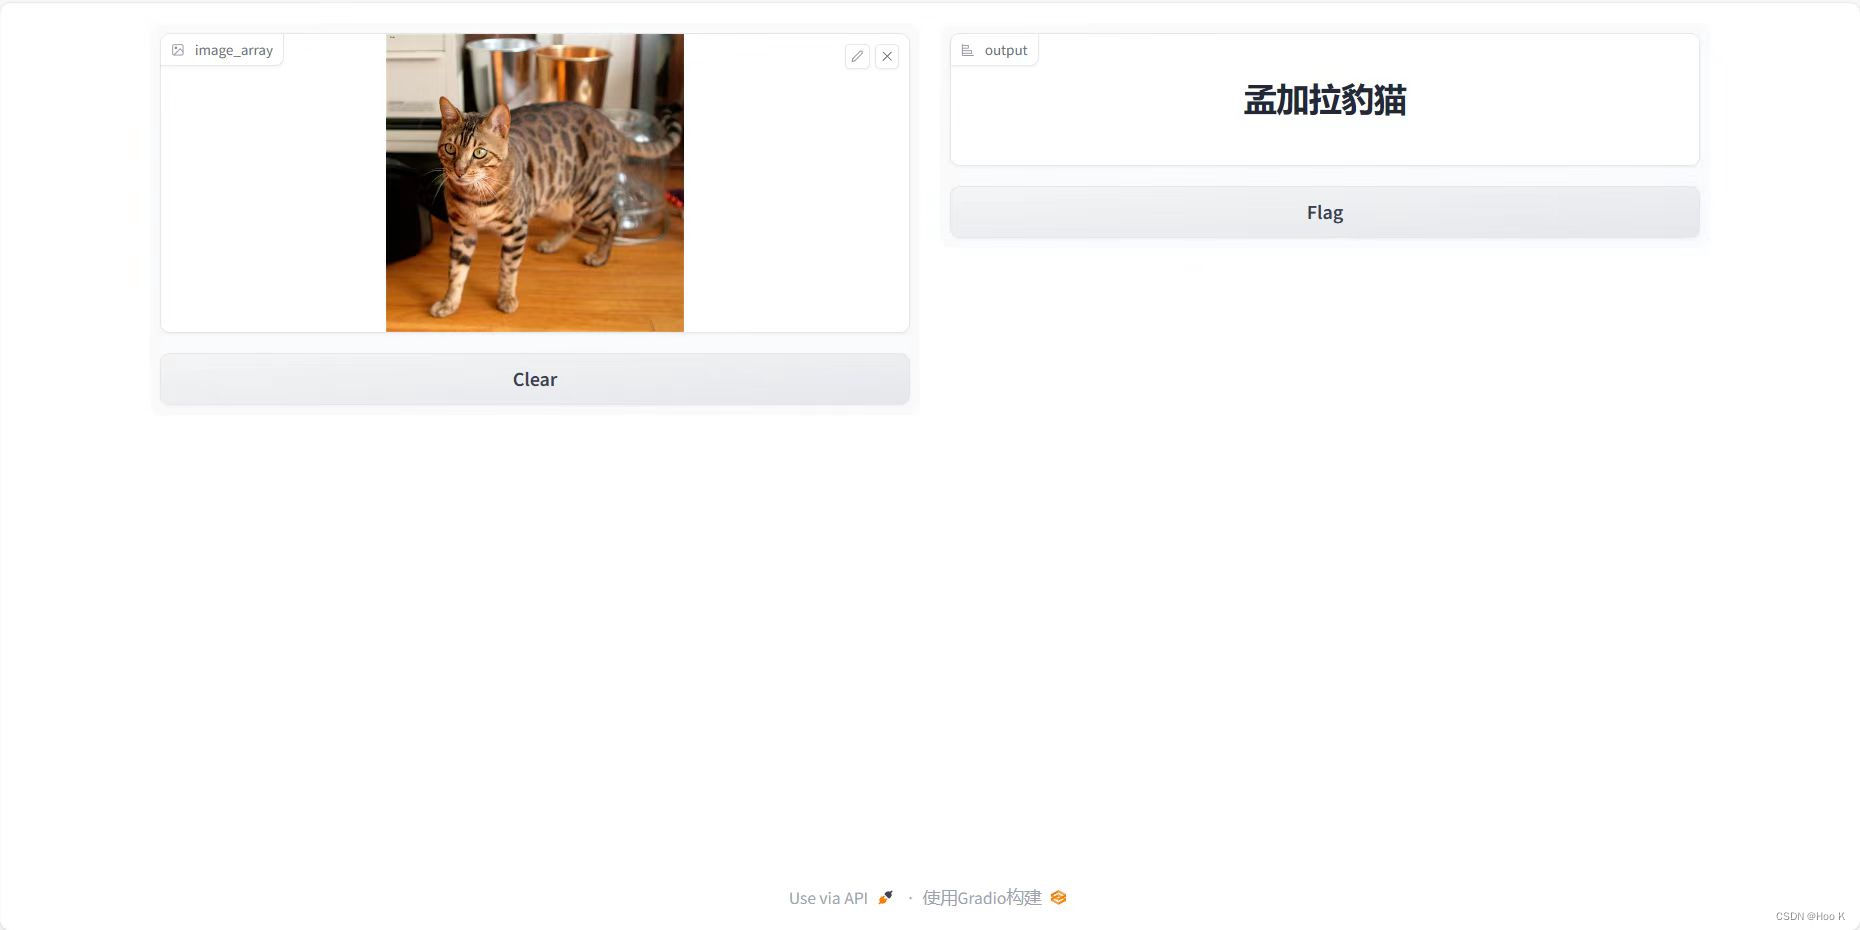
4.gradio page (simple version)
#gradio
def gradio_wrapper(image_array):
    """
    A wrapper function that receives the numpy image passed in by Gradio, saves it as a temporary file, and then passes it to the serve_chicken function.
    """
    # Use PIL to save the numpy array as a temporary image file
    global img
    temp_filename = tempfile.mktemp(suffix=".jpg")
    if image_array is not None:
        img = Image.fromarray(image_array.astype('uint8'))
    else:
        print("Error: image_array is None!")

    img.save(temp_filename)
    # Call the original serve_chicken function
    result = serve_chicken(temp_filename)

    return result

#The following paragraph is a short UI page
def gradient_interface():
    """Use Gradio to create an interactive interface and display the model's predictions."""

    # Use Gradio's new API to define input and output components
    image_input = gr.components.Image(shape=(256, 256), type="numpy")
    label_output = gr.components.Label(num_top_classes=3)

    # Create Gradio interface
    interface = gr.Interface(fn=gradio_wrapper, inputs=image_input, outputs=label_output, live=True)

    # Start Gradio interface
    interface.launch()
5. Main function
if __name__ == "__main__":
    resnet_model = load_pretrained_resnet()
    print("ResNet model has been loaded!")
    result = serve_chicken(r"D:\Desktop\cat12\cat_12_train\A.jpg")
    print(f"The type of cat is [{result}]!")
    gradient_interface()
6.UI interface display
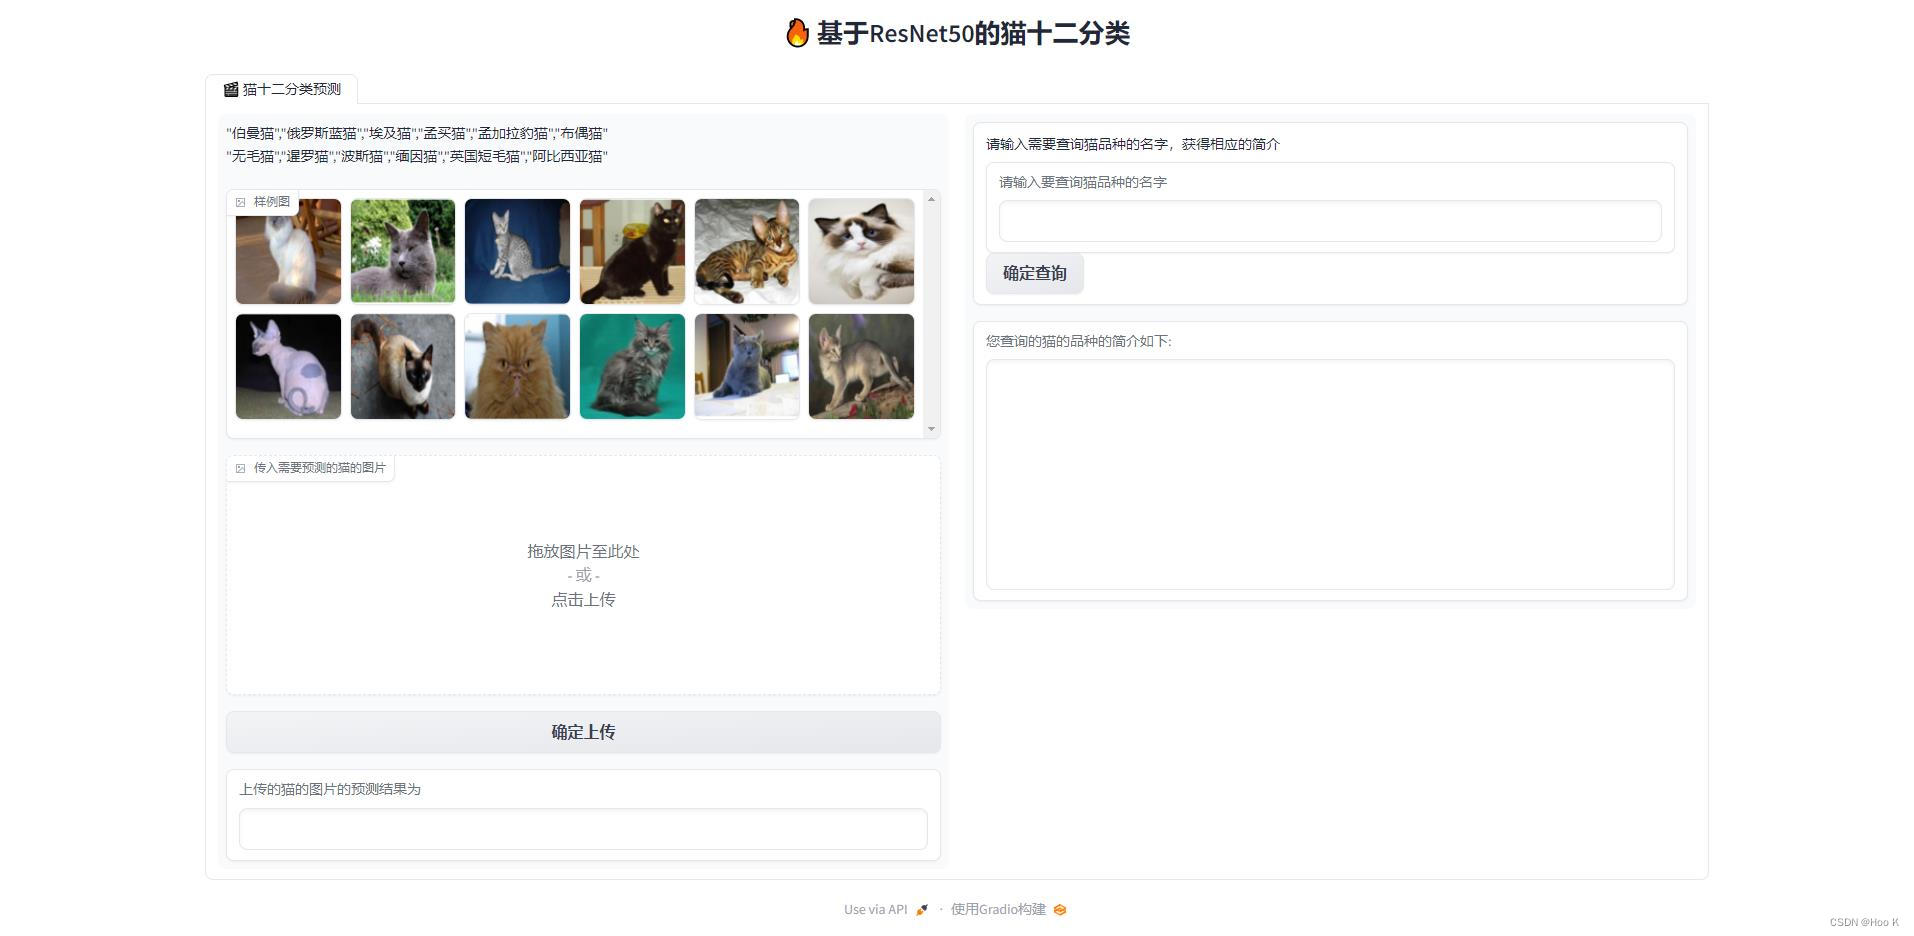
7. Optimized UI page
If you want to implement this optimized UI interface and obtain the introduction of the 12 types of cats and their characteristics, you need to access Wen Xinyiyan’s token.
How to obtain: Feijian Galaxy Community Personal Center –> Access Token (1 million free use opportunities)
#文心一言
def wenxin(question):
    import erniebot
    erniebot.api_type = 'aistudio'
    erniebot.access_token = "<you_token>"

    response = erniebot.ChatCompletion.create(
        model='ernie-bot',
        messages=[{'role': 'user', 'content': "Please explain to me the specific characteristics of {}, the more detailed the better, starting with Dear User, the introduction to the cat breed you are querying is as follows:".format( question)}],
    )
    return response.result

def teac_math():
    with gr.Blocks() as demo:
        image_result_list = get_img_list() #Sample image display
        state_image_list = gr.State(value=image_result_list) #Sample image display
        with gr.Row(equal_height=False):
            with gr.Column(variant='panel'):
                gr.Markdown(''''"Birman cat","Russian Blue cat","Egyptian cat","Bombay cat","Bengal cat","Ragdoll cat"<br/>"Hairless cat"," Siamese cat","Persian cat","Maine Coon cat","British Shorthair cat","Abyssian cat"''')
                image_results = gr.Gallery(value=image_result_list, label='Sample Image', allow_preview=False,
                                           columns=6, height=250)
                image_input = gr.Image(label="Pass in the picture of the cat that needs to be predicted")
                text_button_img = gr.Button("Confirm upload")
                text_output = gr.Textbox(label='The prediction result of the uploaded cat picture is')

            with gr.Column(variant='panel'):
                with gr.Box():
                    with gr.Row():
                        gr.Markdown("Please enter the name of the cat breed you want to query and get the corresponding introduction")
                    text_input = gr.Textbox(label="Please enter the name of the cat breed you want to query")
                    text_button = gr.Button("Confirm query")
                text_outputs = gr.Textbox(label="The brief introduction of the cat breed you are querying is as follows:", lines=10)
        #right
        image_results.select(get_selected_image, state_image_list, queue=False) #Sample image display
        text_button_img.click(fn=gradio_wrapper, inputs=image_input, outputs=text_output)
        #left
        text_button.click(fn=wenxin, inputs=text_input,outputs=text_outputs)
    return demo
8. Optimized main function
if __name__ == "__main__":

    with gr.Blocks(css='style.css') as demo:
        gr.Markdown(
            "# <center> \
{fire} Cat classification based on ResNet50 </center>")
        with gr.Tabs():
            with gr.TabItem('\
{clapper board} cat twelve classification prediction'):
                teac_math()
    demo.launch()
9. Optimized page effect display
—————Produced by HOOK team
The knowledge points of the article match the official knowledge archives, and you can further learn relevant knowledge. Python entry skill treeArtificial intelligenceDeep learning 382,140 people are learning the system