
Welcome to my CSDN homepage!
I am Jun Yi–Qin, a blogger who shares notes on CSDN.
Recommend to everyone my blog column “LInux Practical Development”.
If you feel good, please follow me and add three links!
Looking forward to your joining, learning and making progress together!
Foreword
In the early Linux blog sharing, I shared with veterans about installing the Windows system on the virtual machine and deploying the project files, and successfully accessed it on the host. The previous blog taught you how to install the Linux operating system on a virtual machine. Today’s blog is based on the previous blog. What we share with you today is how to configure our development environment and deploy projects on the Linux system.
1. Deployment and installation of JDK and Tomat
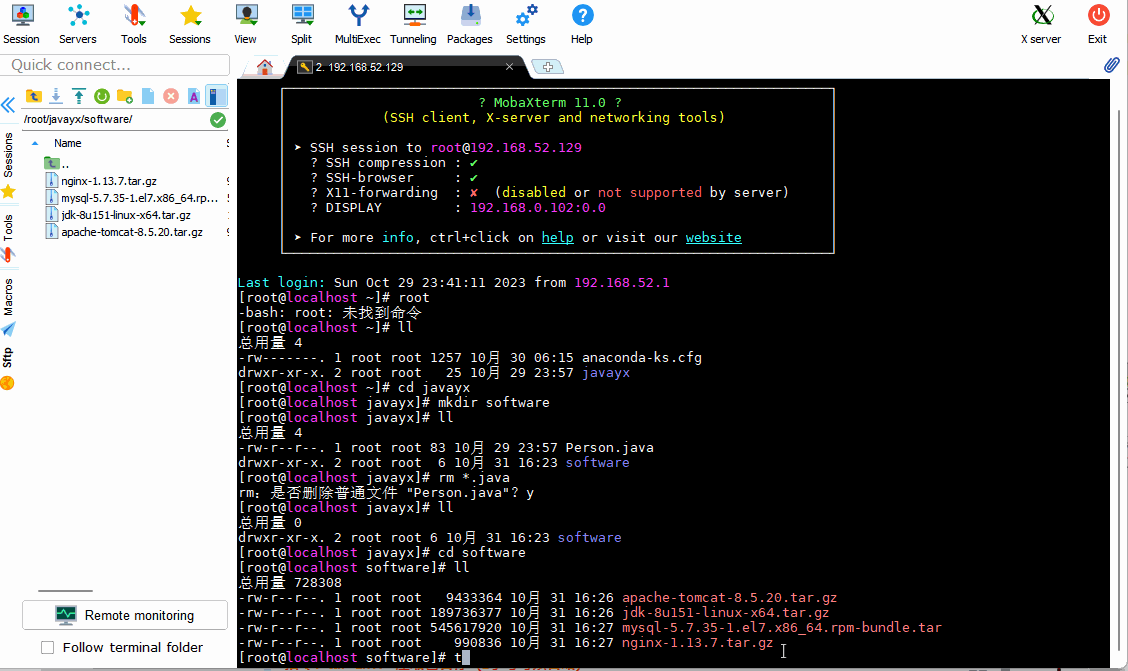
Upload the required installation package and compressed package to the Linux system.


The picture above represents that our installation package has been imported successfully. Some server connection tools support drag-and-drop import, while others require the use of commands, depending on the situation. (The blogger uses mobalxterm)
1. JDK installation
1.1 Unzip the jdk installation compressed package
Enter the following command in the service connection tool to decompress
Command: tar -zxvf + compressed package name (the z letter can be omitted)
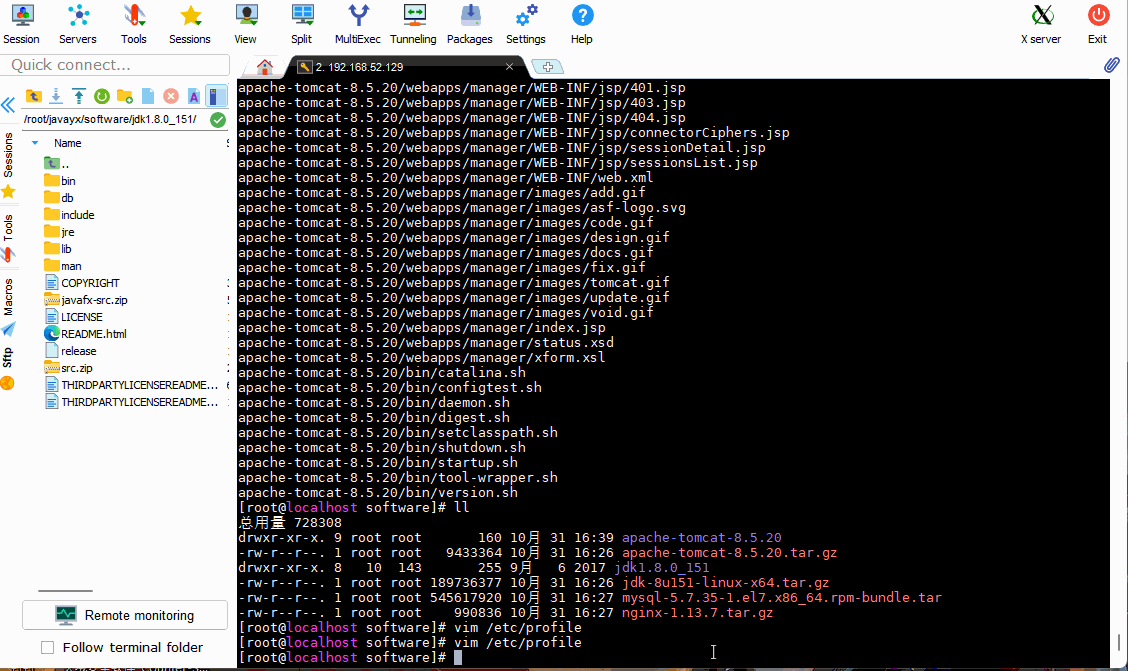
When we view the file directory again, an unzipped jdk folder will be generated

1.2 Configure jdk environment variables
Unlike the Windows system, the Linux system configuration is not configured in the advanced system settings, but is edited and added under the /etc/profile file.
Configuration steps:
- vim /etc/profile —>Enter this file
- Press the i key to enter editing mode
- Add the code for configuring the environment to the end of the file (the code for the configuration variable file is as follows)
#java environment
export JAVA_HOME=/javaxl/jdk1.8.0_151 (own jdk decompression path)
export JRE_HOME=${JAVA_HOME}/jre
export CLASSPATH=.:${JAVA_HOME}/lib:${JRE_HOME}/lib
export PATH=${JAVA_HOME}/bin:$PATH
1.3 Verify whether the configuration is successful
Enter the command to set the environment variable to take effect. Check whether the configuration is successful after entering the command.
Command: source /etc/profile—>Set environment variables to take effect
java -version—–>View jdk version

2. Tomcat installation
2.1 Unzip the installation package
Command: tar -zxvf + compressed package name (the z letter can be omitted)

Just like installing jdk, the corresponding folder will also be generated.

2.2 Verify whether Tomcat is installed successfully
The Tomcat file directory of Linux is consistent with the file directory of Windows system. We enter the bin file of Tomcat, find start.sh, and start the server by running start.sh; and Windows, Windows is started through startup.bat. After startup, we access the host. Successful access means that Tomcat is successfully configured.
Command: ./startup.sh —–>Start the server

We can see that the server cannot be accessed because of the firewall. In Windows systems, when the host sends the host to access the virtual machine server, the firewall service needs to be turned off. Therefore, the same is true for Linux, and we need to set up the firewall.
2.3 Set up firewall
Instructions for firewall settings:
#Open port
firewall-cmd –zone=public –add-port=3306/tcp –permanent
#Update firewall rules
firewall-cmd –reload
#firewalllist
firewall-cmd –zone=public –list-ports
#Firewall status
systemctl status firewalld
#Start firewall
systemctl start firewalld
#Close firewall
systemctl stop firewalld.service#Set not to start automatically when booting
systemctl disable firewalld.service
#Set auto-start at boot
systemctl enable firewalld.service

The host can access the server if the firewall is turned off, but it is not safe after the firewall is turned off. Restart the server and you can access it on the host web page.


Turning off the firewall to allow the host to access the server is a security risk, so we adopt a safer method to allow the host to access the server and let the firewall open a port number so that the host can access the server through the port number. (The previous prompt is to turn on the firewall) The subsequent configuration database also needs to open a port number for host access, so it is set together. After setting, the firewall status needs to be refreshed before it can be used.

Then access our server on the host. The picture below represents successful access and also shows that Tomcat is successfully configured.

2. Install MySql database
1. Uninstall mariadb, otherwise there will be conflicts when installing MySql (check first, then delete and then check)
Because the Linux system will come with a database, it prevents data conflicts when we install MySQL, so we need to check whether the original one exists. If it exists, delete the original one before installing it.
Related directives:
- rpm -qa|grep mariadb —>View database
- rpm -e –nodeps + database file name —->Delete the specified database

2. Install MySQL database
2.1 Unzip the installation package
If you have not imported the database installation package, you can execute the following command to download the installation package.
Download database installation package instructions: wget https://downloads.mysql.com/archives/get/p/23/file/mysql-5.7.35-1.el7.x86_64.rpm-bundle.tar
After downloading or importing the database installation package, the next step is to unzip the database installation package to the specified directory.
So I created a folder to store my database and unzipped the MySQL database installation package into the folder we just created.

Instructions involved:
- tar -xvf + database installation package -C + specified folder
2.2 Install database
Install the corresponding decompressed database file installation package.

Related commands:
- rpm -ivh + files to install
Start installation, -ivh where i means installation, v means display the installation process, h means display progress
2.3 Configuring the database
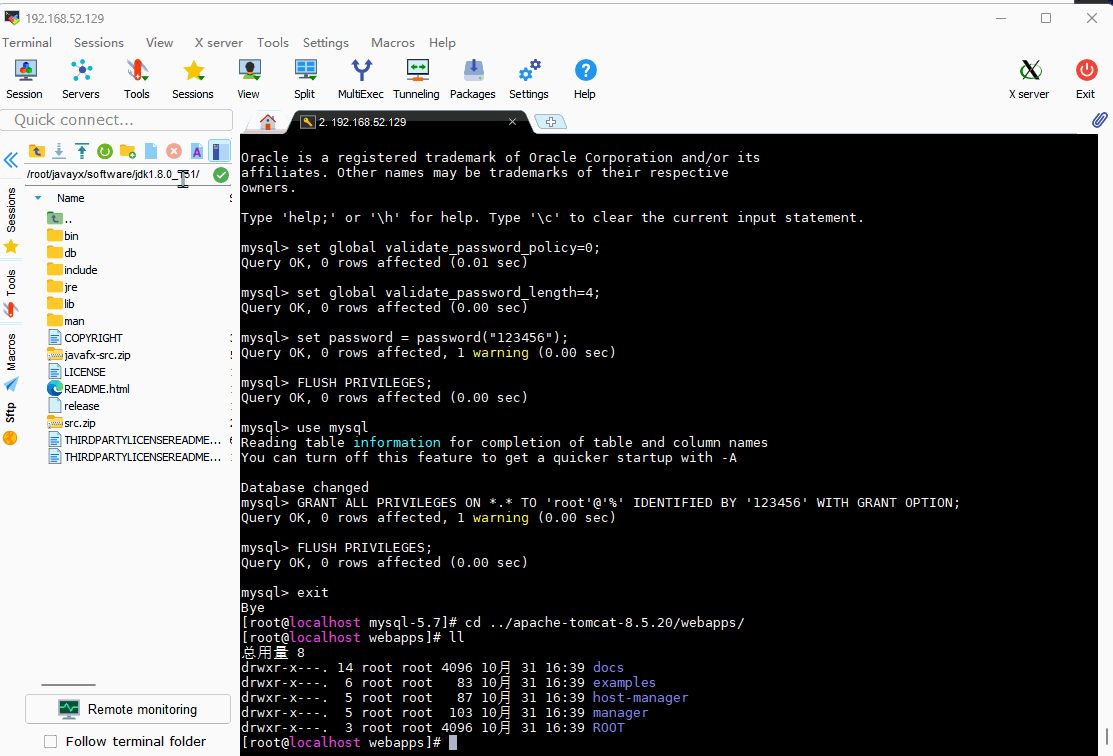
After installing the specified data files, start our Mysql service and perform a series of configurations on the database. When we want to modify the default password of the database, the Linux system is different from the Windows system. Linux is more strict and requires us to set a password verification policy (0 or LOW). Otherwise, the password is too LOW and you will not be allowed to pass it. Set the password verification length, otherwise the password will be too short to allow you to pass (multiple tests found that the minimum password length is 4 digits) before you can change the password.
Enter database service

Modify user password

Set access permissions

Related commands:
- systemctl start mysqld —->Start database service
- grep “password” /var/log/mysqld.log —->View the default password of the database
- mysql -uroot -p —->Log in as database user
- set global validate_password_policy=0 —->Set password verification policy (0 or LOW)
- set global validate_password_length=4 —–>Set password verification length (length 4)
- set password = password(“Password to be set”) ——>Set password
- FLUSH PRIVILEGES ——>Refresh database service
- use mysql —–>Use database
- GRANT ALL PRIVILEGES ON *.* TO ‘User Account’@’%’ IDENTIFIED BY ‘User Password’ WITH GRANT OPTION —–>Set all permissions for the specified user
- exit —->Exit the database
3. Host access database
After completing the appeal operation, it can be accessed in the host’s database.

3. Deploy the back-end interface of the front-end and back-end separation project
Steps:
- Development tools start background project testing
- maven install packages the project
- Put the packaged project under the tomcat/webapps/ file in Linux
- Start tomcat
- Browser testing
The next step is the specific operations
1. Import project package
Find the webapps folder under the Tomcat folder and import the project package into it. The import method is the same as the installation package.

2. Start the server to load the project
Enter the bin directory, stop the server, and then restart to load the project. Then access the project on the host’s web page.

View the database configuration file of the project, create the corresponding database in the database and import the data.

Finally, restart the server and then access the web page again.

4. Extension: Deploy single project (use another port number to access)
Method 1: (Instead of running two projects on one server using two ports, change the port number)
In the conf folder in the tomcat directory, edit the contents of server.xml and modify the port number.

Restart the server to load the project and use the modified port number to access it on the host. Then import the project package into the webapps folder; create a new firewall port to allow access, then the port is consistent with the modified port number, refresh the firewall status to enable the new port number; finally restart the server to load the project, and use Just use the new port number to access the project.
Method 2: (Add a port number to access the project)
1. Deployment preparation
Here are the steps:
- First enter the tomcat directory
- mkdir webapps1 —》Create a webapps1 in the same directory as webapps
- cp -r webapps/* webapps1/ ——-》Copy all the contents of webapps to webapps1
- Copy the conf/Catalina folder and name it Catalina1
- cd conf —->Then enter the conf folder in the tomcat directory
- vi server.xml ——>Edit the contents of this file
1.1 Create folder


1.2 Edit server.xml
server.xml already has the configuration information of the first project. Now you need to add the configuration of the second project. Under the Server node, add a Service node; the second Service node copies the content of the first Service. After copying, make the following port and other configuration changes.
 <Service name="Catalina1">
    <Connector port="8082" protocol="HTTP/1.1"
               maxThreads="5000"
               minProcessors="100"
               maxProcessors="1000"
               minSpareThreads="100"
               maxSpareThreads="1000"
               enableLookups="false"
               URIEncoding="utf-8"
               acceptCount="1000"
               connectionTimeout="20000"
               disableUploadTimeout="ture"
               redirectPort="8444" />
    <Engine name="Catalina1" defaultHost="localhost">
      <Realm className="org.apache.catalina.realm.LockOutRealm">
        <Realm className="org.apache.catalina.realm.UserDatabaseRealm"
               resourceName="UserDatabase"/>
      </Realm>
      <Host name="localhost" appBase="webapps1"
            unpackWARs="true" autoDeploy="true">
        <Valve className="org.apache.catalina.valves.AccessLogValve" directory="logs"
               prefix="localhost_access_log" suffix=".txt"
               pattern="%h %l %u %t & amp;quot;%r & amp;quot; %s %b" />
      </Host>
    </Engine>
  </Service>
1.3 Import the project package in webapps1 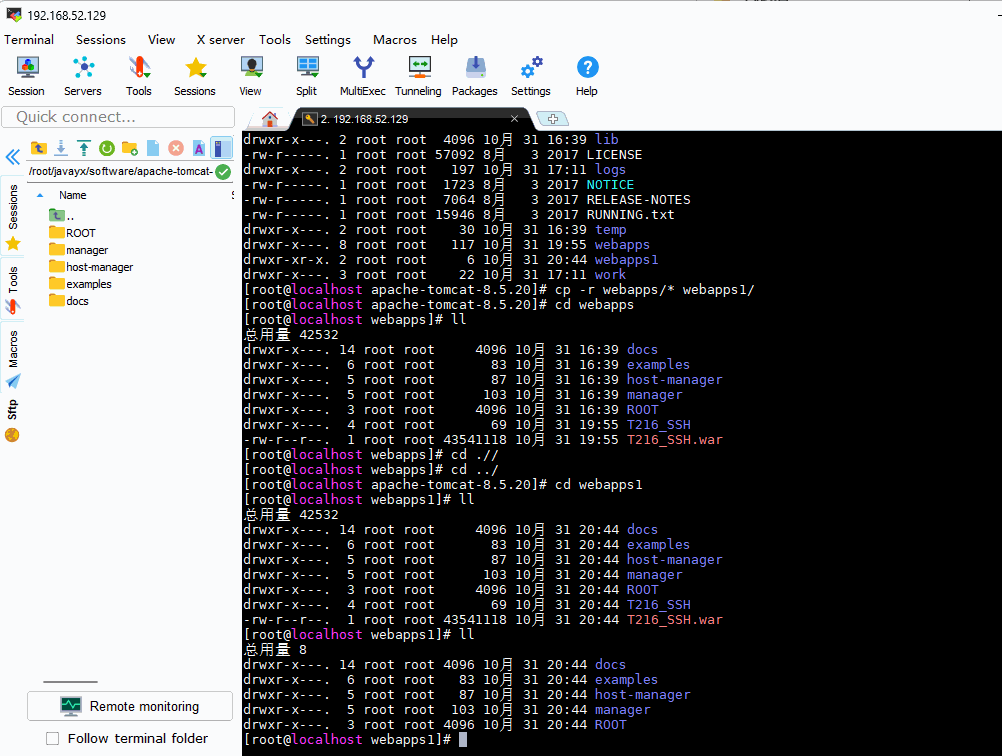

1.4 Run the server configuration database 

1.5 Create a firewall rule corresponding to the port
 < /h5>
2. Host access implementation 
This is to realize the deployment of two different projects by adjusting the settings and using two port numbers under one Tomcat, and successfully access them on the host page.
This ends the blog sharing in this issue. Please follow and support the blog three times in a row.
 < /h5>

This is to realize the deployment of two different projects by adjusting the settings and using two port numbers under one Tomcat, and successfully access them on the host page.
This ends the blog sharing in this issue. Please follow and support the blog three times in a row.

The knowledge points of the article match the official knowledge files, and you can further learn relevant knowledge. CS entry skill treeLinux introductionFirst introduction to Linux 37816 people are learning the system