1. Homework Objectives
Based on the WeChat portal interface implemented in the previous job, when the list on the first interface is clicked, another interface will be entered and a text prompt will be given.
2. Design process
1. Appearance design
Optimize the list of the first interface and add an imageview to item.xml;
Remove the list loop in Fragment1 and modify it to the text you want to display;After clicking on a certain line of text, it jumps to another page and a line of text prompts appears.
2. Internal contact
Write the text to be displayed in the list in fragment1.java, write the content of the intent in Myadapter.java, and pass it to textview_Activity.java. Textview _Activity.java uses getintent() to receive the content and display it in each textview to achieve clicks. A message, start textview_Activity.java to jump to the message page.
3. Technical description and key codes
1. Display string list
The code of Fragment1.java has basically not been modified, only the loop has been modified, as shown below. Then create a Myadapter object and bind it to RecyclerView. When creating the Myadapter object, pass the list variable to it as a parameter.
list = new ArrayList();
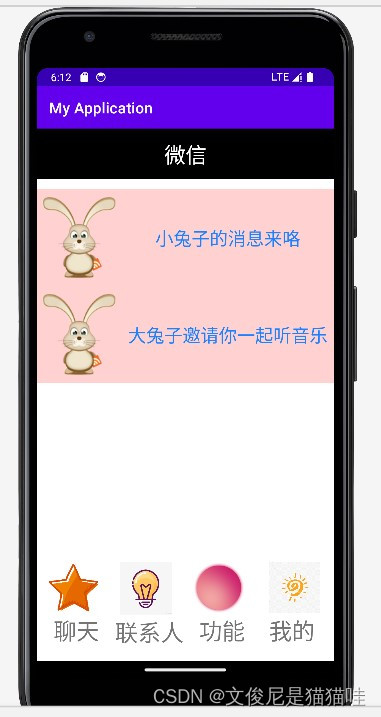
list.add("News from Little Rabbit" );
list.add("Big Rabbit invites you to listen to music together");
Complete code:
package com.example.myapplication;
import android.content.Context;
        import android.os.Bundle;

import androidx.annotation.NonNull;
import androidx.fragment.app.Fragment;

        import android.view.LayoutInflater;
import android.view.MotionEvent;
import android.view.View;
        import android.view.ViewGroup;
        import androidx.appcompat.app.AppCompatActivity;
        import androidx.recyclerview.widget.LinearLayoutManager;
        import androidx.recyclerview.widget.RecyclerView;

        import java.util.ArrayList;
        import java.util.List;

public class Fragment1 extends Fragment {

    RecyclerView recyclerView;

    List list;
    Myadapter myadapter;
    Context context;

    @Override
    public View onCreateView(LayoutInflater inflater, ViewGroup container,
                             Bundle savedInstanceState) {
        View view = inflater.inflate(R.layout.tab1, container, false);
        context = view.getContext();

       recyclerView = view.findViewById(R.id.recyclerView);

        list = new ArrayList();

        list.add("News from Little Rabbit" );
        list.add("Big Rabbit invites you to listen to music together");

        myadapter = new Myadapter(context, list);
        recyclerView.setAdapter(myadapter);
        LinearLayoutManager manager = new LinearLayoutManager(context);
        manager.setOrientation(RecyclerView.VERTICAL);
        recyclerView.setLayoutManager(manager);

        return view;
    }

}
2. Bind data to the control
Myadapter.java implements a simple RecyclerView, which is used to display a text list and start another Activity when the user clicks on the list item.
Mainly, the onBindViewHolder() method is added on the original basis. It sets the text content for the TextView in each item and adds a click event listener for it. When the TextView of each row is clicked, textview_Activity.java will be started. , and pass “yebiyebi” (the text you want) to this Activity.
//Bind data to MyHolder
@Override
public void onBindViewHolder(@NonNull Myholder holder, int position) {
holder.textView.setText(list1.get(position));
holder.textView.setOnClickListener(new View.OnClickListener() {
@Override
public void onClick(View view) {Context context = holder.itemView.getContext();
Intent intent1 = new Intent(context,textview_Activity.class);
intent1.putExtra(“qq”, “yebiyebi”);
context.startActivity(intent1);
}
});
}
Complete code:
package com.example.myapplication;

import android.content.Context;
import android.content.Intent;
import android.view.LayoutInflater;
import android.view.View;
import android.view.ViewGroup;
import android.widget.TextView;

import androidx.annotation.NonNull;
import androidx.recyclerview.widget.RecyclerView;

import java.util.ArrayList;
import java.util.List;

public class Myadapter extends RecyclerView.Adapter<Myadapter.Myholder>{
    Context context1;
    List<String> list1;
    public Myadapter(Context context, List<String> list){
        context1 = context;
        list1 = list;
    }

    //Create instance
    @NonNull
    @Override
    public Myholder onCreateViewHolder(@NonNull ViewGroup parent, int viewType) {
        View view = LayoutInflater.from(context1).inflate(R.layout.item,parent,false);
        Myholder holder=new Myholder(view);
        return holder;
    }
    //Bind data to MyHolder
    @Override
    public void onBindViewHolder(@NonNull Myholder holder, int position) {
        holder.textView.setText(list1.get(position));
        holder.textView.setOnClickListener(new View.OnClickListener() {
            @Override
            public void onClick(View view) {

                Context context = holder.itemView.getContext();
                Intent intent1 = new Intent(context,textview_Activity.class);
                intent1.putExtra("qq", "yebiyebi");
                context.startActivity(intent1);
//
// Intent intent = new Intent(context,textview_return.class);
// intent.putExtra("name", "It's cat Y");
// intent.putExtra("svt17", "Cute Rat");
// context.startActivity(intent);
            }
        });
    }
    //Return the size of the data set collection
    @Override
    public int getItemCount() {

        return list1.size();
    }


    //Used to save control references in item layout
    public class Myholder extends RecyclerView.ViewHolder {
        TextView textView;
        public Myholder(@NonNull View itemView) {
            super(itemView);
            textView = itemView.findViewById(R.id.item);
        }
    }

}
3. Get the text to be displayed on another page
getIntent is used to get the string parameter passed to textview_Activity.java and set it to the content of the textview to be displayed.
String name1=getIntent().getStringExtra(“qq”);
textView1=findViewById(R.id.item);
textView1.setText(name1);
Complete code:
package com.example.myapplication;

import android.content.Intent;
import android.media.MediaPlayer;
import android.os.Bundle;
import android.util.Log;
import android.view.View;
import android.widget.Button;
import android.widget.TextView;

import androidx.activity.result.ActivityResult;
import androidx.activity.result.ActivityResultCallback;
import androidx.activity.result.ActivityResultLauncher;
import androidx.activity.result.contract.ActivityResultContracts;
import androidx.appcompat.app.AppCompatActivity;


public class textview_Activity extends AppCompatActivity {
    //Button button44;

    TextView textView1,textView2,textView3;

    protected void onCreate(Bundle savedInstanceState) {
        super.onCreate(savedInstanceState);
        setContentView(R.layout.item);


// Intent intent = new Intent(textview_Activity.this,textview_return.class);
// intent.putExtra("name", "It's cat Y");
// intent.putExtra("age", 1);
// intent.putExtra("svt17", "Cute Rat");
// intent.putExtra("fighting!", 1);
// intent.putExtra("Infinite flowers are blooming", "It's raining");
// startActivity(intent);
        String name1=getIntent().getStringExtra("qq");
        textView1=findViewById(R.id.item);
        textView1.setText(name1);

        Log.d("svt", "onCreate...");

    }
    @Override
    protected void onPostResume() {
        super.onPostResume();
        Log.d("svt", "onPostResume...");
    }

    @Override
    protected void onResume() {
        super.onResume();
        Log.d("svt", "onResume...");
    }

    @Override
    protected void onStart() {
        super.onStart();
        Log.d("svt", "onStart...");
    }

    @Override
    protected void onStop() {
        super.onStop();
        Log.d("svt", "onStop...");
    }

    @Override
    protected void onDestroy() {
        super.onDestroy();
        Log.d("svt", "onDestroy...");
    }
}
4. Transformation of controls
I only modified the original item.xml according to personal preferences. Among them, android:src=”@drawable/rabit” /> saves a rabit.png image in the drawable folder.
<?xml version="1.0" encoding="utf-8"?>
<LinearLayout xmlns:android="http://schemas.android.com/apk/res/android"
    xmlns:app="http://schemas.android.com/apk/res-auto"
    android:layout_width="wrap_content"
    android:layout_height="wrap_content"
    android:background="#F4D6D6"
    android:backgroundTint="#FFD2D2"
    android:gravity="center">

    <ImageView
        android:id="@ + id/imageView4"
        android:layout_width="302dp"
        android:layout_height="match_parent"
        android:layout_weight="1"
        android:src="@drawable/rabit" />

    <TextView
        android:id="@ + id/item"
        android:layout_width="470dp"
        android:layout_height="match_parent"
        android:layout_gravity="center"
        android:layout_weight="1"
        android:gravity="center"
        android:text="message"
        android:textColor="#1C82FF"
        android:textSize="24sp" />

</LinearLayout>
5. Optimization
1. Whether this code clicks on the first row or the second row of the list, the text prompt returned to the interface is “Yebiyabi”. If you want to return a different message, you can modify Myadapter.java and modify “Yebiyabi”. Use position directly as value, so that the text returned is the text you clicked (the two methods are as follows).
// Context context = holder.itemView.getContext();
// Intent intent1 = new Intent(context1,textview_Activity.class);
// intent1.putExtra("qq", "yebiyebi");
// context.startActivity(intent1);

                Context context = holder.itemView.getContext();
                Intent intent1 = new Intent(context1,textview_Activity.class);
                intent1.putExtra("qq", list1.get(position));
                context1.startActivity(intent1);
2. If you want to define text by yourself, you can write a class yourself. The method of the class directly returns the value passed in. Pass the content you want to display into the class, and then change the sentence “Yebiyabi” to Class calls so that value can be different values. I asked my friends for advice, but I am still implementing it myself.
4. Result display

5. Problems encountered and solutions
1. “qq” in the first sentence below must be the same as the name written in Fragment1.java in the second sentence, otherwise the display will be blank.
String name1=getIntent().getStringExtra("qq");intent1.putExtra("qq", "yebiyebi");


2. The declaration Activity must be given in Mainifest! Don’t think that you can not write it just because it is “false”, otherwise it will be the same as not writing it after running it.
3. My original idea was to write two activities, write the intent content in the first activity, receive it in the second activity, and use different textviews to receive the display content. The final result is to jump directly from the first interface. On the third interface, because Fragment1 has jumped to textview_Activity, if I jump to another activity, it will jump twice. So I deleted another Activity and related intent content.
6. Online warehouse address
luo17_world: Created when studying mobile development technology courses (gitee.com)