Tip: Keep your mind clean
Before you work on your software, you need to clean up your memory. Throw away everything in your mind for the time being. If you have trouble with something, don’t let it influence you. It is mostly the case that trouble will go away. If the trouble is so heavy that you can’t let it go, don’t work. Try to clear things up. But when you start working, let the outer world shape away.
Zero, implementation principles and application case design
1. Principle
For the basic instance Demo, you can refer to the following blog post:
Implementing Vue and other front-end technology stacks to build Windows Forms applications based on .Net CEF – CSDN blog article has been read 291 times. Based on the .Net CEF library, you can use front-end technology stacks such as Vue to build Windows Forms applications https://blog.csdn.net/weixin_47560078/article/details/133974513The principle is very simple, based on .Net CEF implementation, and the library used is CefSharp.
2. Advantages
- You can use Vue/React and other front-end technologies to beautify the page and improve user-friendliness.
- Can schedule operating system resources such as printers, command lines, files
- Front-end and back-end development can be done in parallel
3. Disadvantages
- Loss some performance and takes up more system resources
- Debugging requires separate debugging of the front-end and back-end, which places high demands on developers and requires understanding of the front-end and back-end technology stacks.
- Not cross-platform, only supports Window
4. Application cases
This desktop application loads data from the database into a page table. Users can modify the table data according to their needs, save it to Excel, and print PDF.
5. Technology stack
Vite + Vue3 + TS + ElementUI(plus) + .NET Framework 4.7.2, the development environment is Win10, VS2019, VS Code.
6. Development process
- Integrate Vue + Vite + ElementUI
- Temporarily replace the .Net methods that need to be called by JS with JS methods
- After the page development is completed, then develop .Net methods and business processing logic
- Export .Net methods and replace temporary JS methods with real .Net methods
- Last release test
1. Front-end design and implementation
1. Integrate Vue + Vite + ElementUI
# Create vite vue
cnpm create vite@latest

# element-plus domestic mirror https://element-plus.gitee.io/zh-CN/
# Install element-plus
cnpm install element-plus --save

Introduce element plus as needed,
# Install import plug-in
cnpm install -D unplugin-vue-components unplugin-auto-import

Introduce element-plus and styles in main.ts,
// myapp\src\main.ts
import { createApp } from 'vue'
//import './style.css'
import App from './App.vue'
import ElementPlus from 'element-plus'
import 'element-plus/dist/index.css'

createApp(App).use(ElementPlus).mount('#app')
configure vite,
// myapp\vite.config.ts
import { defineConfig } from 'vite'
import vue from '@vitejs/plugin-vue'
import AutoImport from 'unplugin-auto-import/vite'
import Components from 'unplugin-vue-components/vite'
import { ElementPlusResolver } from 'unplugin-vue-components/resolvers'

// https://vitejs.dev/config/
export default defineConfig({
  plugins: [
    vue(),
    AutoImport({
      resolvers: [ElementPlusResolver()],
    }),
    Components({
      resolvers: [ElementPlusResolver()],
    }),
  ],
})
Create a new component page and reference it in App.vue,
// myapp\src\components\DataViewer.vue
<template>
  <el-table :data="tableData" style="width: 100%">
    <el-table-column fixed prop="date" label="Date" width="150" />
    <el-table-column prop="name" label="Name" width="120" />
    <el-table-column prop="state" label="State" width="120" />
    <el-table-column prop="city" label="City" width="120" />
    <el-table-column prop="address" label="Address" width="600" />
    <el-table-column prop="zip" label="Zip" width="120" />
    <el-table-column fixed="right" label="Operations" width="120">
      <template #default>
        <el-button link type="primary" size="small" @click="handleClick"
          >Detail</el-button
        >
        <el-button link type="primary" size="small">Edit</el-button>
      </template>
    </el-table-column>
  </el-table>
</template>

<script lang="ts" setup>
const handleClick = () => {
  console.log('click')
}

const tableData = [
  {
    date: '2016-05-03',
    name: 'Tom',
    state: 'California',
    city: 'Los Angeles',
    address: 'No. 189, Grove St, Los Angeles',
    zip: 'CA 90036',
    tag: 'Home',
  },
  {
    date: '2016-05-02',
    name: 'Tom',
    state: 'California',
    city: 'Los Angeles',
    address: 'No. 189, Grove St, Los Angeles',
    zip: 'CA 90036',
    tag: 'Office',
  },
  {
    date: '2016-05-04',
    name: 'Tom',
    state: 'California',
    city: 'Los Angeles',
    address: 'No. 189, Grove St, Los Angeles',
    zip: 'CA 90036',
    tag: 'Home',
  },
  {
    date: '2016-05-01',
    name: 'Tom',
    state: 'California',
    city: 'Los Angeles',
    address: 'No. 189, Grove St, Los Angeles',
    zip: 'CA 90036',
    tag: 'Office',
  },
]
</script>
run,
npm run dev

The official Table component example runs as follows:

2. Use icon Icon (supplementary)
cnpm install @element-plus/icons-vue

3. api packaging
Encapsulating DataUtil is used to simulate calling .Net methods to obtain data.
// myapp\src\api\DataUtil.ts

export const getData = async (): Promise<any> => {
    // await CefSharp.BindObjectAsync("dataUtil")
    // return dataUtil.getData()
    return new Promise((resolve, _) => {
        resolve([{
            date: '2016-05-03',
            name: 'Tom',
            state: 'California',
            city: 'Los Angeles',
            address: 'No. 189, Grove St, Los Angeles',
            zip: 'CA 90036',
            tag: 'Home',
        },
        {
            date: '2016-05-02',
            name: 'Tom',
            state: 'California',
            city: 'Los Angeles',
            address: 'No. 189, Grove St, Los Angeles',
            zip: 'CA 90036',
            tag: 'Office',
        },
        {
            date: '2016-05-04',
            name: 'Tom',
            state: 'California',
            city: 'Los Angeles',
            address: 'No. 189, Grove St, Los Angeles',
            zip: 'CA 90036',
            tag: 'Home',
        },
        {
            date: '2016-05-01',
            name: 'Tom',
            state: 'California',
            city: 'Los Angeles',
            address: 'No. 189, Grove St, Los Angeles',
            zip: 'CA 90036',
            tag: 'Office',
        },
        ])
    })
}
4. Obtain data implementation
The page DataViewer.vue loads the data, calls the getData asynchronous method of the api, and requests the data when the page is mounted.
// myapp\src\components\DataViewer.vue
<template>
  <el-table v-loading="loading" :data="tableData" style="width: 100%">
    <el-table-column fixed prop="date" label="Date" width="150" />
    <el-table-column prop="name" label="Name" width="120" />
    <el-table-column prop="state" label="State" width="120" />
    <el-table-column prop="city" label="City" width="120" />
    <el-table-column prop="address" label="Address" width="600" />
    <el-table-column prop="zip" label="Zip" width="120" />
    <el-table-column fixed="right" label="Operations" width="120">
      <template #default>
        <el-button link type="primary" size="small" @click="handleClick">Edit</el-button>
        <el-button link type="primary" size="small">Delete</el-button>
      </template>
    </el-table-column>
  </el-table>
</template>

<script lang="ts" setup>
import { ref, onMounted, reactive } from 'vue'
import { getData } from '../api/DataUtil'

//Table data loading flag
const loading = ref(true)

const handleClick = () => {
  console.log('click')
}

const tableData = reactive([])

onMounted(() => {
  // After obtaining the data, the flag position false will be loaded and bound to the table
  getData().then((res: any) => {
    loading.value = false
    console.log('>>> getData ', res)
    Object.assign(tableData, res)
  })

})

</script>
The local running effect is as follows:

5. Update data implementation
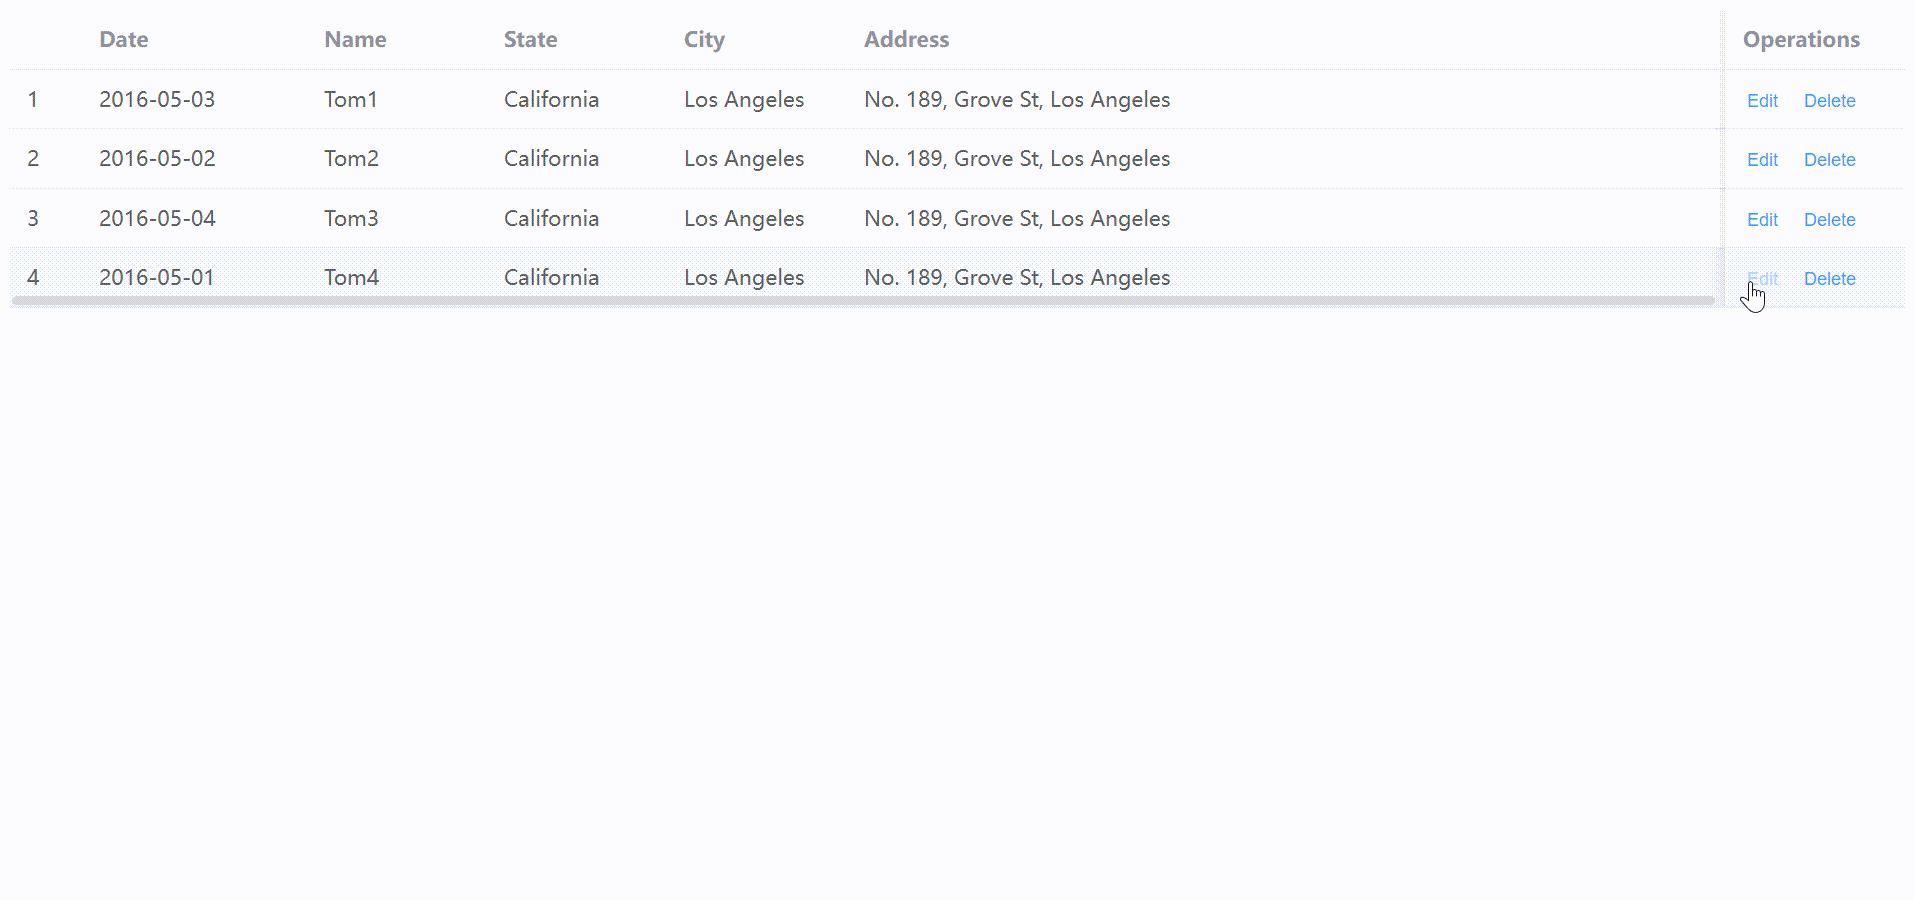
Page DataViewer.vue After selecting a row of data in the table, click “Edit” to edit. After editing, confirm the update and echo it to the page.
// myapp\src\components\DataViewer.vue
<template>
  <!-- Display after obtaining data -->
  <el-table v-loading="loading" :data="tableData" style="width: 100%">
    <el-table-column fixed type="index" :index="indexMethod" />
    <el-table-column prop="date" label="Date" width="150" />
    <el-table-column prop="name" label="Name" width="120" />
    <el-table-column prop="state" label="State" width="120" />
    <el-table-column prop="city" label="City" width="120" />
    <el-table-column prop="address" label="Address" width="600" />
    <el-table-column prop="zip" label="Zip" width="120" />
    <el-table-column fixed="right" label="Operations" width="120">
      <template #default="scope">
        <el-button link type="primary" size="small" @click="handleEdit(scope)">Edit</el-button>
        <el-button link type="primary" size="small">Delete</el-button>
      </template>
    </el-table-column>
  </el-table>

  <!-- When updating data, dialog box -->
  <el-dialog v-model="dialogFormVisible" title="Shipping address">
    <el-form :model="currentRow">
      <el-form-item label="date" :label-width="formLabelWidth">
        <el-input v-model="currentRow.date" autocomplete="off" />
      </el-form-item>
      <el-form-item label="name" :label-width="formLabelWidth">
        <el-input v-model="currentRow.name" autocomplete="off" />
      </el-form-item>
      <el-form-item label="state" :label-width="formLabelWidth">
        <el-input v-model="currentRow.state" autocomplete="off" />
      </el-form-item>
      <el-form-item label="city" :label-width="formLabelWidth">
        <el-input v-model="currentRow.city" autocomplete="off" />
      </el-form-item>
      <el-form-item label="address" :label-width="formLabelWidth">
        <el-input v-model="currentRow.address" autocomplete="off" />
      </el-form-item>
      <el-form-item label="zip" :label-width="formLabelWidth">
        <el-input v-model="currentRow.zip" autocomplete="off" />
      </el-form-item>
      <el-form-item label="tag" :label-width="formLabelWidth">
        <el-input v-model="currentRow.tag" autocomplete="off" />
      </el-form-item>
    </el-form>
    <template #footer>
      <span class="dialog-footer">
        <el-button @click="dialogFormVisible = false">Cancel</el-button>
        <el-button type="primary" @click="handleUpdate()">
          Confirm
        </el-button>
      </span>
    </template>
  </el-dialog>
</template>

<script lang="ts" setup>
import { ref, onMounted, reactive } from 'vue'
import { getData } from '../api/DataUtil'

//Table data loading flag
const loading = ref(true)
const tableData = reactive([])

//Update data dialog
const dialogFormVisible = ref(false)
const formLabelWidth = '140px'

// Currently selected row data
const currentRow = reactive({
  date: 'please input date',
  name: 'please input name',
  state: 'please input state',
  city: 'please input city',
  address: 'please input address',
  zip: 'please input zip',
  tag: 'please input tag',
})

const currentRowIndex = ref(1)

// update event
const handleUpdate = () => {
  //console.log('>>> handleUpdate ', currentRow, currentRowIndex.value)
  Object.assign(tableData[currentRowIndex.value], currentRow)
  dialogFormVisible.value = false
}

// Index rules
const indexMethod = (index: number) => {
  return index + 1
}

// Edit event
const handleEdit = (scope: any) => {
  //console.log('edit',scope.$index,scope.row)
  Object.assign(currentRow, scope.row)
  currentRowIndex.value = scope.$index
  dialogFormVisible.value = true
}

//Mounting method
onMounted(() => {
  // After obtaining the data, the flag position false will be loaded and bound to the table
  getData().then((res: any) => {
    //console.log('>>> getData ', res)
    loading.value = false
    Object.assign(tableData, res)
  })

})

</script>
<style>
.el-button--text {
  margin-right: 15px;
}

.el-select {
  width: 300px;
}

.el-input {
  width: 300px;
}

.dialog-footer button:first-child {
  margin-right: 10px;
}
</style>
The local running effect is as follows:
6. Deletion of data implementation
Page DataViewer.vue After selecting a row of data in the table, click “Delete” to delete, a pop-up window will pop up to confirm, and the deletion result will be echoed to the page.
// myapp\src\components\DataViewer.vue
<template>
  <!-- Display after obtaining the data -->
  <el-table v-loading="loading" :data="tableData" style="width: 100%">
    <el-table-column fixed type="index" :index="indexMethod" />
    <el-table-column prop="date" label="Date" width="150" />
    <el-table-column prop="name" label="Name" width="120" />
    <el-table-column prop="state" label="State" width="120" />
    <el-table-column prop="city" label="City" width="120" />
    <el-table-column prop="address" label="Address" width="600" />
    <el-table-column prop="zip" label="Zip" width="120" />
    <el-table-column fixed="right" label="Operations" width="120">
      <template #default="scope">
        <el-button link type="primary" size="small" @click="handleEdit(scope)">Edit</el-button>
        <el-button link type="primary" size="small" @click="handleDelete(scope)">Delete</el-button>
      </template>
    </el-table-column>
  </el-table>

  <!-- When updating data, dialog box -->
  <el-dialog v-model="dialogUpdateFormVisible" title="Update Shipping address ?">
    <el-form :model="currentRow">
      <el-form-item label="date" :label-width="formLabe