1 Add dependencies
First create a project and add ES-related dependencies to the project. The specific dependencies are as follows:
<dependency>
    <groupId>org.elasticsearch</groupId>
    <artifactId>elasticsearch</artifactId>
    <version>7.1.0</version>
</dependency>
<dependency>
    <groupId>org.elasticsearch.client</groupId>
    <artifactId>elasticsearch-rest-high-level-client</artifactId>
    <version>7.1.0</version>
</dependency>
2 Create ES configuration
Configure the relevant parameters of ES in the configuration file application.properties. The specific contents are as follows:
elasticsearch.host=localhost
elasticsearch.port=9200
elasticsearch.connTimeout=3000
elasticsearch.socketTimeout=5000
elasticsearch.connectionRequestTimeout=500
It specifies the host and port of the ES and the timeout settings. In addition, our ES does not add any security authentication, so the username and password are not set.
Then create the ElasticsearchConfiguration class under the config package, read the corresponding parameters from the configuration file, and then declare an initRestClient method, which returns a RestHighLevelClient, and adds the @Bean(destroyMethod = “close”) annotation to it. When destroy When doing a shutdown, this method is mainly about how to initialize and create a RestHighLevelClient.
@Configuration
public class ElasticsearchConfiguration {<!-- -->

    @Value("${elasticsearch.host}")
    private String host;

    @Value("${elasticsearch.port}")
    private int port;

    @Value("${elasticsearch.connTimeout}")
    private int connTimeout;

    @Value("${elasticsearch.socketTimeout}")
    private int socketTimeout;

    @Value("${elasticsearch.connectionRequestTimeout}")
    private int connectionRequestTimeout;

    @Bean(destroyMethod = "close", name = "client")
    public RestHighLevelClient initRestClient() {<!-- -->
        RestClientBuilder builder = RestClient.builder(new HttpHost(host, port))
                .setRequestConfigCallback(requestConfigBuilder -> requestConfigBuilder
                        .setConnectTimeout(connTimeout)
                        .setSocketTimeout(socketTimeout)
                        .setConnectionRequestTimeout(connectionRequestTimeout));
        return new RestHighLevelClient(builder);
    }
}
3 Define document entity class
First define the constant interface under the constant package, and define the index name in the interface as user:
public interface Constant {<!-- -->
    String INDEX = "user";
}
Then create a document entity class under the document package:
public class UserDocument {<!-- -->
    private String id;
    private String name;
    private String sex;
    private Integer age;
    private String city;
    // Omit getter/setter
}
4 ES basic operations
Here we mainly introduce simple operations related to ES indexing, documents, and search, and create the UserService class under the service package.
4.1 Index operation
When creating an index, you can set the index name, number of shards, number of replicas, and mappings in CreateIndexRequest. Here the index name is user, the number of shards number_of_shards is 1, and the number of replicas number_of_replicas is 0. The specific code is as follows:
public boolean createUserIndex(String index) throws IOException {<!-- -->
    CreateIndexRequest createIndexRequest = new CreateIndexRequest(index);
    createIndexRequest.settings(Settings.builder()
            .put("index.number_of_shards", 1)
            .put("index.number_of_replicas", 0)
    );
    createIndexRequest.mapping("{\\
" +
            " "properties": {\\
" +
            " "city": {\\
" +
            " "type": "keyword"\\
" +
            " },\\
" +
            " "sex": {\\
" +
            " "type": "keyword"\\
" +
            " },\\
" +
            " "name": {\\
" +
            " "type": "keyword"\\
" +
            " },\\
" +
            " "id": {\\
" +
            " "type": "keyword"\\
" +
            " },\\
" +
            " "age": {\\
" +
            " "type": "integer"\\
" +
            " }\\
" +
            " }\\
" +
            "}", XContentType.JSON);
    CreateIndexResponse createIndexResponse = client.indices().create(createIndexRequest, RequestOptions.DEFAULT);
    return createIndexResponse.isAcknowledged();
}
By calling this method, you can create an index user. The index information is as follows:
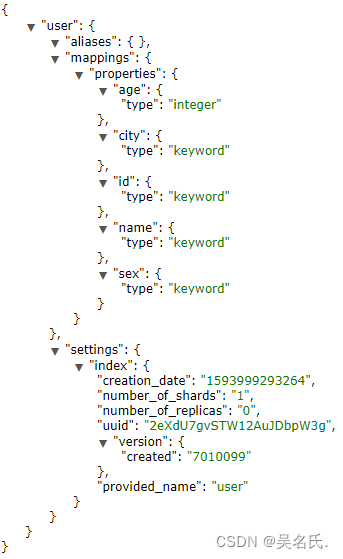
There will be a special article explaining the Mapping of ES.
4.2 Delete index
The index can be deleted by passing the index name in DeleteIndexRequest. The specific code is as follows:
public Boolean deleteUserIndex(String index) throws IOException {<!-- -->
    DeleteIndexRequest deleteIndexRequest = new DeleteIndexRequest(index);
    AcknowledgedResponse deleteIndexResponse = client.indices().delete(deleteIndexRequest, RequestOptions.DEFAULT);
    return deleteIndexResponse.isAcknowledged();
}
After introducing the basic operations of indexing, the following describes the related operations of documents:
4.3 Document Operation
Create documents, create documents in batches, view documents, update documents, and delete documents in this demonstration:
4.3.1 Creating documents
When creating a document, you need to specify the index name in IndexRequest. If the id is not passed, it will be automatically generated by ES and then passed in the source. The specific code is as follows:
public Boolean createUserDocument(UserDocument document) throws Exception {<!-- -->
    UUID uuid = UUID.randomUUID();
    document.setId(uuid.toString());
    IndexRequest indexRequest = new IndexRequest(Constant.INDEX)
            .id(document.getId())
            .source(JSON.toJSONString(document), XContentType.JSON);
    IndexResponse indexResponse = client.index(indexRequest, RequestOptions.DEFAULT);
    return indexResponse.status().equals(RestStatus.OK);
}
Next, by calling this method, two documents are created. The specific contents are as follows:

4.3.2 Create documents in batches
In a REST request, re-establishing network overhead is very performance-intensive, so ES provides the Bulk API to support operations on different indexes in one API call, thereby reducing network transmission overhead and increasing the write rate.
The following method is to create documents in batches. Multiple Requests can be added to one BulkRequest. The specific code is as follows:
public Boolean bulkCreateUserDocument(List<UserDocument> documents) throws IOException {<!-- -->
    BulkRequest bulkRequest = new BulkRequest();
    for (UserDocument document : documents) {<!-- -->
        String id = UUID.randomUUID().toString();
        document.setId(id);
        IndexRequest indexRequest = new IndexRequest(Constant.INDEX)
                .id(id)
                .source(JSON.toJSONString(document), XContentType.JSON);
        bulkRequest.add(indexRequest);
    }
    BulkResponse bulkResponse = client.bulk(bulkRequest, RequestOptions.DEFAULT);
    return bulkResponse.status().equals(RestStatus.OK);
}
Let’s create some documents through this method to facilitate the following search demonstration.
4.3.3 View documentation
To view a document, you need to pass in the index name and document id in GetRequest. The specific code is as follows:
public UserDocument getUserDocument(String id) throws IOException {<!-- -->
    GetRequest getRequest = new GetRequest(Constant.INDEX, id);
    GetResponse getResponse = client.get(getRequest, RequestOptions.DEFAULT);
    UserDocument result = new UserDocument();
    if (getResponse.isExists()) {<!-- -->
        String sourceAsString = getResponse.getSourceAsString();
        result = JSON.parseObject(sourceAsString, UserDocument.class);
    } else {<!-- -->
        logger.error("No document with this id found");
    }
    return result;
}
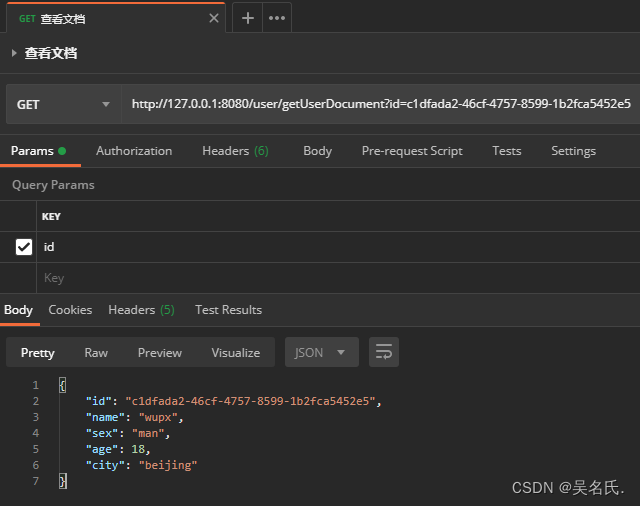
Next, pass in the document id and call this method. The result is as follows:
4.3.4 Update documentation
To update a document, you first pass in the index name and document id to UpdateRequest, and then update it by passing in the new doc. The specific code is as follows:
public Boolean updateUserDocument(UserDocument document) throws Exception {<!-- -->
    UserDocument resultDocument = getUserDocument(document.getId());
    UpdateRequest updateRequest = new UpdateRequest(Constant.INDEX, resultDocument.getId());
    updateRequest.doc(JSON.toJSONString(document), XContentType.JSON);
    UpdateResponse updateResponse = client.update(updateRequest, RequestOptions.DEFAULT);
    return updateResponse.status().equals(RestStatus.OK);
}
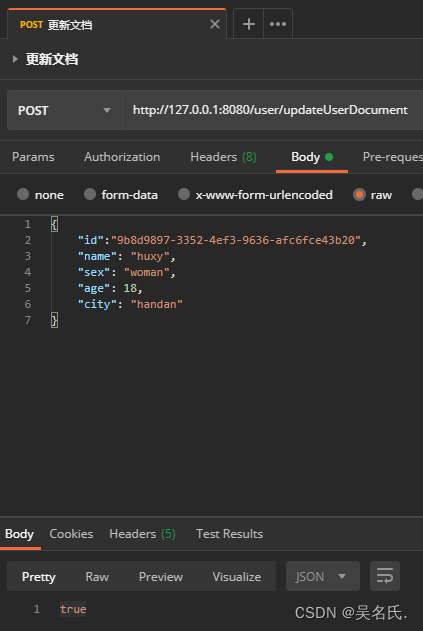
Next, change the city information of the document with document ID 9b8d9897-3352-4ef3-9636-afc6fce43b20 to handan. The result of calling the method is as follows:
4.3.5 Delete documents
To delete a document, you only need to pass in the index name and document id in DeleteRequest, and then execute the delete method to complete the deletion of the document. The specific code is as follows:
public String deleteUserDocument(String id) throws Exception {<!-- -->
    DeleteRequest deleteRequest = new DeleteRequest(Constant.INDEX, id);
    DeleteResponse response = client.delete(deleteRequest, RequestOptions.DEFAULT);
    return response.getResult().name();
}
After introducing the basic operations of documents, let’s give a brief introduction to search:
4.4 Search operation
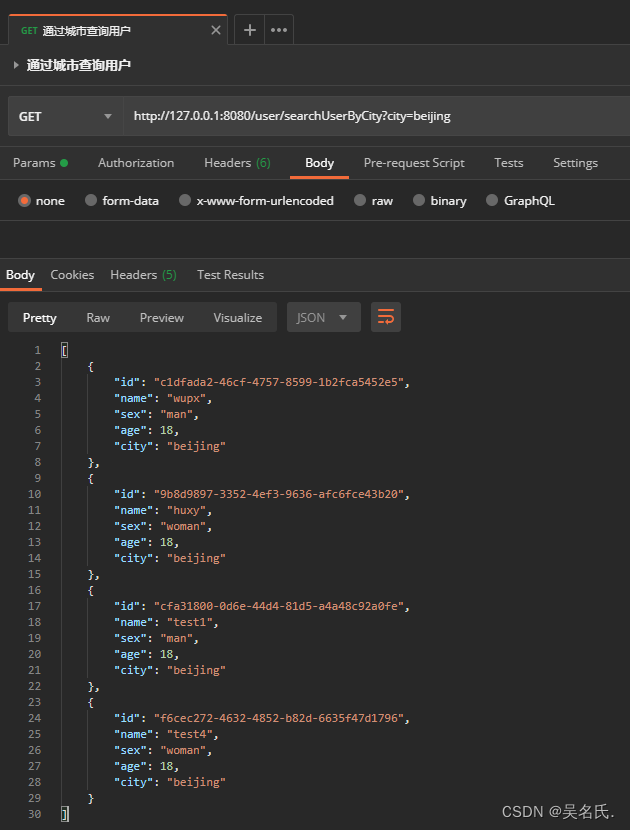
A simple search operation requires setting the index name to be searched in SearchRequest (multiple index names can be set), and then constructing the search source through SearchSourceBuilder. Next, pass the TermQueryBuilder search query to searchSourceBuilder, and finally set the search source of searchRequest to searchSourceBuilder and execute The search method implements searching by city. The specific code is as follows:
public List<UserDocument> searchUserByCity(String city) throws Exception {<!-- -->
    SearchRequest searchRequest = new SearchRequest();
    searchRequest.indices(Constant.INDEX);
    SearchSourceBuilder searchSourceBuilder = new SearchSourceBuilder();
    TermQueryBuilder termQueryBuilder = QueryBuilders.termQuery("city", city);
    searchSourceBuilder.query(termQueryBuilder);
    searchRequest.source(searchSourceBuilder);
    SearchResponse searchResponse = client.search(searchRequest, RequestOptions.DEFAULT);
    return getSearchResult(searchResponse);
}
4.4.1 Aggregated search
Aggregation search is to add aggregate search to searchSourceBuilder. The following method is to use TermsAggregationBuilder to construct a classification aggregation by city first, which also includes a sub-aggregation that averages age. Then when obtaining the aggregation results, you can use the constructor The aggregation result is obtained by the aggregation name during aggregation. The specific code is as follows:
public List<UserCityDTO> aggregationsSearchUser() throws Exception {<!-- -->
    SearchRequest searchRequest = new SearchRequest(Constant.INDEX);
    SearchSourceBuilder searchSourceBuilder = new SearchSourceBuilder();
    TermsAggregationBuilder aggregation = AggregationBuilders.terms("by_city")
            .field("city")
            .subAggregation(AggregationBuilders
                    .avg("average_age")
                    .field("age"));
    searchSourceBuilder.aggregation(aggregation);
    searchRequest.source(searchSourceBuilder);
    SearchResponse searchResponse = client.search(searchRequest, RequestOptions.DEFAULT);
    Aggregations aggregations = searchResponse.getAggregations();
    Terms byCityAggregation = aggregations.get("by_city");
    List<UserCityDTO> userCityList = new ArrayList<>();
    for (Terms.Bucket buck : byCityAggregation.getBuckets()) {<!-- -->
        UserCityDTO userCityDTO = new UserCityDTO();
        userCityDTO.setCity(buck.getKeyAsString());
        userCityDTO.setCount(buck.getDocCount());
        // Get subaggregation
        Avg averageBalance = buck.getAggregations().get("average_age");
        userCityDTO.setAvgAge(averageBalance.getValue());
        userCityList.add(userCityDTO);
    }
    return userCityList;
}
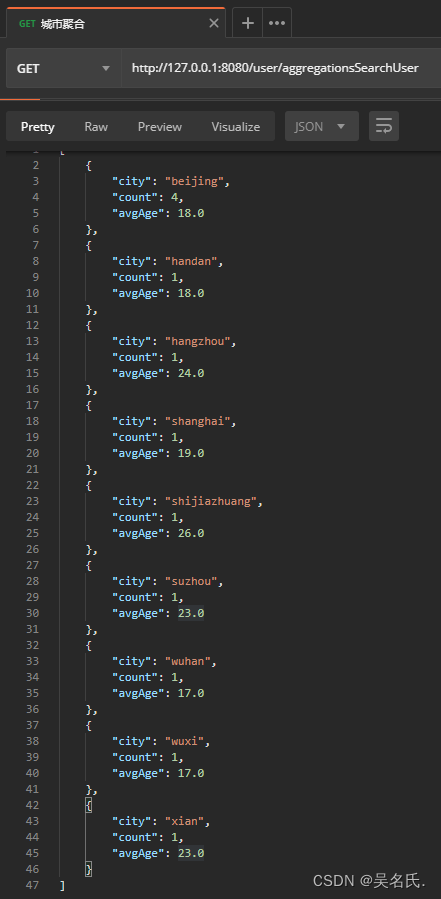
The following is the result of executing this method:
So far, the basic operations of ES have been briefly introduced. You can try it more. If you don’t know how, you can read the official documentation.
5 Summary
The complete code of this article is under https://github.com/363153421/springboot-elasticsearch.
Combining Spring Boot with ES is relatively simple. You can download the project source code, run and debug the project locally, and better understand how to build ES-based applications in Spring Boot.