The NuGet Package Manager Console is built into Visual Studio in Windows 2012 and later. (Not included with Visual Studio for Mac or Visual Studio Code.)
Console, you can use NuGet PowerShell commands to find, install, uninstall, and update NuGet packages. Using the console is necessary in situations where the package manager UI does not provide information on how to perform an operation. To use the nuget.exe command in the console, see Using the CLI nuget.exe in the console.
For example, to find and install a package, you can use three simple steps:
-
In Visual Studio, open your project/solution and open the console using the Tools > NuGet Package Manager > Package Manager Console command.
-
Find the package you want to install. If you already know this, skip to step 3.
ps
# Find packages containing the keyword "elmah"
Find-Package elmah
-
Run the installation command:
ps
# Install the Elmah package to the project named MyProject.
Install-Package Elmah -ProjectName MyProject
important
All operations available in the console are also available with the NuGet CLI. However, console commands run within the context of Visual Studio and saved projects/solutions, and often complete multiple of their equivalent CLI commands. For example, installing a package through the console adds a reference to the project but the CLI command does not run. For this purpose, developers who typically work in Visual Studio prefer to use the CLI to the console.
hint
Many console operations depend on using a known path name to open a solution in Visual Studio. If you have an unsaved solution or no solution, you can see this error, “The solution was not opened or saved. Please make sure you have the solution open and saved.” This means that the console cannot determine the solution folder. Saving the unsaved solution, or creating and saving the solution if you haven’t opened it yet, should correct the error.
Opening the console and console controls
-
Open the console in Visual Studio using the Tools > NuGet Package Manager > Package Manager console command. In the console, you can arrange and position Visual Studio windows to your liking (see Customize window layout in Visual Studio).
-
By default, console commands run against specific package sources and controls set at the top of the window in the project:

-
Selecting a different package source and/or project changes these default settings for subsequent commands. Most commands support the
-Sourceand-ProjectNameoptions to override the default settings without changing them. -
To manage package sources, select the gear icon. This is a shortcut to Tools > Options > NuGet Package Manager > Package Source dialog as described on the Package Manager UI page. Additionally, the project selector control on the right clears the contents of the console:

-
The rightmost button interrupts long-running commands. For example, running
Get-Package -ListAvailable -PageSize 500to list the first 500 packages on a default source (such as nuget.org) may take several minutes to run.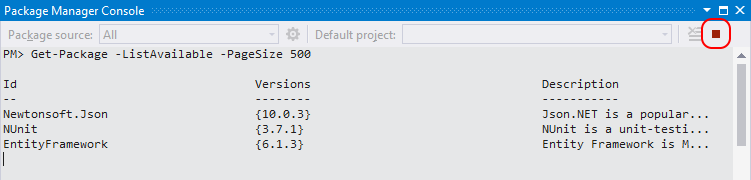


Installing package
ps
# Add the Elmah package to the default project as specified in the console's project selector
Install-Package Elmah

# Add the Elmah package to a project named UtilitiesLib that is not the default
Install-Package Elmah -ProjectName UtilitiesLib
See the installation package.
The installed package performs the following operations:
- Applicable license terms are displayed in the console window with implied agreement. If you do not agree to these terms, you should uninstall the package immediately.
- Add citations to the project in whatever citation format you are using. The reference will then appear in Solution Explorer and the applicable reference format file. However, please note that with PackageReference, you need to save the project before you can directly see the changes in the project file.
- Cache package:
- PackageReference: The cached package
%USERPROFILE%\.nuget\packagesand the lock file i.e.project.assets.jsonare updated. packages.config: Create thepackagespackage file into a subfolder in the solution root directory and copy the folder.package.configupdate file.
- PackageReference: The cached package
- Update
app.configand/orweb.configif the package uses source and configuration file transformations. - Install any dependencies if they don’t already exist in the project. As described in , this may update the package version during dependency resolution.
- If available, display the package’s readme file in a Visual Studio window.
hint
One of the main advantages of installing a package is that when using the Install-Package command in the console, it will have a reference to the project, just like using the package manager UI. In contrast, the nuget install CLI command only downloads the package and does not automatically add references.
Uninstalling package
ps
# Uninstalls the Elmah package from the default project
Uninstall-Package Elmah

# Uninstalls the Elmah package and all its unused dependencies
Uninstall-Package Elmah -RemoveDependencies # Uninstalls the Elmah package even if another package depends on it Uninstall-Package Elmah -Force
See Uninstalling a package. Use Get Packages to view all packages currently installed in the default project if you need to find the identifier.
Uninstalling a package does the following:
- A reference to the package from the project (and whatever citation format is being used). The reference no longer appears in Solution Explorer. (You may need to rebuild the project to see it removed from the Bin folder.)
- Reverse any changes made to
app.configorweb.configwhen the package was installed. - If there are no remaining packages using these dependencies, the dependencies from the previous installation are removed.
hint
Commands such as Install-Package and Uninstall-Package have the benefit of managing references in the project, with the nuget uninstall CLI command.
Updating package
ps
# Checks if there are newer versions available for any installed packages
Get-Package-updates

# Updates a specific package using its identifier, in this case jQuery
Update-Package jQuery # Update all packages in the project named MyProject (as it appears in Solution Explorer) Update-Package -ProjectName MyProject # Update all packages in the solution Update-Package
See Get packages and update packages
Finding package
ps
# Find packages containing keywords
Find-Package elmah
Find-Package logging

# List packages whose ID begins with Elmah
Find-Package Elmah -StartWith # By default, Get-Package returns a list of 20 packages; use -First to show more Find-Package logging -First 100 # List all versions of the package with the ID of "jquery" Find -Package jquery -AllVersions -ExactMatch
See Finding Packages. In Visual Studio 2013 and earlier, use Get Package instead.
Console availability
In Visual Studio 2017, NuGet and the NuGet Package Manager will be automatically installed when any is selected. Provides .NET-related workloads; you can also install it separately by checking the Individual Components > Code Tools > NuGet Package Manager option in the Visual Studio 2017 installer.
Also, if you are missing the NuGet Package Manager in Visual Studio 2015 and earlier, please check Tools > Extensions and Updates… and search for the NuGet Package Manager extension. If you are unable to use the extension installer in Visual Studio, you can download the extension directly from https://dist.nuget.org/index.html.
The Package Manager console is not currently available for Visual Studio for Mac. Equivalent commands, however, function through the NuGet CLI. Visual Studio for Mac also has some UI for managing NuGet packages. See the NuGet packages included in your project.
The Package Manager console does not include Visual Studio Code.
Extension Pack Manager Console
Certain packages install new console commands. For example, MvcScaffolding creates a command like Scaffold as shown below, which will generate an ASP.NET MVC controller and view:

Set NuGet PowerShell profile
PowerShell profiles provide commonly used commands whenever you use PowerShell. NuGet support NuGet specific configuration files are typically found in:
%UserProfile%\Documents\WindowsPowerShell\\
uGet_profile.ps1
To find the profile, type $profile in the console:
ps
$profile
C:\Users\<user>\Documents\WindowsPowerShell\\
uGet_profile.ps1
For more details, see Windows PowerShell Profiles.
Using nuget.exe CLI in the console
To make the nuget.exe CLI available in the package manager console, install the NuGet.CommandLine package from the console:
ps
# Other versions are available, see http://www.nuget.org/packages/NuGet.CommandLine/
Install-Package NuGet.CommandLine -Version 4.4.1