Directory of series articles
Chapter 1 Dragging controls within Grid
Chapter 2 Dragging controls within Canvas
Chapter 3 Dragging any control
Chapter 4 Window Dragging
Chapter 5 Additional attributes enable arbitrary dragging
Chapter 6 Expand more dragging functions (this chapter)
Article directory
- Table of Contents of Series Articles
- Preface
- 1. Added functions
-
- 1. MoveTo of any control
- 2. DragMove any control
- 3. Boundary restrictions
- 4. Window maximized and dragged to restore
- 5. Drag event
- 2. Complete code
- 3. Usage examples
-
- 1. MoveTo
- 2.DragMove
- 3. Boundary restrictions
- 4. Window maximized and dragged to restore
- 5. Drag event
- Summarize
Foreword
In the last chapter, we implemented the unified drag function of any control and can easily add drag to any control. During the development process, I found that there are still some functions that can be continued to be expanded, such as moving controls in CS code, triggering drag after responding to events, limiting the drag range, etc.
1. Added functions
The following functions have been added based on Chapter 5.
1. MoveTo any control
This function is relatively simple, just judge different types of containers and distinguish different movement logic.
The code example is as follows:
/// <summary>
/// Move any control to the specified coordinate point
/// </summary>
/// <param name="elememt">this</param>
/// <param name="parentPoint">The coordinate point of the parent container. The reason why the coordinates of the container are sampled is because the sampling of its own coordinate control position will be invalid. When sampling the screen coordinates, you need to convert the dpi yourself (PointToScreen does not Can do dpi conversion)</param>
public static void MoveTo(this FrameworkElement elememt, Point parentPoint)
{<!-- -->
    var parent = VisualTreeHelper.GetParent(elememt);
    if (parent is Canvas)
    {<!-- -->
        //Canvas movement logic
    }
    else if (elememt is Window)
    {<!-- -->
        //Window movement logic
    }
    else
    {<!-- -->
        //Grid or Transform movement logic, both can be applied to any control
    }
}
Expanding a method to obtain the location to facilitate the use of MoveTo
/// <summary>
/// Get the coordinates of the control, based on the parent control. Window is the desktop location.
/// </summary>
/// <param name="elememt"></param>
public static Point GetPosition(this FrameworkElement elememt)
{<!-- -->
    var parent = VisualTreeHelper.GetParent(elememt);
    if (elememt is Window)
    {<!-- -->
        var window = elememt as Window;
        return new Point(window!.Left, window.Top);
    }
    return elememt.TranslatePoint(new Point(0, 0), parent as UIElement);
}
2. DragMove any control
We know that the Window of wpf has the DragMove function. It is very convenient to call this method in the left mouse button press event to realize the drag function. DragMove of any control can also be implemented. We need to use the DragMoveable object in Chapter 5 combined with manually triggered events to achieve it.
The code example is as follows:
/// <summary>
/// Click and drag
/// Similar to Window's DragMove, this method must be called by pressing the left mouse button.
/// await can wait for the drag to end
/// </summary>
/// <param name="elememt">this</param>
/// <returns></returns>
/// <exception cref="InvalidOperationException"></exception>
public static Task DragMove(this FrameworkElement elememt)
{<!-- -->
    if (Mouse.LeftButton != MouseButtonState.Pressed)
    {<!-- -->
        throw new InvalidOperationException("Left button down to call this method");
    }
    var tcs = new TaskCompletionSource();
     //Initialize DragMoveable object
     //Manually trigger elememt's left mouse button press event
     //After dragging is completed tcs.SetResult();
    return tcs.Task;
}
3. Boundary restrictions
Add an IsMoveInBounds additional property to indicate whether the drag range is within the parent control.
The code example is as follows:
 public static bool GetIsMoveInBounds(DependencyObject obj)
 {<!-- -->
     return (bool)obj.GetValue(IsMoveInBoundsProperty);
 }

 public static void SetIsMoveInBounds(DependencyObject obj, bool value)
 {<!-- -->
     obj.SetValue(IsMoveInBoundsProperty, value);
 }
 /// <summary>
 /// Whether to drag within the parent container area and not exceed the boundary
 /// </summary>
 // Using a DependencyProperty as the backing store for IsMoveInBounds. This enables animation, styling, binding, etc...
 public static readonly DependencyProperty IsMoveInBoundsProperty =
     DependencyProperty.RegisterAttached("IsMoveInBounds", typeof(bool), typeof(Move), new PropertyMetadata(true));
In Chapter 5, additional attributes are added to the drag logic to implement arbitrary dragging. For example, the example of Canvas is as follows:
var p = _parent as Canvas;
if (GetIsMoveInBounds(c))
//Correct movement range
{<!-- -->
    if (left < 0) left = 0;
    if (top < 0) top = 0;
    if (left + c.ActualWidth > p.ActualWidth) left = p.ActualWidth - c.ActualWidth;
    if (top + c.ActualHeight > p.ActualHeight) top = p.ActualHeight - c.ActualHeight;
}
4. Window maximized and dragged to restore
When the window of the Windows system is maximized and the title is dragged, it will automatically return to the normal state of the window. After realizing the borderless window, this function will be lost. You need to implement it yourself, and there is a certain logic in the position of the window that restores the normal state.
The code example is as follows:
if (window.WindowState == WindowState.Maximized)
//Drag logic when maximizing
{<!-- -->
    //restore to normal window
    window.WindowState = WindowState.Normal;
    double width = SystemParameters.PrimaryScreenWidth;//Get the overall width of the screen
    double height = SystemParameters.PrimaryScreenHeight;//Get the overall height of the screen
    //Adjust the window position according to the position of the mouse. The basic logic is that the horizontal position is the midpoint of the mouse, and the vertical position is the top of the mouse. If it exceeds the screen range, it will be corrected to the side closer to it.
}
5. Drag event
Provides 3 drag events, drag start, drag change, drag end.
The code example is as follows:
 /// <summary>
 /// Drag start event
 /// </summary>
 public static readonly RoutedEvent DragMoveStartedEvent = EventManager.RegisterRoutedEvent("DragMoveStarted", RoutingStrategy.Direct, typeof(EventHandler<DragMoveStartedEventArgs>), typeof(Move));
/// <summary>
/// Drag change event
/// </summary>
public static readonly RoutedEvent DragMoveDeltaEvent = EventManager.RegisterRoutedEvent("DragMoveDelta", RoutingStrategy.Direct, typeof(EventHandler<DragMoveDeltaEventArgs>), typeof(Move));
/// <summary>
/// Drag end event
/// </summary>
public static readonly RoutedEvent DragMoveCompletedEvent = EventManager.RegisterRoutedEvent("DragMoveCompleted", RoutingStrategy.Direct, typeof(EventHandler<DragMoveCompletedEventArgs>), typeof(Move));
2. Complete code
The vs2022 wpf .net 6.0 project includes the functions of Chapter 5 and does not require repeated downloads.
https://download.csdn.net/download/u013113678/88513646
3. Usage examples
Since this chapter is an expansion of Chapter 5, you can refer to Chapter 5 for basic functions.
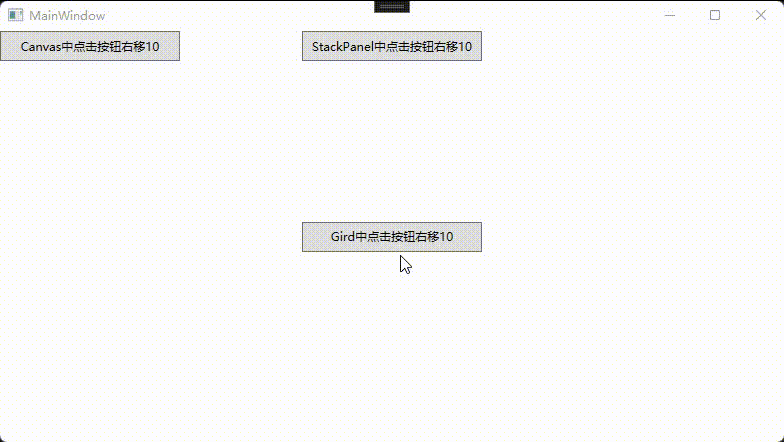
1. MoveTo
xaml
<Window x:Class="WpfMove.MainWindow"
        xmlns="http://schemas.microsoft.com/winfx/2006/xaml/presentation"
        xmlns:x="http://schemas.microsoft.com/winfx/2006/xaml"
        xmlns:d="http://schemas.microsoft.com/expression/blend/2008"
        xmlns:mc="http://schemas.openxmlformats.org/markup-compatibility/2006"
        xmlns:local="clr-namespace:WpfMove"
        mc:Ignorable="d"
        Title="MainWindow" Height="450" Width="800"
        >
    <Grid>
        <Button Width="180" Height="30" Click="Button_Click">Click the button in Gird to move 10 to the right</Button>
        <StackPanel>
            <Button Width="180" Height="30" Click="Button_Click">Click the button in the StackPanel to move 10 to the right</Button>
        </StackPanel>
        <Canvas>
            <Button Width="180" Height="30" Click="Button_Click">Click the button in Canvas to move 10 to the right</Button>
        </Canvas>
    </Grid>
</Window>
Because it is an extension method, you can directly call moveTo after obtaining the control object.
cs
using AC;
using System.Windows;
using System.Windows.Media;

namespace WpfMove
{<!-- -->
    /// <summary>
    /// Interaction logic for MainWindow.xaml
    /// </summary>
    public partial class MainWindow : Window
    {<!-- -->
        public MainWindow()
        {<!-- -->
            InitializeComponent();
        }
        private void Button_Click(object sender, RoutedEventArgs e)
        {<!-- -->
            var fe = sender as FrameworkElement;
            //Get the position of the control
            var p = fe.GetPosition();
            //right offset 10
            p.Offset(10, 0);
            fe.MoveTo(p);
        }
    }
}
Effect preview
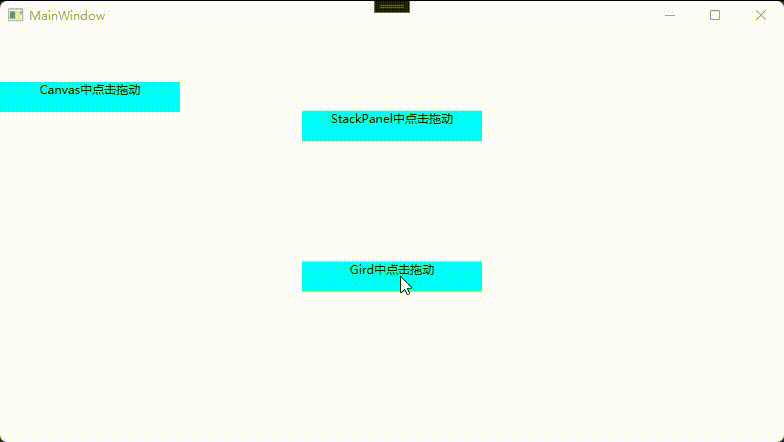
2. DragMove
xaml
<Window x:Class="WpfMove.MainWindow"
        xmlns="http://schemas.microsoft.com/winfx/2006/xaml/presentation"
        xmlns:x="http://schemas.microsoft.com/winfx/2006/xaml"
        xmlns:d="http://schemas.microsoft.com/expression/blend/2008"
        xmlns:mc="http://schemas.openxmlformats.org/markup-compatibility/2006"
        xmlns:local="clr-namespace:WpfMove"
        mc:Ignorable="d"
        Title="MainWindow" Height="450" Width="800"
        >
    <Grid>
        <TextBlock Background="Aqua" TextAlignment="Center" Margin="0,80,0,0" Width="180" Height="30" MouseDown="TextBlock_MouseDown" >Click and drag in Gird</TextBlock>
        <StackPanel>
            <TextBlock Background="Aqua" TextAlignment="Center" Margin="0,80,0,0" Width="180" Height="30" MouseDown="TextBlock_MouseDown" >Click and drag in StackPanel</TextBlock>
        </StackPanel>
        <Canvas>
            <TextBlock Background="Aqua" TextAlignment="Center" Margin="0,80,0,0" Width="180" Height="30" MouseDown="TextBlock_MouseDown" >Click and drag in Canvas</TextBlock>
        </Canvas>
    </Grid>
</Window>
This method is also an extension method. Any control can call this method in the mouse press event, and you can wait for the drag to complete through await.
cs
using AC;
using System;
using System.Windows;

namespace WpfMove
{<!-- -->
    /// <summary>
    /// Interaction logic for MainWindow.xaml
    /// </summary>
    public partial class MainWindow : Window
    {<!-- -->
        public MainWindow()
        {<!-- -->
            InitializeComponent();
        }

        private async void TextBlock_MouseDown(object sender, System.Windows.Input.MouseButtonEventArgs e)
        {<!-- -->
            var fe = sender as FrameworkElement;
            await fe.DragMove();
            Console.WriteLine("Drag completed");
        }
    }
}
Effect preview
3. Boundary restrictions
Set whether to limit the boundary through the additional attribute IsMoveInBounds. The default is false.
xaml
<Window x:Class="WpfMove.MainWindow"
        xmlns="http://schemas.microsoft.com/winfx/2006/xaml/presentation"
        xmlns:x="http://schemas.microsoft.com/winfx/2006/xaml"
        xmlns:d="http://schemas.microsoft.com/expression/blend/2008"
        xmlns:mc="http://schemas.openxmlformats.org/markup-compatibility/2006"
        xmlns:local="clr-namespace:WpfMove"
         xmlns:ac="clr-namespace:AC"
        mc:Ignorable="d"
        Title="MainWindow" Height="450" Width="800"
        >
    <Grid>
        <TextBlock HorizontalAlignment="Left" Background="Aqua" TextAlignment="Center" Margin="0,80,0,0" Width="180" Height="60" ac:Move.IsDragMoveable="True" ac:Move.IsMoveInBounds="True">Drag limit boundaries</TextBlock>
        <TextBlock HorizontalAlignment="Right" Background="Aqua" TextAlignment="Center" Margin="0,80,0,0" Width="180" Height="60" ac:Move.IsDragMoveable="True" ac:Move.IsMoveInBounds="False">Drag without limiting boundaries</TextBlock>
    </Grid>
</Window>
Effect preview

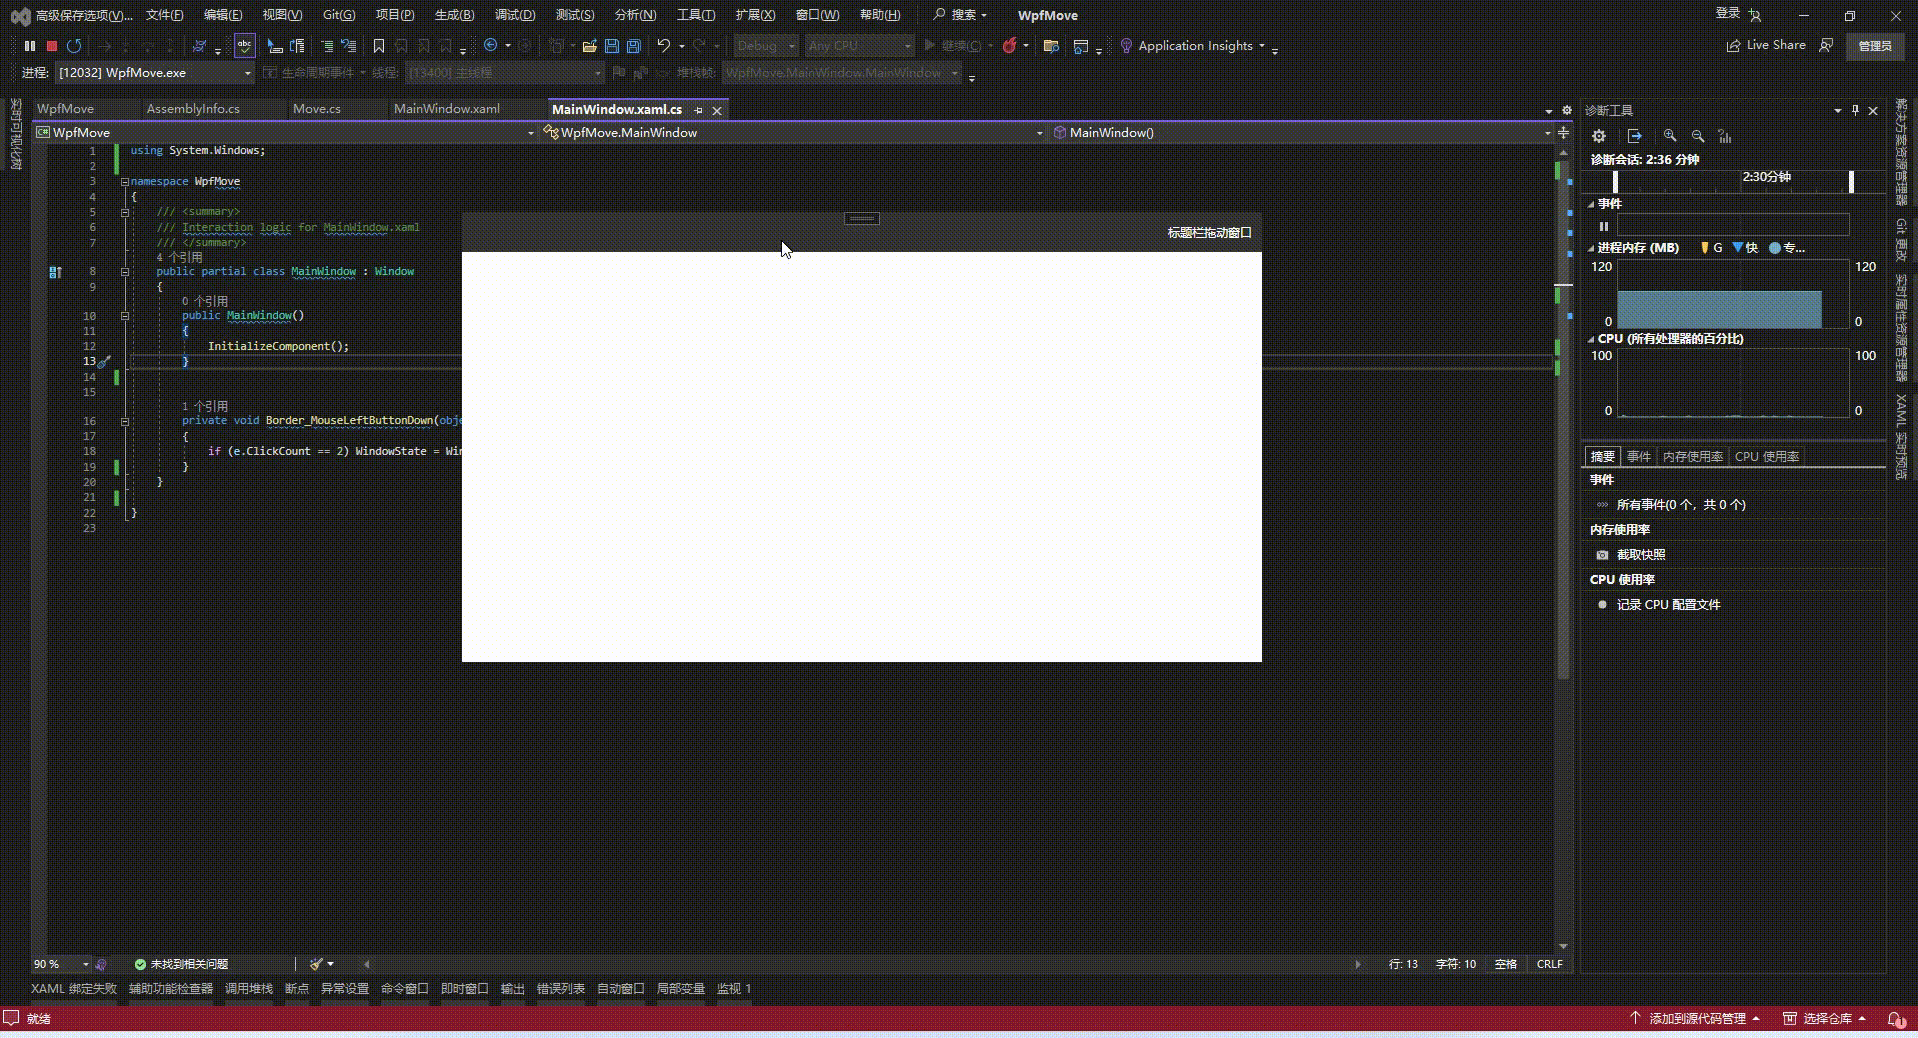
4. Window maximized and dragged to restore
The internal implementation already supports maximized dragging and restoration. You only need to set the window to be draggable. The usage scenario is to customize the title bar of a borderless window.
xaml
<Window x:Class="WpfMove.MainWindow"
        xmlns="http://schemas.microsoft.com/winfx/2006/xaml/presentation"
        xmlns:x="http://schemas.microsoft.com/winfx/2006/xaml"
        xmlns:d="http://schemas.microsoft.com/expression/blend/2008"
        xmlns:mc="http://schemas.openxmlformats.org/markup-compatibility/2006"
        xmlns:local="clr-namespace:WpfMove"
        xmlns:ac="clr-namespace:AC"
        mc:Ignorable="d"
        WindowStyle="None"
        ResizeMode="NoResize"
        WindowState="Normal"
        Title="MainWindow" Height="450" Width="800"
        x:Name="window"
        >
    <Grid>
        <Border VerticalAlignment="Top" Height="40" Background="#333333" ac:Move.DragMoveTarget="{Binding ElementName= window}" MouseLeftButtonDown="Border_MouseLeftButtonDown">
            <TextBlock Margin="0,0,10,0" VerticalAlignment="Center" HorizontalAlignment="Right" Foreground="White" Text="Title Bar Drag Window"></ TextBlock>
        </Border>
    </Grid>
</Window>
cs
using System.Windows;
namespace WpfMove
{<!-- -->
    /// <summary>
    /// Interaction logic for MainWindow.xaml
    /// </summary>
    public partial class MainWindow : Window
    {<!-- -->
        public MainWindow()
        {<!-- -->
            InitializeComponent();
        }
        private void Border_MouseLeftButtonDown(object sender, System.Windows.Input.MouseButtonEventArgs e)
        {<!-- -->
            if (e.ClickCount == 2) WindowState = WindowState != WindowState.Maximized ? WindowState = WindowState.Maximized : WindowState = WindowState.Normal;
        }
    }
}
Effect preview
5. Drag event
xaml
<Window x:Class="WpfMove.MainWindow"
        xmlns="http://schemas.microsoft.com/winfx/2006/xaml/presentation"
        xmlns:x="http://schemas.microsoft.com/winfx/2006/xaml"
        xmlns:d="http://schemas.microsoft.com/expression/blend/2008"
        xmlns:mc="http://schemas.openxmlformats.org/markup-compatibility/2006"
        xmlns:local="clr-namespace:WpfMove"
         xmlns:ac="clr-namespace:AC"
        mc:Ignorable="d"
        Title="MainWindow" Height="450" Width="800"
        >
    <StackPanel>
        <TextBlock Background="Aqua"
                   TextAlignment="Center"
                   Margin="0,80,0,0" Width="180" Height="30"
                   ac:Move.IsDragMoveable="True"
                   ac:Move.DragMoveStarted="window_DragMoveStarted"
                   ac:Move.DragMoveCompleted="window_DragMoveCompleted"
                   ac:Move.DragMoveDelta="window_DragMoveDelta">Click and drag in StackPanel</TextBlock>
    </StackPanel>
</Window>
cs
using AC;
using System;
using System.Windows;

namespace WpfMove
{<!-- -->
    /// <summary>
    /// Interaction logic for MainWindow.xaml
    /// </summary>
    public partial class MainWindow : Window
    {<!-- -->
        public MainWindow()
        {<!-- -->
            InitializeComponent();
        }
        private void window_DragMoveStarted(object sender, DragMoveStartedEventArgs e)
        {<!-- -->
            Console.WriteLine("Drag start");
        }

        private void window_DragMoveCompleted(object sender, DragMoveCompletedEventArgs e)
        {<!-- -->
            Console.WriteLine("Drag completed");
        }

        private void window_DragMoveDelta(object sender, DragMoveDeltaEventArgs e)
        {<!-- -->
            Console.WriteLine("Horizontal offset:" + e.HorizontalOffset + "," + "Vertical offset:" + e.VerticalOffset);
        }
    }
}
Effect preview

Summary
The above is what I will talk about today. After expanding more dragging functions, it becomes more convenient to use and the flexibility is also improved. Dragging can be achieved using xmal or cs code, and it is very simple to customize the title bar. With the drag event, you can also perform some undo and redo functions. In general, the dragging function in this article can be used as a general module in projects to a certain extent.