I recently started to learn the SSD algorithm. From being confused when I got the code to finally being able to run my own code (I have a weak foundation), I am very, very happy. This article mainly introduces my modification process and the encounters I encountered during the training process. The problems I mentioned can help everyone avoid pitfalls, and also make it easier for me to use it myself in the future. Then let’s start~
In addition, the sources of articles referenced during training should be indicated. If there is any infringement, please contact me to delete:
[Dataset Production] VOC2007 format data set production and processing tutorial (Faster-RCNN model standard input)_AI Xiaoyang’s blog-CSDN blog
SSD pytorch trains its own data set (windows + colab) | Programmer Sought
Summary of problems encountered in SSD’s pytorch implementation training_userwarning: volatile was removed and now has no e-CSDN blog
1. Data set production
What is introduced here is the process of the data set from 0 to 1. If you have already prepared the data set, then skip this part~
1.1 Create folder
Here I am using a data set in VOC2007 format. Before starting to create the data set, you need to create the following folders in the SSD working directory:

Among them, Datacluster Fire and Smoke Sample is the name of the data set I used (it does not need to be the same as mine)
- Annotations: the label file of the image, which is an xml file
- JPEGImages: store original images
- ImageSets:
- Main:
- test.txt: test set
- train.txt: training set
- trainval.txt: training set and validation set
- val.txt: validation set
- Main:
1.2 Original image data renaming
After creating the corresponding folder, put the original image into the JPEGImages folder. Since the acquired data set has a messy name, you can rename the original image data. The script file is as follows
import os
path = r"C:\Users\xxx\Desktop\VOC2007\JPEGImages"#The path to the JPEGImages folder
filelist = os.listdir(path) #All files in this folder (including folders)
count=0
for file in filelist:
    print(file)
for file in filelist: #Traverse all files
    Olddir=os.path.join(path,file) #Original file path
    if os.path.isdir(Olddir): #If it is a folder, skip it
        continue
    filename=os.path.slitext(file)[0] #File name
    filetype='.jpg' #File extension
    Newdir=os.path.join(path,str(count).zfill(6) + filetype) #Use the string function zfill to complete the required number of digits with 0
    os.rename(Olddir,Newdir)#Rename
    count + =1
1.3 Image annotation
There are many data set labeling tools. The labeling tool used here is consistent with the original text: LabelImage. There are many installation tutorials and usage methods on the website. I will not go into details here. I will mainly introduce a few methods that can simplify the operation.
- Default save address: shortcut keys to select the default save folder, use the shortcut keys Ctrl + r to select the default save folder as Annotation, so you don’t have to select a folder to save every time.
- Set the default label value: If there is only one label value, you can set the default label value in the upper right corner of the labeling tool.

- Shortcut keys: w key to select annotation, Ctrl + s key to save, a and d keys to quickly switch between the previous and next pictures
1.4 Data set division
After the annotation is completed, the files in the Annotation need to be divided into data sets and divided into training sets, test sets, and verification sets in proportion.
import os
import random

trainval_percent = 0.9#Percentage of validation set and training set
train_percent = 0.7#Percentage of training set
xmlfilepath = r'C:\Users\xxx\Desktop\VOC2007\Annotations'#Annotation folder location
txtsavepath = r'C:\Users\xxx\Desktop\VOC2007\ImageSets\Main'#The location of the Main folder under the ImageSets file
total_xml = os.listdir(xmlfilepath)

num = len(total_xml)
list = range(num)
tv = int(num * trainval_percent)
tr = int(tv * train_percent)
trainval = random.sample(list, tv)
train = random.sample(trainval, tr)
#The four corresponding txt folder paths under the Main folder
ftrainval = open(r'C:\Users\xxx\Desktop\VOC2007\ImageSets\Main\trainval.txt', 'w')
ftest = open(r'C:\Users\xxx\Desktop\VOC2007\ImageSets\Main\test.txt', 'w')
ftrain = open(r'C:\Users\xxx\Desktop\VOC2007\ImageSets\Main\train.txt', 'w')
fval = open(r'C:\Users\xxx\Desktop\VOC2007\ImageSets\Main\val.txt', 'w')

for i in list:
    name = total_xml[i][:-4] + '\\
'
    if i in trainval:
        ftrainval.write(name)
        if i in train:
            ftrain.write(name)
        else:
            fval.write(name)
    else:
        ftest.write(name)

ftrainval.close()
ftrain.close()
fval.close()
ftest.close()
At this time, the name of the corresponding image is in the .txt file under the ImageSets/Main folder. The data set is now ready~
2. Start training
2.1 Environment Configuration
The main thing here is to install the torch version and cv library that match your computer. Here are two torch and cuda version matching tables, which are not original! ! Picture source: torch and cuda version, Driver Version, torchversion, torchaudio correspondence_torch and cuda version correspondence_noob_noob’s blog-CSDN blog
- Corresponding versions of CUDA driver and CUDAToolkit

- CUDA and its available PyTorch corresponding version


2.2config.py modification
Copy your own data set below according to the format of the VOC and coco data sets. In order to simply test whether it can run, the number of iterations is only 5.
fire = {
    'num_classes': 2, #Number of categories + 1, + 1: background
    'lr_steps': (40000, 50000, 60000), #The number of steps to adjust the learning rate
    'max_iter': 5,#Number of iterations, you can first set a small test to see if it can run
    'feature_maps': [38, 19, 10, 5, 3, 1],
    'min_dim': 300,
    'steps': [8, 16, 32, 64, 100, 300],
    'min_sizes': [30, 60, 111, 162, 213, 264],
    'max_sizes': [60, 111, 162, 213, 264, 315],
    'aspect_ratios': [[2], [2, 3], [2, 3], [2, 3], [2], [2]],
    'variance': [0.1, 0.2],
    'clip': True,
    'name': 'FIRE',
}
2.3 Create a new fire.py file in data
Because the data set I use is in VOC format, it can be modified on the basis of voc0712. The modifications are marked with #########:
from .config import HOME
import os.path as osp
importsys
import torch
import torch.utils.data as data
import cv2
import numpy as np
if sys.version_info[0] == 2:
    import xml.etree.cElementTree as ET
else:
    import xml.etree.ElementTree as ET

FIRE_CLASSES = ( 'fire')############

# note: if you used our download scripts, this should be right
FIRE_ROOT = osp.join('D:/Document/Learning/ObjectDetection/SSD/ssd.pytorch-master', "data/Datacluster Fire and Smoke Sample/") ########## ######


class FIREAnnotationTransform(object):###############
    """Transforms a VOC annotation into a Tensor of bbox coords and label index
    Initilized with a dictionary lookup of classnames to indexes

    Arguments:
        class_to_ind (dict, optional): dictionary lookup of classnames -> indexes
            (default: alphabetic indexing of VOC's 20 classes)
        keep_difficult (bool, optional): keep difficult instances or not
            (default: False)
        height (int): height
        width (int): width
    """

    def __init__(self, class_to_ind=None, keep_difficult=False):
        # self.class_to_ind = class_to_ind or dict(
        # zip(VOC_CLASSES, range(len(VOC_CLASSES))))
        # self.keep_difficult = keep_difficult
        self.class_to_ind = class_to_ind or dict(fire=0)########There is only one category, the dictionary is created directly, otherwise it will be rewritten according to the original form
        self.keep_difficult = keep_difficult

    def __call__(self, target, width, height):
        """
        Arguments:
            target (annotation) : the target annotation to be made usable
                will be an ET.Element
        Returns:
            a list containing lists of bounding boxes [bbox coords, class name]
        """
        res = []
        for obj in target.iter('object'):
            difficult = int(obj.find('difficult').text) == 1
            if not self.keep_difficult and difficult:
                continue
            name = obj.find('name').text.lower().strip()
            bbox = obj.find('bndbox')

            pts = ['xmin', 'ymin', 'xmax', 'ymax']
            bndbox = []
            for i, pt in enumerate(pts):
                cur_pt = int(bbox.find(pt).text) - 1
                # scale height or width
                cur_pt = cur_pt / width if i % 2 == 0 else cur_pt / height
                bndbox.append(cur_pt)
            label_idx = self.class_to_ind[name]
            bndbox.append(label_idx)
            res + = [bndbox] # [xmin, ymin, xmax, ymax, label_ind]
            # img_id = target.find('filename').text[:-4]

        return res # [[xmin, ymin, xmax, ymax, label_ind], ... ]


class FIREDetection(data.Dataset):##############
    """VOC Detection Dataset Object

    input is image, target is annotation

    Arguments:
        root (string): filepath to VOCdevkit folder.
        image_set (string): imageset to use (eg. 'train', 'val', 'test')
        transform (callable, optional): transformation to perform on the
            input image
        target_transform (callable, optional): transformation to perform on the
            target `annotation`
            (eg: take in caption string, return tensor of word indices)
        dataset_name (string, optional): which dataset to load
            (default: 'VOC2007')
    """

    def __init__(self, root,
                 # image_sets=[('2007', 'trainval'), ('2012', 'trainval')],
                 image_sets='trainval',#################
                 transform=None, target_transform=FIREAnnotationTransform(),#############
                 dataset_name='FIRE'):################
        self.root = root
        self.image_set = image_sets
        self.transform = transform
        self.target_transform = target_transform
        self.name = dataset_name
        self._annopath = osp.join('%s', 'Annotations', '%s.xml')
        self._imgpath = osp.join('%s', 'JPEGImages', '%s.jpg')
        self.ids = list()
        # for (year, name) in image_sets:
        # rootpath = osp.join(self.root, 'VOC' + year)
        # for line in open(osp.join(rootpath, 'ImageSets', 'Main', name + '.txt')):
        # self.ids.append((rootpath, line.strip()))
        for line in open(FIRE_ROOT + '/ImageSets/Main/' + self.image_set + '.txt'):
            self.ids.append((FIRE_ROOT, line.strip()))###################

    def __getitem__(self, index):
        im, gt, h, w = self.pull_item(index)

        return im, gt

    def __len__(self):
        return len(self.ids)

    def pull_item(self, index):
        img_id = self.ids[index]

        target = ET.parse(self._annopath % img_id).getroot()
        img = cv2.imread(self._imgpath % img_id)
        height, width, channels = img.shape

        if self.target_transform is not None:
            target = self.target_transform(target, width, height)

        if self.transform is not None:
            target = np.array(target)
            img, boxes, labels = self.transform(img, target[:, :4], target[:, 4])
            # to rgb
            img = img[:, :, (2, 1, 0)]
            # img = img.transpose(2, 0, 1)
            target = np.hstack((boxes, np.expand_dims(labels, axis=1)))
        return torch.from_numpy(img).permute(2, 0, 1), target, height, width
        # return torch.from_numpy(img), target, height, width

    def pull_image(self, index):
        '''Returns the original image object at index in PIL form

        Note: not using self.__getitem__(), as any transformations passed in
        could mess up this functionality.

        Argument:
            index (int): index of img to show
        Return:
            PIL img
        '''
        img_id = self.ids[index]
        return cv2.imread(self._imgpath % img_id, cv2.IMREAD_COLOR)

    def pull_anno(self, index):
        '''Returns the original annotation of image at index

        Note: not using self.__getitem__(), as any transformations passed in
        could mess up this functionality.

        Argument:
            index (int): index of img to get annotation of
        Return:
            list: [img_id, [(label, bbox coords),...]]
                eg: ('001718', [('dog', (96, 13, 438, 332))])
        '''
        img_id = self.ids[index]
        anno = ET.parse(self._annopath % img_id).getroot()
        gt = self.target_transform(anno, 1, 1)
        return img_id[1], gt

    def pull_tensor(self, index):
        '''Returns the original image at an index in tensor form

        Note: not using self.__getitem__(), as any transformations passed in
        could mess up this functionality.

        Argument:
            index (int): index of img to show
        Return:
            tensorized version of img, squeezed
        '''
        return torch.Tensor(self.pull_image(index)).unsqueeze_(0)
2.4__init__ file
# from .voc0712 import VOCDetection, VOCAnnotationTransform, VOC_CLASSES, VOC_ROOT
from .fire import FIREDetection,FIREAnnotationTransform,FIRE_CLASSES,FIRE_ROOT
# from .coco import COCODetection, COCOAnnotationTransform, COCO_CLASSES, COCO_ROOT, get_label_map
2.5 ssd.py
import torch
import torch.nn as nn
import torch.nn.functional as F
from torch.autograd import Variable
from layers import *
from data import voc, coco, fire ############
import os
 def __init__(self, phase, size, base, extras, head, num_classes):
        super(SSD, self).__init__()
        self.phase = phase
        self.num_classes = num_classes
        self.cfg = (coco, voc, fire)[num_classes == 2] ###########
        self.priorbox = PriorBox(self.cfg)
        # self.priors = Variable(self.priorbox.forward(), volatile=True)
        with torch.no_grad(): ############
            self.priors = self.priorbox.forward() #############
        self.size = size
2.6 train.py
The batcsize and other parameters in the hyperparameters can be modified according to your actual situation.
parser = argparse.ArgumentParser(
    description='Single Shot MultiBox Detector Training With Pytorch')
train_set = parser.add_mutually_exclusive_group()
parser.add_argument('--dataset', default='FIRE', choices=['VOC', 'COCO','FIRE'],########
                    type=str, help='VOC or COCO')
parser.add_argument('--dataset_root', default=FIRE_ROOT, ########
                    help='Dataset root directory path')
In the train function, imitate and add your own data set
 elif args.dataset == 'FIRE':
        # if args.dataset_root == FIRE_ROOT:
        # parser.error('Must specify dataset if specifying dataset_root')
         cfg=fire
         # print(cfg)
         dataset = FIREDetection(root=args.dataset_root,
                               transform=SSDAugmentation(cfg['min_dim'],
                                                         MEANS))
If you use CPU like me, remember to modify all .cuda in the file and –GPU in the parameters.
The modification is complete here. You can try to run it. If it runs smoothly, congratulations! (Although the probability is not high)
If you encounter problems, don’t worry, just read the third part~
####################### Supplementary breakpoint continuation training###################### #
**When we are affected by the long training time and cannot finish training at once but are too sleepy, we can use the breakpoint resume training function! In this way, we can continue training from the breakpoint the next day without letting the previous efforts go to waste. The specific operations are as follows:
First, set the resume parameter of the parameter list to True:
parser.add_argument('--resume', default=True, type=str,
                    help='Checkpoint state_dict file to resume training from')
Then load the weight path address (here is “weights/FIRE.pth”) and modify it as follows
 if args.resume:
        print('Resuming training, loading {}...'.format(args.resume))
        # ssd_net.load_weights(args.resume)
        ssd_net.load_weights("weights/FIRE.pth")#############
    else:
        vgg_weights = torch.load(args.save_folder + args.basenet)
        print('Loading base network...')
        ssd_net.vgg.load_state_dict(vgg_weights)
In this way, when you start training again, you can continue training from the breakpoint!
3. Problem summary
3.1 StopIteration
Change images, targets = next(batch_iterator) in train.py to
try:
            images, targets = next(batch_iterator)
        except StopIteration:
            batch_iterator = iter(data_loader)
            images, targets = next(batch_iterator)
3.2 IndexError: invalid index of a 0-dim tensor. Use tensor.item() to convert a 0-dim tensor to a Python number
Change all data[0] in train.py to data.item()
 loc_loss + = loss_l.data.item()#############
        conf_loss + = loss_c.data.item()###########

        # if iteration % 10 == 0:
        # print('timer: %.4f sec.' % (t1 - t0))
        # print('iter ' + repr(iteration) + ' || Loss: %.4f ||' % (loss.data.item()), end=' ')

        print('timer: %.4f sec.' % (t1 - t0)) #Print once for each iteration
        print('iter ' + repr(iteration) + ' || Loss: %.4f ||' % (loss.data.item()), end=' ')###### ########

        if args.visdom:
            update_vis_plot(iteration, loss_l.data.item(), loss_c.data.item(),##########
                            iter_plot, epoch_plot, 'append')

        if iteration != 0 and iteration % 5000 == 0:
            print('Saving state, iter:', iteration)
            torch.save(ssd_net.state_dict(), 'weights/ssd300_FIRE_' + ###########I missed one thing, and I also need to change it to my own data set name here.
                       repr(iteration) + '.pth')
3.3 xavier_uniform has been deprecated
Change init.xavier_uniform(param) in train.py to
def xavier(param):
    init.xavier_uniform_(param)
3.4 UserWarning: volatile was removed and now has no effect. Use with torch.no_grad(): instead.molded_images = Variable(molded_images, volatile=True)
Remove volatile=True in train.py
images = Variable(images)
targets = [Variable(ann) for ann in targets]
3.5 UserWarning: size_average and reduce is now deprecated,please use reduction=sum’ instead
Modify in multibox_loss.py to
loss_l = F.smooth_l1_loss(loc_p, loc_t, reduction='sum')
loss_c = F.cross_entropy(conf_p, targets_weighted, reduction='sum')
3.6 UserWarning: torch.set_default_tensor_type() is deprecated as of PyTorch 2.1
In train.py, modify torch.set_default_tensor_type(‘torch.FloatTensor’) to
torch.set_default_dtype(torch.float32)
3.7 ValueError: setting an array element with a sequence.
Modify in the augmentations.py file
 def __init__(self):
        self.sample_options = np.array([
            # using entire original input image
            None,
            # sample a patch s.t. MIN jaccard w/ obj in .1,.3,.4,.7,.9
            (0.1, None),
            (0.3, None),
            (0.7, None),
            (0.9, None),
            # randomly sample a patch
            (None, None),
        ],dtype=object) # When the randomly selected array dimensions are inconsistent, dtype=object needs to be added (problems caused by too high numpy versions)
3.8 Others
Summary of problems encountered in the article SSD’s pytorch implementation training_userwarning: volatile was removed and now has no Suggestions given in the e-CSDN blog, but I don’t seem to have encountered them. If there are any errors, you can refer to them.

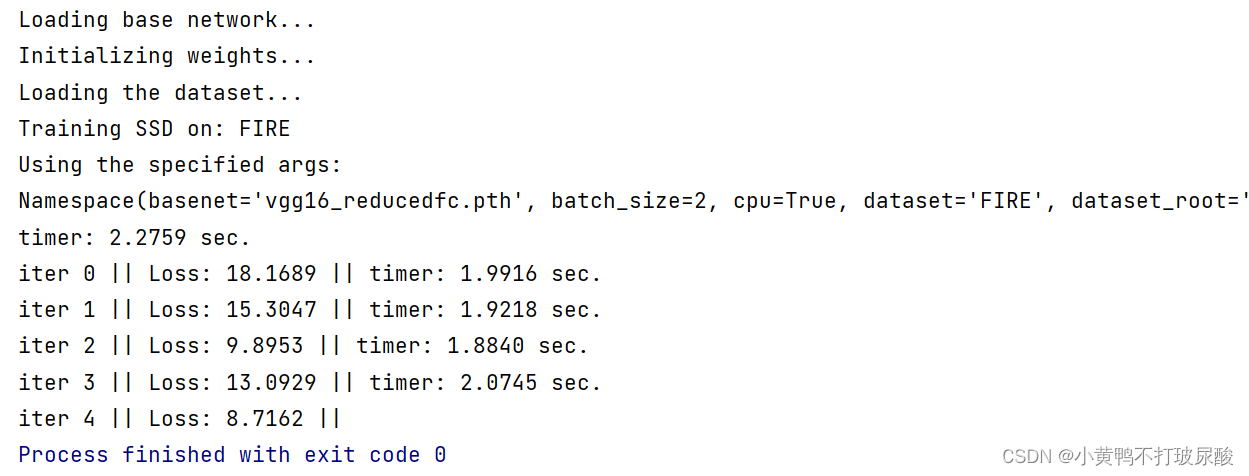
4. Run the display
After a series of operations, it finally ran successfully! (This is modified to print information once in each round)~~~
The knowledge points of the article match the official knowledge files, and you can further learn relevant knowledge. Python entry skill treeArtificial intelligenceDeep learning 388,920 people are learning the system