1. Basic introduction
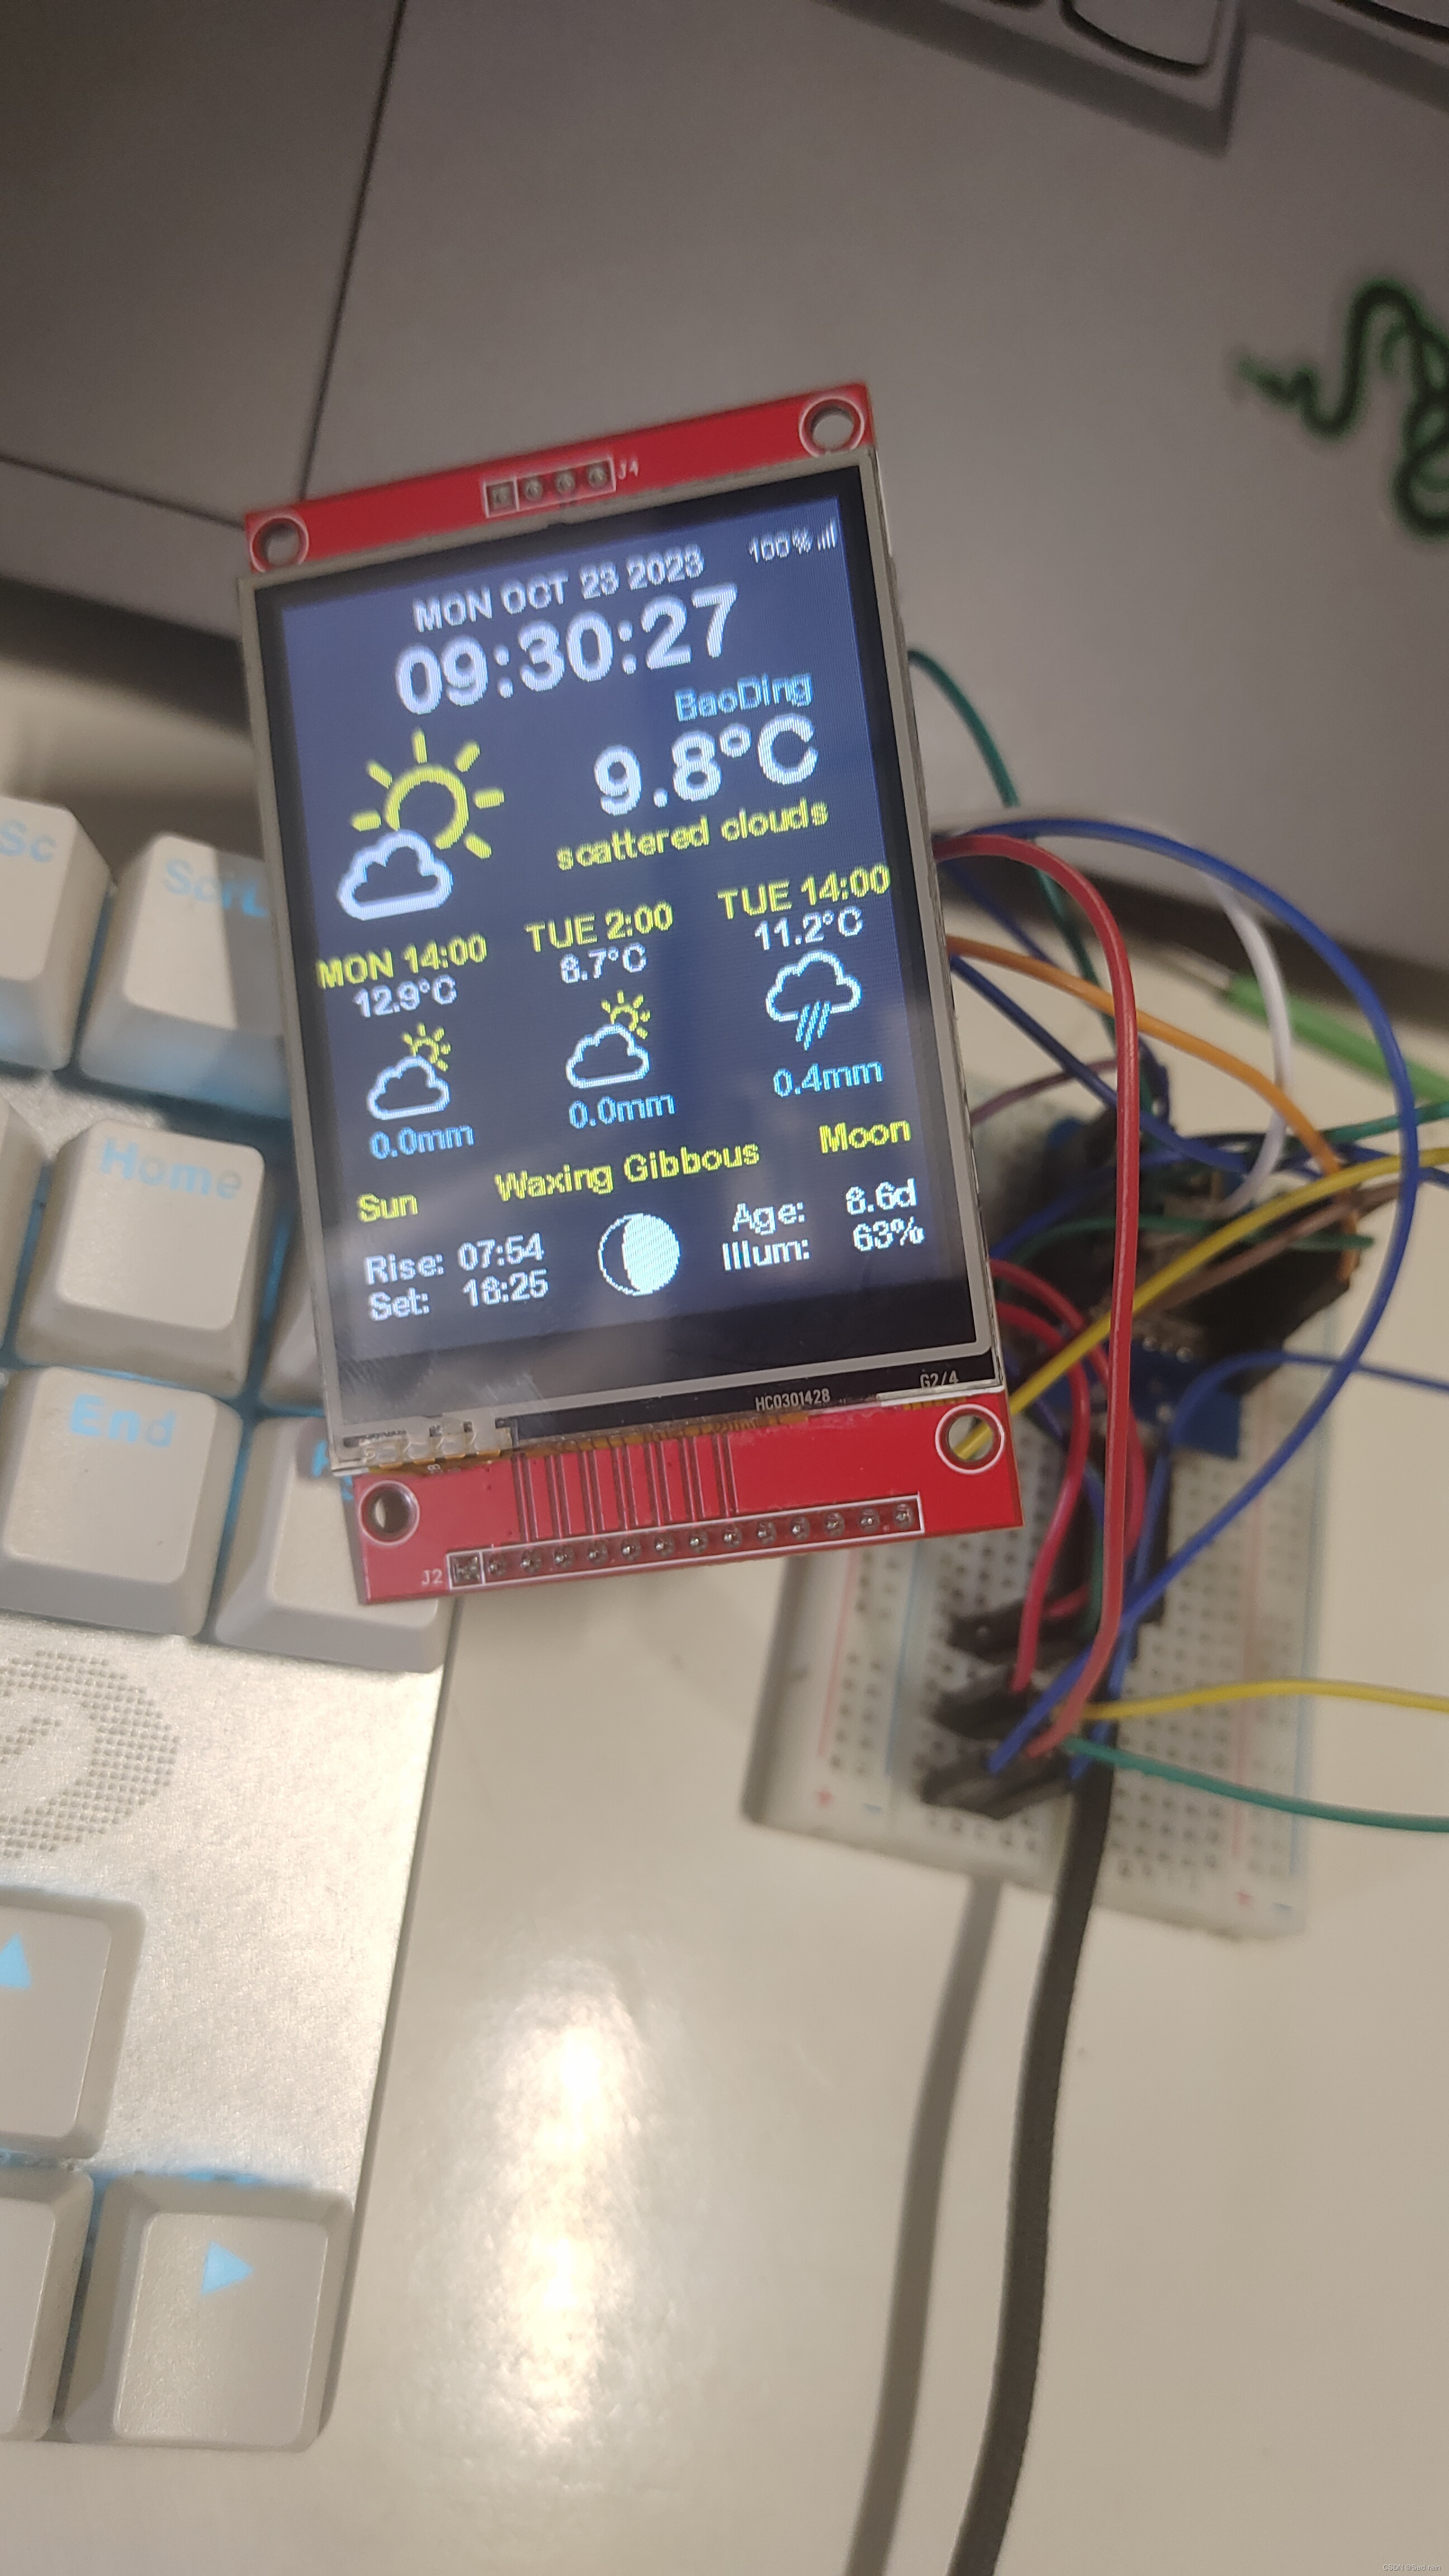
This project designs a weather display that can be controlled by touch. It is mainly composed of Wemos D1 Mini Pro and TFT display. Wemos D1 Mini Pro is used as the main control chip of the device to send out Wi-Fi signals and receive corresponding instructions. It transmits the received information to the TFT display by calling the API. The TFT display The screen will display the received information. The weather display realizes the functions of displaying the current time and date in the area; the weather information of the day, such as temperature, pressure, humidity, rainfall; and seven-day future forecast.
The design uses Wemos D1 Mini Pro and uses API to display the weather information obtained in real time through the TFT display. The design block diagram is shown in Figure 2.1

2. The main components of the weather display
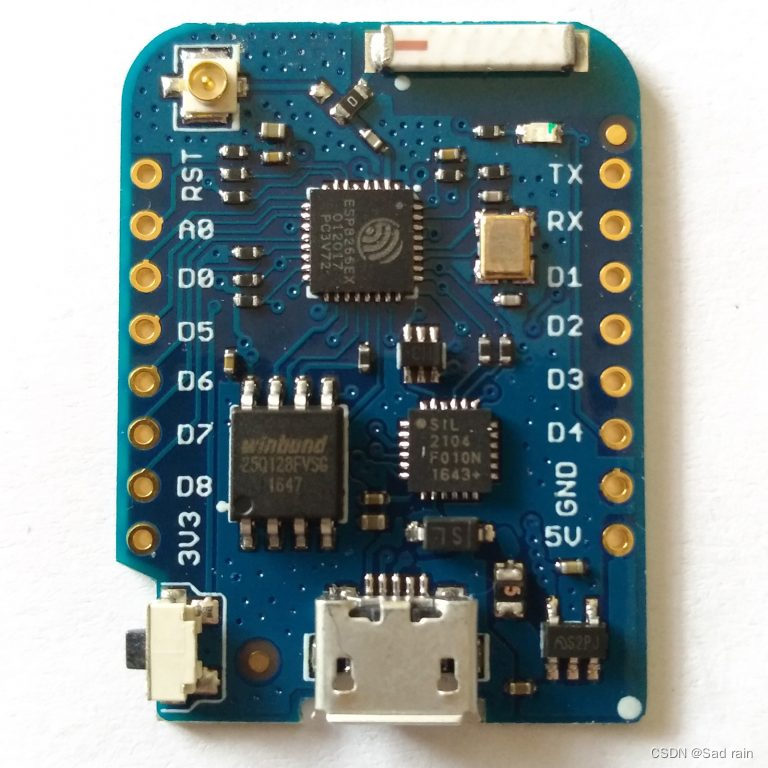
2.1 control chip Wemos D1 Mini Pro
The D1 mini Pro is an ESP-8266EX based wifi board with 16MB flash memory, external antenna connector and built-in ceramic antenna
feature:
11 digital input/output pins
Interrupt/pwm/I2C/single wire
1 analog input (maximum input 3.2V)
16M bytes (128M bits) flash memory
External antenna connector
Built-in ceramic antenna
New CP2104 USB-TO-UART IC
Same dimensions as D1 mini but lighter

2.2, TFT display screen
Color LCD screen abbreviation TFT (ThinFilmTransistor) refers to thin film transistor, which means that each liquid crystal pixel is driven by a thin film transistor integrated behind the pixel, so that high-speed, high-brightness, and high-contrast display screen information can be achieved. It is one of the best LCD color display devices, its effect is close to that of CRT monitors, and it is the mainstream display device on laptops and desktops. TFT is formed on non-single-wafers such as glass or plastic substrates (of course it can also be on wafers) through sputtering and chemical deposition processes to form various films necessary for manufacturing circuits. Large-scale semiconductor integrated circuits (LSIC) are produced by processing the films. . The use of non-single crystal substrates can significantly reduce costs, and is an extension of traditional large-scale integrated circuits to large area, multi-function, and low cost.

3. Weather display production process
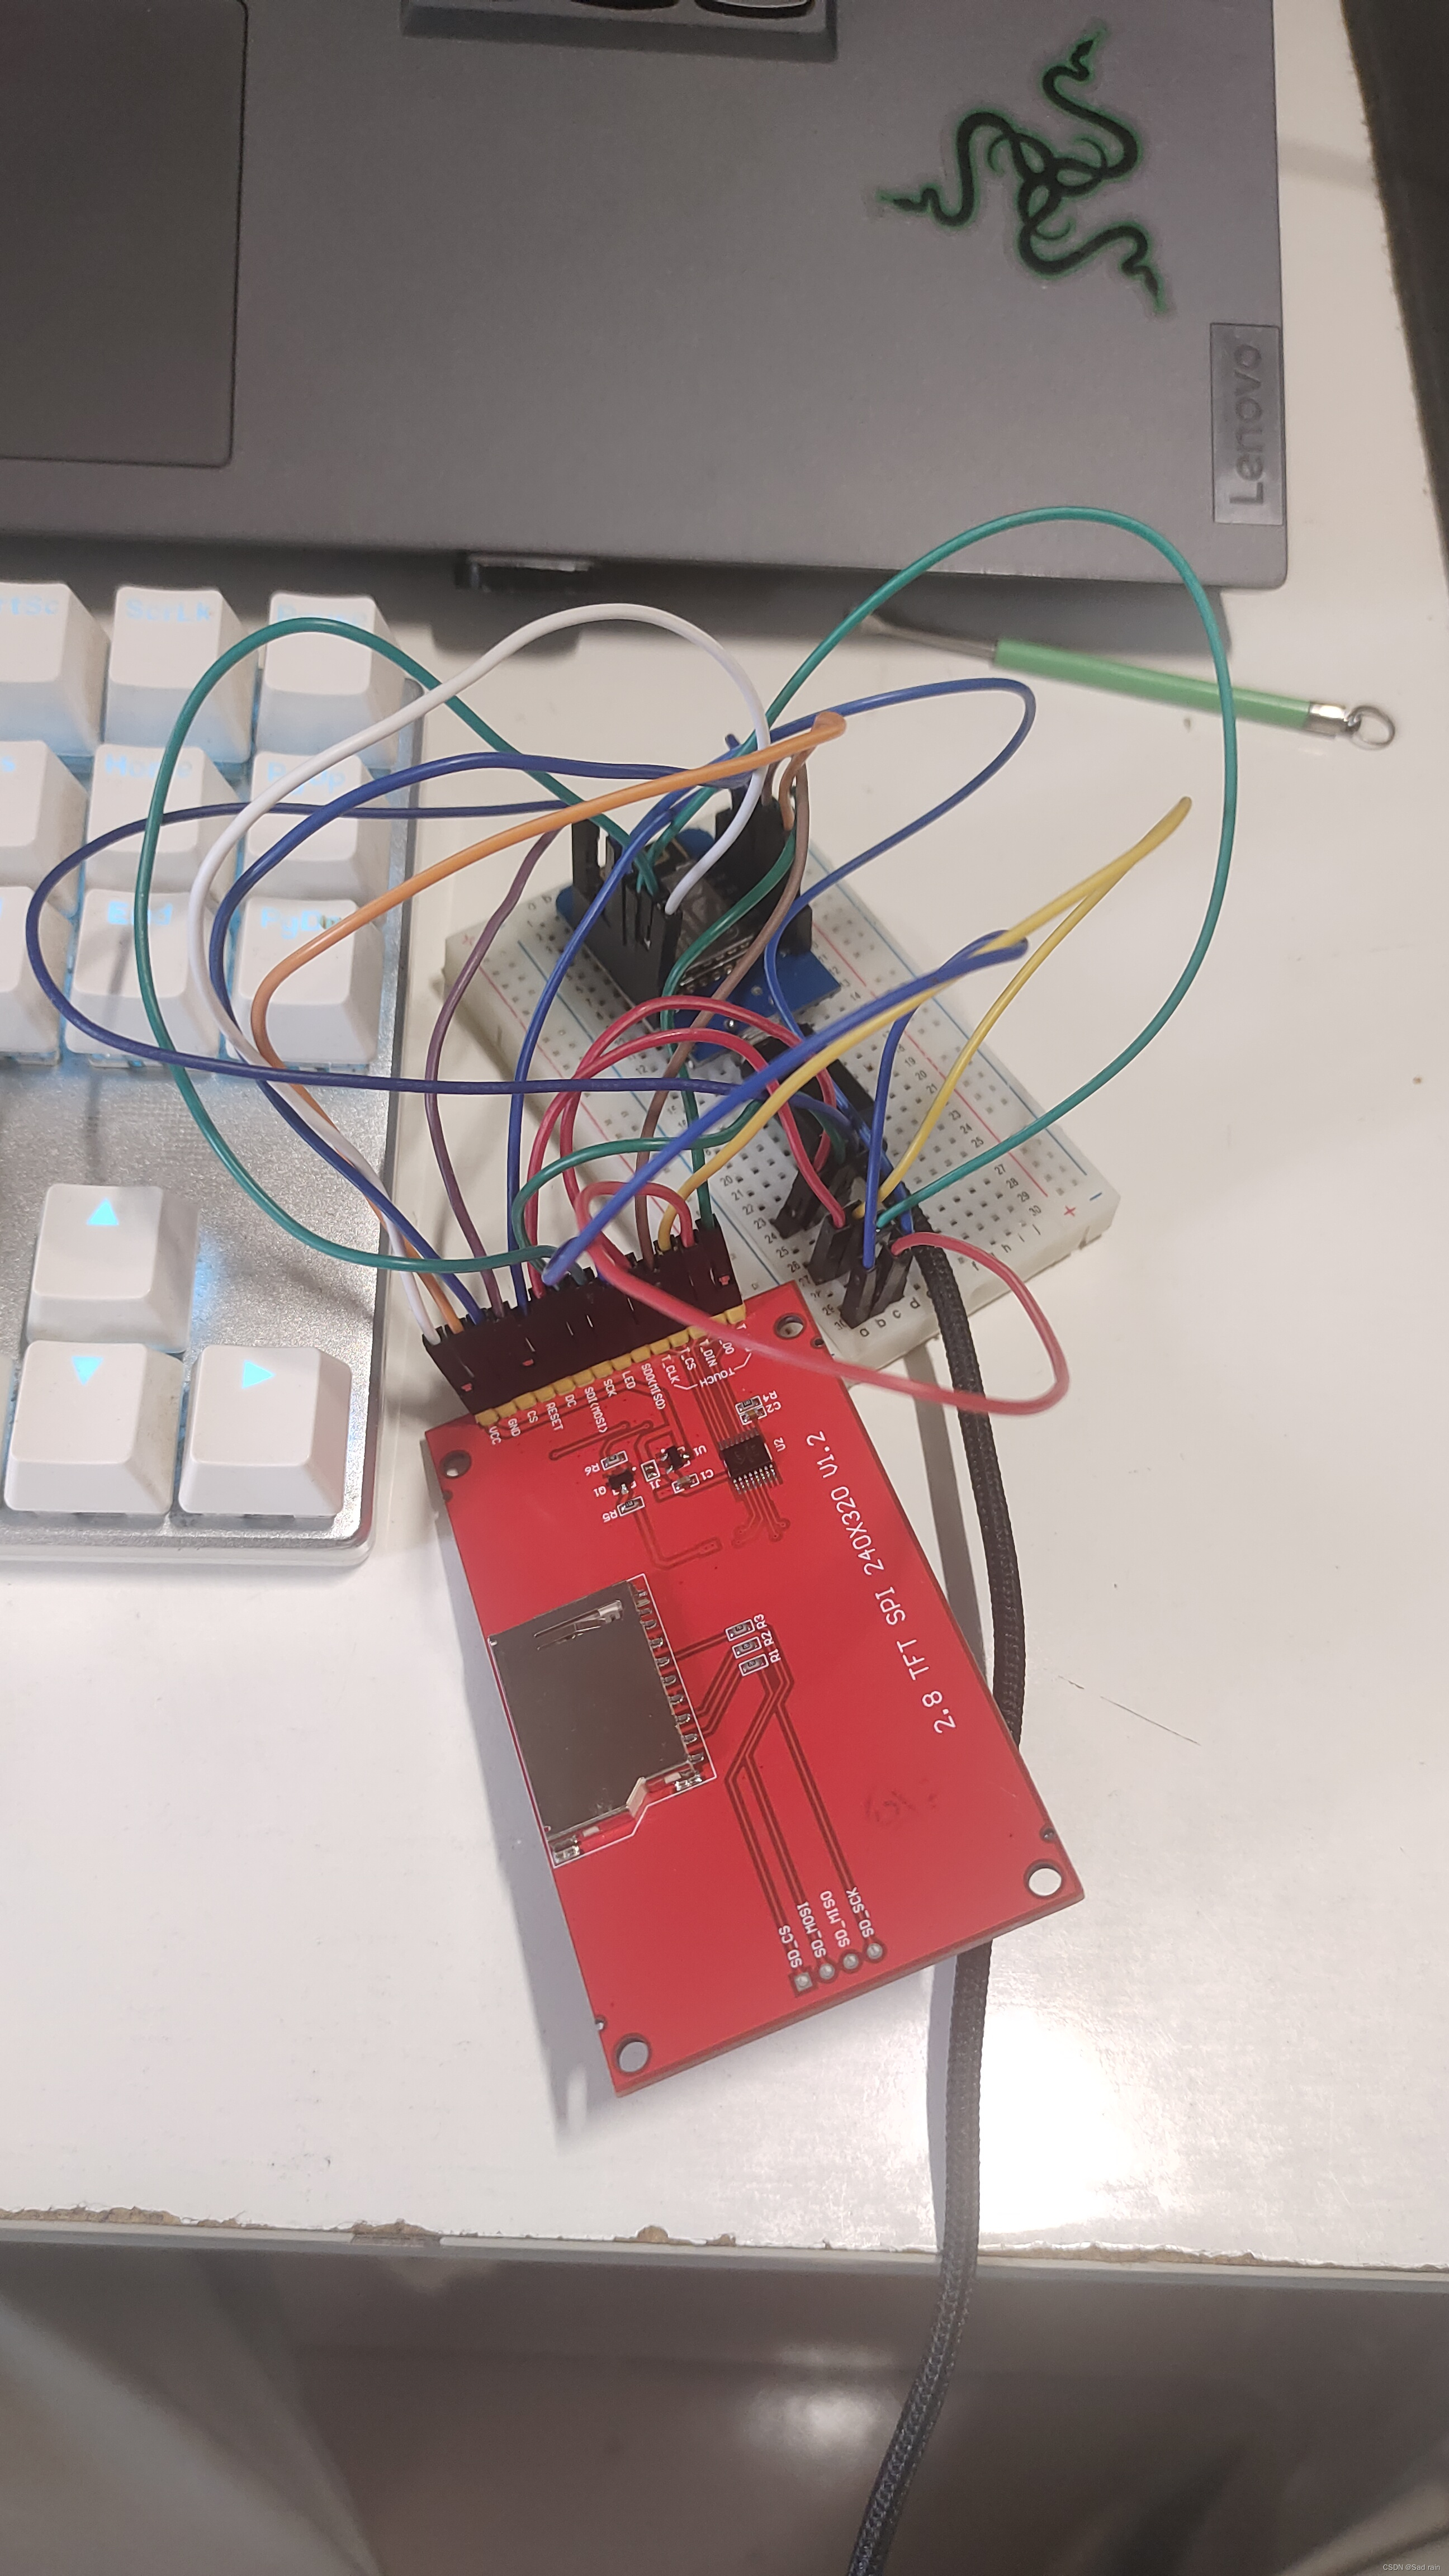
3.1 Item preparation
A Wemos D1 Mini Pro development board, a TFT display, a USB cable, and some DuPont cables.
3.2 Software Installation and Debugging
3.2.1 Download and installation of Arduino IDE
Open the browser and search (https://www.arduino.cc/en/software) or directly search the Arduino official website. Download and install Arduino IDE. After the download is completed, download the corresponding driver from the official website according to the system version of your computer.
3.2.2Wemos D1 Mini Pro development environment configuration
1. Open Arduino IDE. Click “File” -> “Preferences” -> “Additional Development Board Manager URL”, fill in http://arduino.esp8266.com/stable/package_esp8266com_index.json, and then click “OK”.

2. After the preference settings are completed, restart the Arduino IDE. Then click “Tools” -> “Development Board” -> “Development Board Manager”, then search for esp8266, select “esp8266 by ESP8266 Community” from the search results, and then choose to install the latest version.

3. After the installation is complete, restart the Arduino IDE again. Click “Tools”->”Development Boards”->”ESP8266 Boards(3.0.2)” and select LILIN(WEMOS)D1 R2 & mini. The Wemos D1 Mini Pro development environment is set up.

3.2.3 Related library installation
There are two types of libraries in Arduino IDE, one is the standard library, and the other is a third-party library. The standard library has been imported when Arduino IDE is installed, and the third-party library needs to be imported. If the third-party library is not imported, an error will occur when uploading the code. Third-party libraries needed for this project:
First, find the library file and download it. The following is the file address of the library file:
“SunMoonCalc.h”–https://github.com/ThingPulse/esp8266-weather-station/blob/master/src/SunMoonCalc.h
Secondly, enter the web download library. (You can also use a browser to search and download the library file. It is recommended to use Google Chrome browser. Using Google Chrome browser, the first one searched is usually the required library file acquisition address.)
Click the web address to enter the page, click Code, click Download ZIP to complete the download. (If you cannot enter the web page, you will need an auxiliary software to help you enter the web page. Science Internet.jpg)

To add a library, open the Arduino IDE, click on the project, move the mouse to the import library, the menu bar will be displayed on the right, click Add .ZIP Library…, select the library file to be added, click Open, and the addition is completed. (If the addition is unsuccessful or the last code run is unsuccessful, it may be that the added library file is incorrect. At this time, you need to search and download other library files with the same name again.)

3.2.4 Obtain Open Weather Map API key and Location ID
The weather information displayed by the design is achieved by calling the API key of the Open Weather Map weather website. Therefore, the API key should be obtained first to ensure that weather data can be obtained. The weather data provided by this weather website is relatively comprehensive, including real-time weather data; weather forecast data for the last 5 days (time accuracy: one piece of data every 3 hours); weather forecast data for the last 16 days (time accuracy: one piece of data every day); Historical data query; UV index query; weather map layers provided; weather station data provided; batch data download; air pollution query and other data.
Enter the Open Weather Map official website (https://docs.thingpulse.com/how-tos/openweathermap-key/) registration link Members (openweathermap.org)
Obtain the API key after registration is completed
After logging in, you will enter the homepage of the Open Weather Map weather website.
After clicking API keys to enter, slide down to the following interface.

Click on the first Get API key (free)
Click Get keys to enter the interface. The Key in the first column is the API key you want to obtain.
Click https://openweathermap.org/find?q to enter the page to obtain the Location ID
Enter the city name in the search bar (for example: BaoDing, that is, enter the name of the city where you want to get weather information), and click the search point
Click the red font to enter the page. The last seven digits in the search bar above (https://openweathermap.org/city/xxxxxxx) are the Location ID you want to obtain.
Fill in the two obtained information into the following two positions. (Note that the format of the Open Weather Map weather website API key that needs to be filled in and the city name filled in must correspond to the Location ID)

4. Writing code
This topic uses a 2.8-inch TFT display. Before choosing a certain TFT display, it is necessary to fully understand the basic information of the display. Therefore, in order to let the user know more about the information of the display, the basic information of the hardware is displayed. On the first page, the information includes heap memory, flash memory, WiFi strength, chip ID, power supply, and dynamic frequency conversion. Part of the code written is as follows:
 drawLabelValue(7, "Heap Mem:", String(ESP.getFreeHeap() / 1024) + "kb");

   drawLabelValue(8, "Flash Mem:", String(ESP.getFlashChipRealSize() / 1024 / 1024) + "MB");

   drawLabelValue(9, "WiFi Strength:", String(WiFi.RSSI()) + "dB");

   drawLabelValue(10, "Chip ID:", String(ESP.getChipId()));

   drawLabelValue(11, "VCC: ", String(ESP.getVcc() / 1024.0) + "V");

   drawLabelValue(12, "CPU Freq.: ", String(ESP.getCpuFreqMHz()) + "MHz");
4.1 Writing display time and date codes
Part of its core code for obtaining local information is as follows (including font, text alignment and color):
1 char time_str[11];

2 time_t now = time(nullptr);

3 struct tm * timeinfo = localtime( & amp;now);

4 gfx.setTextAlignment(TEXT_ALIGN_CENTER);

5 gfx.setFont(ArialRoundedMTBold_14);

6 gfx.setColor(MINI_WHITE);
The first line above defines the time_str[] array; the third line sets the local time; the fourth line sets the text alignment to center alignment; the fifth line sets the font using the ArialRoundedMTBold_14 array and sets the width, height, first character, and character in the array Number, the sixth line sets the color to white.
1 String date = WDAY_NAMES[timeinfo->tm_wday] + " " + MONTH

2 NAMES[timeinfo->tm_mon] + " " + String(timeinfo->tm_mday) + " "

3 + String(1900 + timeinfo->tm_year);

4 gfx.drawString(120, 6, date);

5 gfx.setFont(ArialRoundedMTBold_36);
The first, second, and third lines above set the year, month, and day, and the fourth line indicates drawing the date on the screen; the fifth line sets the font using the ArialRoundedMTBold_36 array, and the width, height, first character, and number of characters are set in the array.
1 if (IS_STYLE_12HR){

2 int hour = (timeinfo->tm_hour + 11) % 12 + 1;

3 if (IS_STYLE_HHMM) {

4 sprintf(time_str, "-: d\\
", hour, timeinfo->tm_min);

5 } else {

6 sprintf(time_str, "-: d: d\\
", hour, timeinfo->tm_min, tim

7 einfo->tm_sec);}

8 } else {

9 if (IS_STYLE_HHMM) {

10 sprintf(time_str, " d: d\\
", timeinfo->tm_hour, timeinfo->

11 tm_min);

12 } else {

13 sprintf(time_str, " d: d: d\\
", timeinfo->tm_hour, tim

14 einfo->tm_m14in, timeinfo->tm_sec);

15}

16}

17 gfx.drawString(120, 20, time_str);

18 gfx.setTextAlignment(TEXT_ALIGN_LEFT);

19 gfx.setFont(ArialMT_Plain_10);

20 gfx.setColor(MINI_BLUE);
The first line above uses an if statement to determine whether it is a 12-hour timer; the second line defines hour; the third line uses an if statement to determine whether the time format is HHMM; the fourth line indicates that if the if conditional statement is met, the time will be output on the serial port and output The time format is hh (hour): mm (minute); the fifth, sixth, and seventh lines indicate that if the if conditional statement is not met, the else statement will be executed. After execution, the time is output on the serial port and the time format is hh (hour): mm ( minutes): ss (seconds); the else statement in the eighth line is executed without satisfying the if statement in the first line, indicating that the time is 24 hours; the ninth line means the same as the third line; Ten, eleven and the fourth line have the same meaning; twelve, thirteen and fourteen have the same meaning as the fifth, six and seven; the seventeenth line draws the time on the screen; the eighteenth line means Set the text alignment to left alignment; line 19 means setting the font; line 20 means setting the color to blue.
4.2 Writing of moon phase display code
The display information of this project also includes moon phases and sunrise and sunset. The moon has eight different shapes: new moon, Emei moon, first quarter moon, gibbous moon, full moon, waning moon, last quarter moon, and waning moon.
1 gfx.setFont(MoonPhases_Regular_36);

2 gfx.setColor(MINI_WHITE);

3 gfx.setTextAlignment(TEXT_ALIGN_CENTER);

4 gfx.drawString(120, 275, String(determineMoonIcon()));

5 gfx.setColor(MINI_WHITE);

6 gfx.setFont(ArialRoundedMTBold_14);

7 gfx.setTextAlignment(TEXT_ALIGN_CENTER);

8 gfx.setColor(MINI_YELLOW);

9 gfx.drawString(120, 250, MOON_PHASES[moonData.phase.index]);

10 gfx.setTextAlignment(TEXT_ALIGN_LEFT);

11 gfx.setColor(MINI_YELLOW);

12 gfx.drawString(5, 250, SUN_MOON_TEXT[0]);

13 gfx.setColor(MINI_WHITE);
The first line above sets the font and uses the MoonPhases_Regular_36[] array. The width, height, first character, and number of characters are set in the array; the second line sets the color to white; the third line sets the text alignment to center alignment; the fourth line Indicates drawing a confirmed moon icon on the screen; the fifth line sets the color to white; the sixth line sets the font and uses the ArialRoundedMTBold_14 [] array, in which the width, height, first character, and number of characters are set; the seventh line sets the text alignment The mode is center-aligned; the eighth line sets the color to yellow; the ninth line indicates drawing the lunar phase on the screen and uses the MOON_PHASES[] array, which includes lunar data, phase, and index; the tenth line sets the text alignment to Align to the left; line 11 sets the color to yellow; line 12 represents drawing the first set of data of the SUN_MOON_TEXT[] array on the screen, which represents the rising and falling time data of the sun and moon; line 13 Set the color to white.
The core codes for sunrise and sunset are as follows:
1 time_t time = currentWeather.sunrise;

2 gfx.drawString(5, 276, SUN_MOON_TEXT[1] + ":");

3 gfx.drawString(45, 276, getTime( & amp;time));

4 time = currentWeather.sunset;

5 gfx.drawString(5, 291, SUN_MOON_TEXT[2] + ":");

6 gfx.drawString(45, 291, getTime( & amp;time));

7 gfx.setTextAlignment(TEXT_ALIGN_RIGHT);

8 gfx.setColor(MINI_YELLOW);

9 gfx.drawString(235, 250, SUN_MOON_TEXT[3]);

10 gfx.setColor(MINI_WHITE);
The first line above, time_t is a long integer type, defines time as a long integer type, and assigns the sunrise time to time; the second line indicates drawing the second set of data of the SUN_MOON_TEXT[] array on the screen and adding \ after it. “:”; The third line represents the time obtained by drawing on the screen; the fourth line represents assigning the sunset time to time; the fifth line represents drawing the third set of data of the SUN_MOON_TEXT[] array on the screen and adding it after “:”; The sixth line represents the time obtained by drawing on the screen; the seventh line sets the text alignment to right alignment; the eighth line sets the color to yellow; the ninth line represents drawing SUN_MOON_TEXT[] on the screen The fourth set of data in the array; the tenth line sets the color to white.
To obtain the time information of the lunar calendar, part of the core code is as follows:
1 float lunarMonth = 29.53;

2 gfx.drawString(190, 276, SUN_MOON_TEXT[4] + ":");

3 gfx.drawString(235, 276, String(moonData.age, 1) + "d");

4 gfx.drawString(190, 291, SUN_MOON_TEXT[5] + ":");

5 gfx.drawString(235, 291, String(moonData.illumination * 100, 0) + "%");
The first line above defines the lunar calendar as a single-precision floating point number; the second line indicates drawing the fifth set of data of the SUN_MOON_TEXT[] array on the screen and adding “:” at the end and making it formatted as “Rise:hh: mm”; the third line represents drawing the monthly age on the screen and formatting it as “Age:11.0d”, where “11.0” changes according to the actual situation; the fourth line represents drawing the sixth element of the SUN_MOON_TEXT[] array on the screen Set the data and add “:” after it and format it as “Set: hh:mm”; the fifth line represents drawing the moon phase on the screen and format it as “lllum: 85%”, where “85” Change according to actual situation.
4.3 Preparation of weather information prediction code for the next seven days
Information includes the day’s temperature, wind speed, wind direction, pressure, humidity, clouds, and visibility. When setting the display format of weather forecast information, you need to use the forecasts[] array. This array is a structure array and contains multiple elements. The corresponding elements are defined as follows:
typedef struct OpenWeatherMapForecastData {//{"dt":1527066000,

   uint32_t observationTime; //Define observationTime as a 32-bit unsigned integer

   float temp;//Define temp (temperature) as a single-precision floating point number, and its display format is "main":{"temp":17.35,

   float feelsLike;//Feeling temperature, "feels_like": 16.99,

   float tempMin;//Minimum temperature value, "temp_min":16.89,

   float tempMax;//Maximum temperature value, "temp_max":17.35,

   float pressure;//Pressure, "pressure":970.8,

   float pressureSeaLevel;//Sea level pressure, "sea_level":1030.62,

   float pressureGroundLevel;//Ground layer pressure, "grnd_level":970.8,

   uint8_t humidity;//Define humidity (humidity) as an 8-bit unsigned integer, "humidity":97,

   uint16_t weatherId; //Define weatherId as a 16-bit unsigned integer, },"weather":[{"id":802,

   String main;// "main":"Clouds"

   String description; //"description":"scattered clouds"

   String icon;// "icon":"03d"

   String iconMeteoCon;

   uint8_t clouds;//Define clouds as an 8-bit unsigned integer, }],"clouds":{"all":44}

   float windSpeed;//Define windSpeed (wind speed) as a single-precision floating point number, "wind":{"speed":1.77,

   float windDeg;//Demeanor,"deg":207.501

   float rain;//Rain, rain: {3h: 0.055},},"sys":{"pod":"d"}

   String observationTimeText;// dt_txt: "2018-05-23 09:00:00"

} OpenWeatherMapForecastData;
Set the display format of weather forecast information. The core code is as follows:
Set the display format to: T:-2℃ and draw it on the screen, where T represents the temperature, the color of T: is blue, -2 can be changed according to the actual situation, and the font color of -2℃ is white
gfx.setColor(MINI_BLUE);

   gfx.drawString(firstColumnLabelX, y, "T:");

   gfx.setColor(MINI_WHITE);

   gfx.drawString(firstColumnValueX, y, String(forecasts[i].temp, 0) + degreeSign);
Set the display format to: H: 24% and draw it on the screen, where H represents humidity, the color of H: is blue, 24 can be changed according to the actual situation, and the font color of 24% is white
 gfx.setColor(MINI_BLUE);

   gfx.drawString(firstColumnLabelX, y + 15, "H:");

   gfx.setColor(MINI_WHITE);

   gfx.drawString(firstColumnValueX, y + 15,
String(forecasts[i].humidity) + “%”);
Set the display format to: P: 0.00mm and draw it on the screen, where P represents visibility, the color of P: is blue, 0.00 can be changed according to the actual situation, and the font color of 0.00mm is white
 gfx.setColor(MINI_BLUE);

   gfx.drawString(firstColumnLabelX, y + 30, "P: ");

   gfx.setColor(MINI_WHITE);

   gfx.drawString(firstColumnValueX, y + 30, String(forecasts[i].rain, 2) + (IS_METRIC ? "mm" : "in"));
Set the display format to: Pr:1034hPa and draw it on the screen, where Pr represents pressure, the color of Pr: is blue, 1034 can be changed according to the actual situation, and the font color of 1034hPa is white
 gfx.setColor(MINI_BLUE);

   gfx.drawString(secondColumnLabelX, y, "Pr:");

   gfx.setColor(MINI_WHITE);

   gfx.drawString(secondColumnValueX, y, String(forecasts[i].pressure, 0) + "hPa")
Set the display format as: WSp:1m/s and draw it on the screen, where WSp represents the wind speed, the color of WSp: is blue, 1 can be changed according to the actual situation, and the font color of 1m/s is white
 gfx.setColor(MINI_BLUE);

   gfx.drawString(secondColumnLabelX, y + 15, "WSp:");

   gfx.setColor(MINI_WHITE);

   gfx.drawString(secondColumnValueX, y + 15, String(forecasts[i].windSpeed, 0) + (IS_METRIC ? "m/s" : "mph") );
Set the display format as: WDi:120° and draw it on the screen, where WDi represents the wind direction, the color of WDi: is blue, 120 can be changed according to the actual situation, and the font color of 120° is white
 gfx.setColor(MINI_BLUE);

   gfx.drawString(secondColumnLabelX, y + 30, "WDi: ");

   gfx.setColor(MINI_WHITE);

   gfx.drawString(secondColumnValueX, y + 30, String(forecasts[i].windDeg, 0) + "°");
4.4 Writing Wi-Fi Code
This design requires the Wemos D1 Mini Pro development board to be connected to Wi-Fi in order to obtain weather information from the Open Weather Map weather website and display the weather information through the TFT display. The Wi-Fi account password can be the account password of the broadband router or the mobile hotspot. Wemos D1 Mini Pro serves as the STA terminal and the mobile phone serves as the AP terminal. After connecting to the Wemos D1 Mini Pro, you can access the Open Weather Map weather website through Wi-Fi to obtain the required weather information. Part of its core code is as follows:
1 void connectWifi() {

2 if (WiFi.status() == WL_CONNECTED) return;

     //Manual WifiManual Wi-Fi

3 Serial.printf("Connecting to WiFi %s/%s", WIFI_SSID.c_str(), WIFI_PASS.c_str());

4WiFi.disconnect();

5 WiFi.mode(WIFI_STA);// Wi-Fi mode

6 WiFi.hostname(WIFI_HOSTNAME); //Wi-Fi host name

7 WiFi.begin(WIFI_SSID.c_str(), WIFI_PASS.c_str());

8 int i = 0;

9 while (WiFi.status() != WL_CONNECTED) {

10 delay(500);//Delay 500MS

11 if (i > 80) i = 0;

12 drawProgress(i, "Connecting to WiFi '" + String(WIFI_SSID.c_str()) + "'");

13 i + = 10;

14 Serial.print(".");

15}

16 drawProgress(100, "Connected to WiFi '" + String(WIFI_SSID.c_str()) + "'");

17 Serial.println("connected.");

18 Serial.printf("Connected,IPaddress:%s/%s\\
",WiFi.localIP().toString().c_str(),

19 WiFi.subnetMask().toString().c_str());

20 Serial.printf("Connected, MAC address: %s\\
", WiFi.macAddress().c_str());

21}
Set up Wi-Fi, write code to access the Open Weather Map website, and fill in the account and password of the Wi-Fi you need to connect to “” respectively. The core code is as follows:
String WIFI_SSID = "";

String WIFI_PASS = "";
5. Hardware connection