Table of Contents
Preface
1. Installation of JDK and Tomcat
1.JDK installation
2. Tomcat installation
2. Install MySQL
3. Backend interface deployment
1. Deploy the ssh front-end and back-end separation projects
?2. Deploy single project
3. Deploy the ssm front-end and back-end separation projects and modify the port number
Foreword
With the rapid development of modern software development, more and more enterprises and individuals are beginning to use Linux as a server operating system. This becomes a very important task when it comes to installing JDK, Tomcat and MySQL and deploying projects on Linux. Therefore, in this blog, we will introduce how to install JDK, Tomcat and MySQL on Linux, and explain in detail how to deploy back-end projects on Linux. let’s start!
1. Installation of JDK and Tomcat
1.JDK installation
Visit Oracle’s official website and download the JDK installation package for Linux (tar.gz format) directly
wget --no-check-certificate -c --header "Cookie: oraclelicense=accept-securebackup-cookie" https://download.oracle.com/otn-pub/java/jdk/18.0.2 +7/0d1cfde4252546c6931946de8db48ee2/jdk-18.0.2_linux-x64_bin.tar.gz
or
Download first and then upload directly to the Linux server, upload jdk and tomcat installation packages

Unzip the JDK installation package
//Unzip jdk
tar -zxvf jdk-8u151-linux-x64.tar.gz

Configure environment variables (JAVA_HOME and PATH)
vim /etc/profile
<strong>Add the following to the end of the file:</strong>
//java environment
export JAVA_HOME=/glgj/software/jdk1.8.0_151/ (jdk decompression path)
export JRE_HOME=${JAVA_HOME}/jre
export CLASSPATH=.:${JAVA_HOME}/lib:${JRE_HOME}/lib
export PATH=${JAVA_HOME}/bin:$PATH

Enable configuration to take effect:
#Set environment variables to take effect
source /etc/profile
Verify that JDK installation is successful
java-version

2.Tomcat installation
Visit Apache Tomcat official website to download the Tomcat installation package (tar.gz format)
wget https://mirrors.bfsu.edu.cn/apache/tomcat/tomcat-10/v10.0.12/bin/apache-tomcat-10.0.12.tar.gz
or
Download first and then upload directly to the Linux server
Unzip the tomcat installation package
#Unzip tomcat
tar -zxvf apache-tomcat-8.5.20.tar.gz

Start tomcat
./startup.sh
Tomcat homepage should be accessed via the following URL:
http://localhost:8080/ //Change localhost to our corresponding IP address

After starting tomcat, you still cannot access the URL. The firewall may block access to Tomcat. Here are two solutions.
Firewall related settings
#Open port
firewall-cmd --zone=public --add-port=8080/tcp --permanent
#Update firewall rules
firewall-cmd --reload
#firewalllist
firewall-cmd --zone=public --list-ports
#Firewall status
systemctl status firewalld
#Start firewall
systemctl start firewalld
#Close firewall
systemctl stop firewalld.service
systemctl disable firewalld.service
① Turn off the firewall (not recommended, it is naturally less secure if turned off)

②Open port

Both methods can solve our problem well (It is recommended to use the second one)
Visit tomcat homepage

2. Install MySQL
In order to facilitate subsequent MySQL operations, here we also directly open the port number of MySQL3306

After installing centos, there will be a default database in it. We need to delete it first and then install our MySQL.

Visit the MySQL official website to download the MySQL installation package (tar.gz format) (mine is mysql-5.7)
wget https://downloads.mysql.com/archives/get/p/23/file/mysql-5.7.35-1.el7.x86_64.rpm-bundle.tar
Here we can also download it in advance and upload it directly to the Linux server
Unzip the MySQL installation package
tar -xvf mysql-5.7.35-1.el7.x86_64.rpm-bundle.tar -C mysql-5.7

Next we will install MySQL through rpm, that is, install some of its plug-ins
rpm -ivh mysql-community-common-5.7.35-1.el7.x86_64.rpm
rpm -ivh mysql-community-libs-5.7.35-1.el7.x86_64.rpm
rpm -ivh mysql-community-client-5.7.35-1.el7.x86_64.rpm
rpm -ivh mysql-community-server-5.7.35-1.el7.x86_64.rpm

View the database default password and change the password
#View database default password
grep "password" /var/log/mysqld.log
#Set the password verification policy (0 or LOW), otherwise the password is too LOW and will not let you pass
set global validate_password_policy=0;
#Set the password verification length, otherwise the password will not be allowed to pass if it is too short (multiple tests found that the minimum password length is 4 digits)
set global validate_password_length=4;
#update password
set password = password("123456");
#After input, the following statement is needed to make the modification effective.
FLUSH PRIVILEGES;
#quit
exit

Authorize and connect to the database
#The database is not authorized, allowing remote login to mysql as root
GRANT ALL PRIVILEGES ON *.* TO 'root'@'%' IDENTIFIED BY '123456' WITH GRANT OPTION;
#After input, the following statement is needed to make the modification effective.
FLUSH PRIVILEGES;


3. Backend interface deployment
1. Deploy the ssh front-end and back-end separate projects
Put the war package of the packaged project into tomcat/wepapp

Start the tomcat server

Establish database name, account password, etc.

Create the corresponding database

Import data

 Restart tomcat service

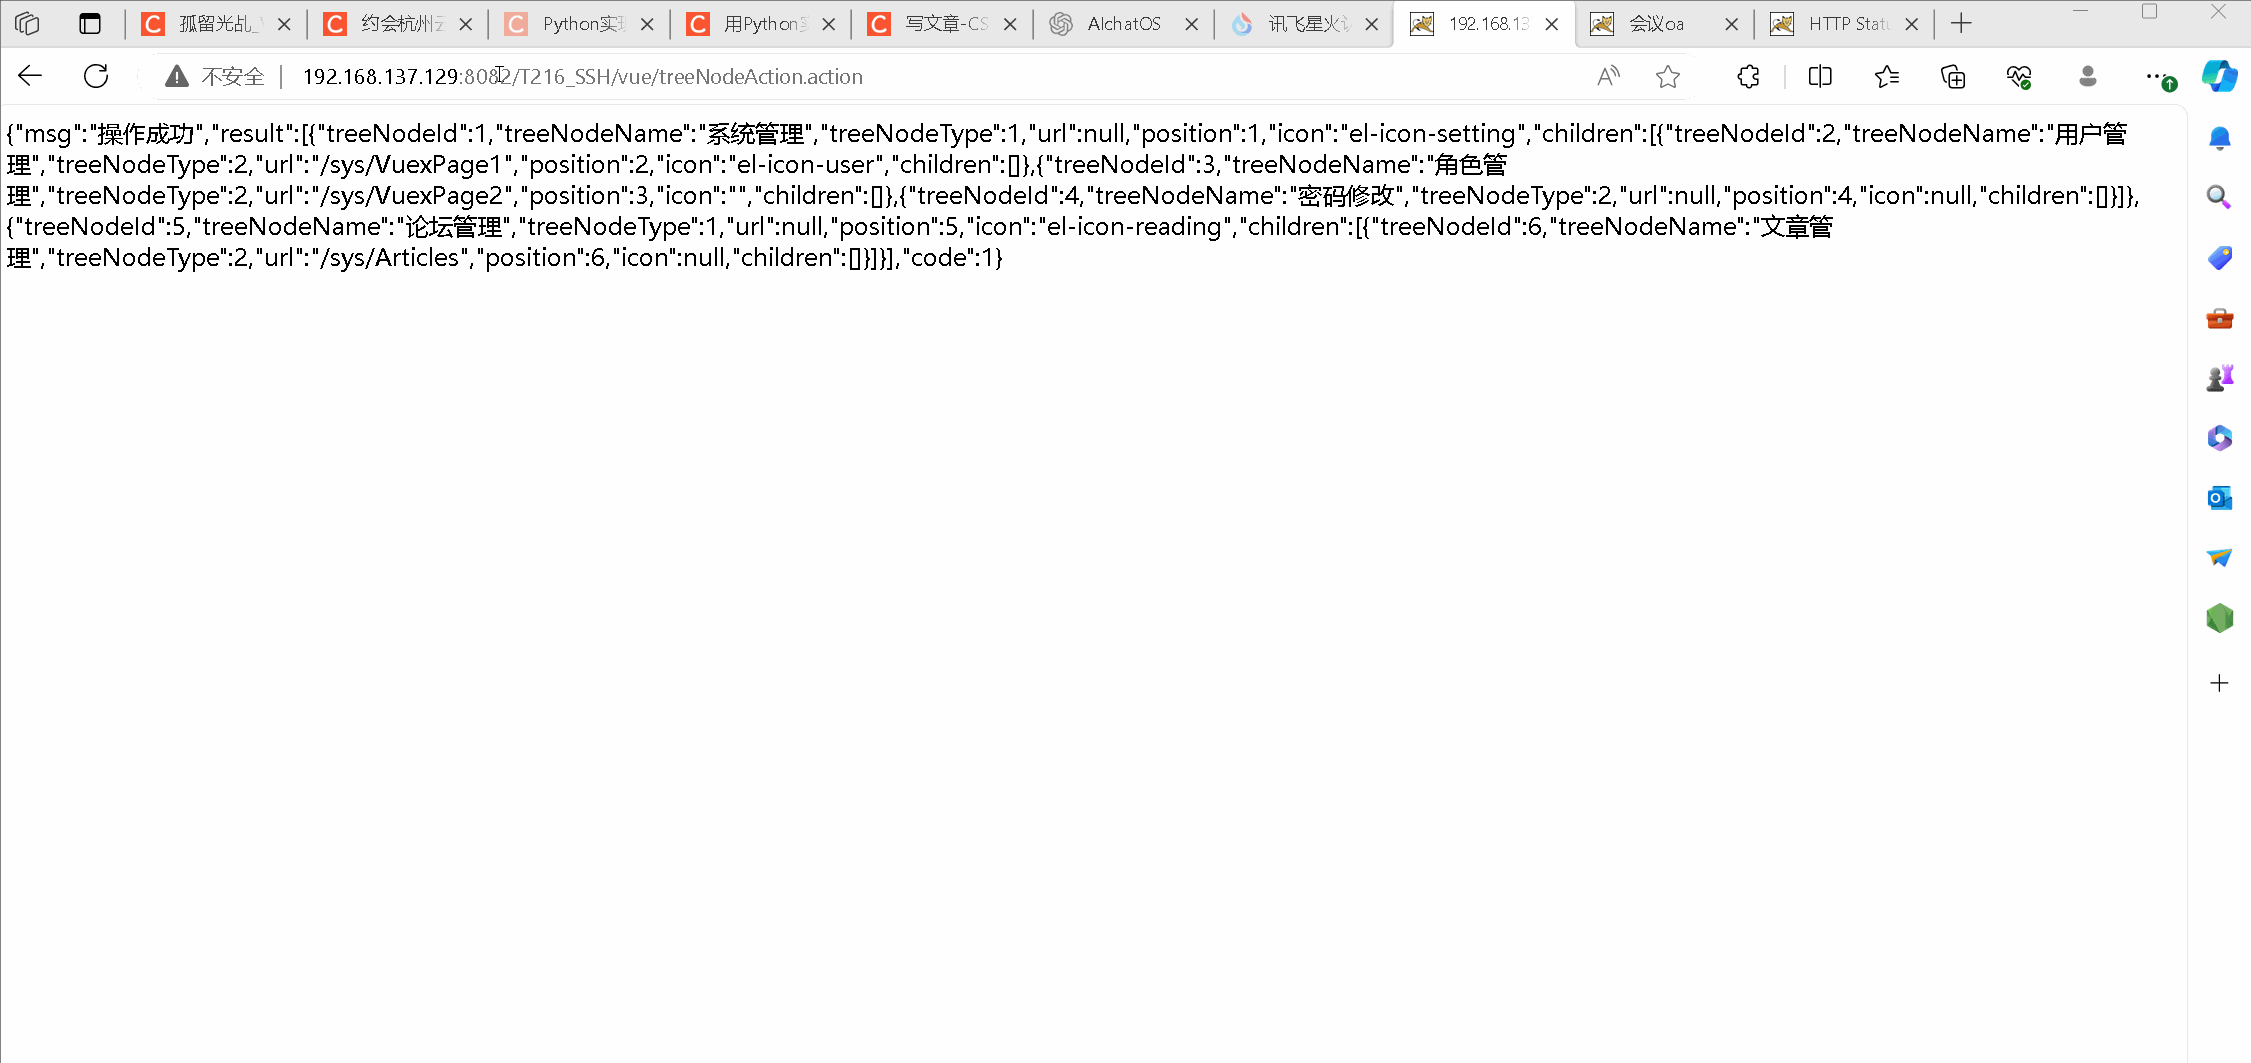
Demonstration effect:
 2. Deploy the single project
 2. Deploy the single project
Put the war package of the packaged project into tomcat/wepapp

Note: Find the configuration file to connect to the database. The database name, account password, etc. need to be consistent

Create database

Import data

Demonstration effect of restarting the tomcat service:

3. Deploy and modify the ssm front-end and front-end separated projects Port number
Put the war package of the packaged project into tomcat/wepapp

Check whether the connection database configuration file needs to be modified and establish the database name

Create database

Import data

Restart the tomcat service and demonstrate the effect:

It has been successful, then we will modify the port number

Open port 8082 and restart the service

Demonstration of effects before modifying the port

Demonstration of the effect after modifying the port