Introduction
Mock means simulation. During the testing process, for some objects that are not easy to construct or obtain, a virtual object is used to create a test method for testing. Its biggest advantage is to reduce the coupling between the front and back ends.
This allows front-end engineers to return data without relying on the back-end, and first develop front-end styles and logic processing. In simple terms: Mock is used to solve dependency problems, using a simple
fake object instead.
Mock Server is the Mock interface server, which can quickly mock out new interfaces through configuration.
Mock Server usage scope:
Front-end and back-end separation projects
The interface tested relies on a third-party system (not available yet)
The tested interface relies on complex or unstable interfaces and is not the main verification object.
At the same time, when the interface has not yet been developed, providing a Mock interface (fake interface) will be more intuitive than having only interface documents, and can effectively reduce communication costs and some document understanding.
When conducting interface testing, the system under test often needs to connect to a third-party system. However, there is no ready-made third-party system environment. At this time, we need to use mocks to solve this dependency relationship, and Python provides a mock API that can be easily built. Interface service module: flask. Flask is a simple and very powerful Python web framework.
It is called a microframework. “Micro” does not mean putting the entire web application into a Python file. The “micro” in microframework means that Flask aims to keep the code simple and easy to expand. The main features of the Flask framework are The core composition is relatively simple, but it has strong scalability and compatibility. Programmers can use Python language to quickly implement a website or web service.
Therefore, flask can easily build a web service, which can also be called a client to provide web services to the outside world. Based on the characteristics of the flask framework, we can easily build an API interface for client access.
Flask mock interface development example
First install the required Flask modules. If pip is already installed in your environment, type: pip install flask to complete the installation.
Or retrieve the installation directly in pycharm:
1.1 Build the interface of GET request method
Create a new py file in Pycharm and edit the following code
# -*- coding: utf-8 -*-
import flask,json
import time

server = flask.Flask(__name__) # Create a service and treat the current python file as a service

@server.route('/VIID/System/Time', methods=['get']) # @server.route() can convert ordinary functions into services, interface paths, and request methods. If methods are not written, it will default get method
def Time():
    '''Query string: None, Message body: None, Return result: SystemTime'''
    response_data = {
                "SystemTimeObject": {
                    "VIIDServerID": "123",
                    "TimeMode": "1",
                    "LocalTime": time.strftime('%Y%m%d%H%M%S', time.localtime(time.time())),
                }
            }
    return json.dumps(response_data, ensure_ascii=False)

if __name__ == '__main__':
    server.run(debug=True, port=5000, host='10.82.25.11') #Specify the access port and host
Then run the py file. The file will be a web service when running locally. Use a browser or postman to try to access the URL of the service.
Browser access:

Postman sends a request to access:

After the browser or postman request is completed, the following output will be output in the Pycharm output column:

Other request methods such as POST, PUT, DELETE, etc. can be specified in the methods parameter. However, POST, PUT, DELETE and other methods cannot be directly accessed by the browser, because the browser defaults to accessing the get method. You can use postman to specify method to send a request
1.2 Get the interface with json format request body
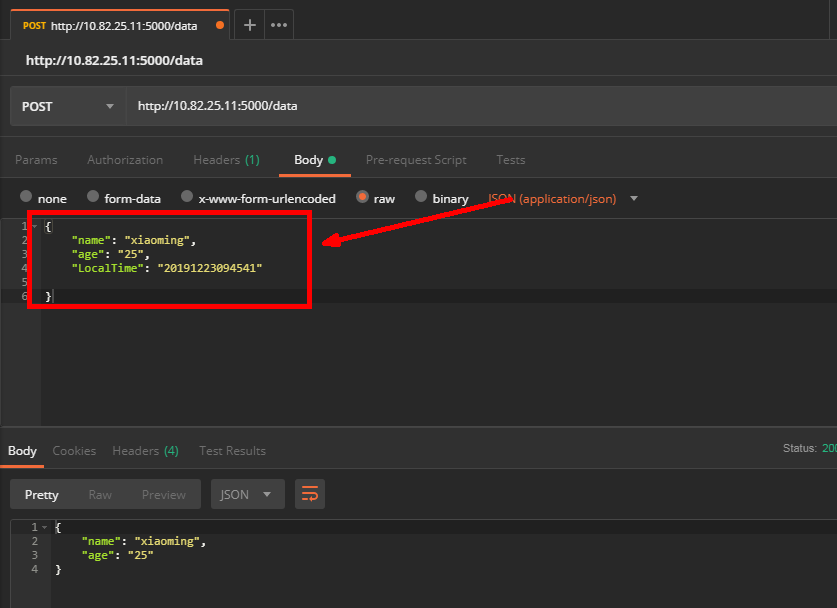
Sometimes the request sent by the client is in json format. In this case, you need to get the requested json. Edit the code as follows:
@server.route('/data',methods=['post'])
def post_json():
    if flask.request.is_json:
        print(flask.request.json)
        name = flask.request.json.get('name') # Get the value of the first parameter of the json request body
        age = flask.request.json.get('age') # Get the value of the second parameter of the json request body
        data = {'name':name,'age':age}
        return json.dumps(data,ensure_ascii=False)
    else:
        return json.dumps({'msg':'Please pass json format parameters'}, ensure_ascii=False)
Use postman as the client to send a request with a json request body, as shown below:
1.3 Get the parameters sent in the get request
The methods provided by flask are:
value = flask.request.args.get('name') # Get the value of the get request parameter name
1.4 Construct dynamic URL and redirection of response body
Many times, the URL requested by the client changes, that is, it contains dynamic parameters. Flask can also easily build a URL resource service that provides dynamic parameters and redirect the response body. The code is as follows:
# -*- coding: utf-8 -*-
import flask,json
from flask import url_for,redirect

server = flask.Flask(__name__) # Create a service and treat the current python file as a service

@server.route('/data')
def data(): # Return data
    data = {
                'VideoSliceInfoObject': {
                    'VideoID': 'esse elit',
                    'AudioCodeFormat': 'commodo'
                }
    }
    return json.dumps(data, ensure_ascii=False)

@server.route('/data/<ID>/Info', methods=['post'])
def data_redirect(ID):
    return redirect(url_for('data', guest=ID))

if __name__ == '__main__':
    server.run(debug=True, port=5000, host='10.82.25.11') #Specify the access port and host
No matter what the ID parameter is in the URL sent by postman or the client later, you can respond.
1.5 Reconstruct response headers and response status codes
Sometimes when connecting with a third-party system, it is necessary to return a response header message and a specified response status code. Customized response messages can also be constructed in flask.
# -*- coding: utf-8 -*-
import flask,json

server = flask.Flask(__name__) # Create a service and treat the current python file as a service

@server.route('/data',methods=['post'])
def post_json():
    if flask.request.is_json:
        print(flask.request.json)
        name = flask.request.json.get('name') # Get the value of the first parameter of the json request body
        age = flask.request.json.get('age') # Get the value of the second parameter of the json request body
        data = {'name':name,'age':age}
        # Construct response header fields and status codes
        resp = flask.make_response(json.dumps(data, ensure_ascii=False))
        resp.status = "666"
        resp.headers[
            "python"] = "python flask"
        return resp
    else:
        return json.dumps({'msg':'Please pass json format parameters'}, ensure_ascii=False)

if __name__ == '__main__':
    server.run(debug=True, port=5000, host='10.82.25.11') #Specify the access port and host
Run the py file, send the request in postman, and view the response information, as shown below, which becomes the response header and status code we customized.

This way we completely customize the response headers and status codes
Conclusion
This post ends here. Finally, I hope friends who read this post can gain something.
Summary:
Thank you to everyone who reads my article carefully! ! !
As someone who has experienced it, I also hope that everyone will avoid some detours. If you don’t want to experience the feeling of not being able to find information, no one to answer questions, and giving up after a few days of study, here I will share with you some learning about automated testing. Resources, I hope they can help you on your way forward.

How to obtain documents:
Join my software testing exchange group: 632880530 Get it for free~ (Academic exchanges with fellow experts, and live broadcasts every night to share technical knowledge points)
This document should be the most comprehensive and complete preparation warehouse for friends who want to engage in [software testing]. This warehouse has also accompanied me through the most difficult journey. I hope it can also help you!
All of the above can be shared. You only need to search the vx official account: Programmer Hugo to get it for free