Table of Contents
1. Use of Git graphical interface
1.1 Preparation
1.2 Use of Git graphical interface
1.2.1 File code cloning
1.2.2 Check the effect of file GIt management
1.2.3 Git Gui page details illustration
1.2.4 Git Gui function demonstration effect
(1) Temporary storage
(2) Submission and comments
(3) Push remote push
2. SSH protocol
2.1 Definition
2.2 Features
2.3 The difference between SSH protocol and SSL/TLS protocol
2.3.1 Design purpose and application scenarios
2.3.2 Communication methods
2.3.3 Ports and protocols
2.3.4 Identity verification method
2.3.5 Application areas
2.3.6 Working level
2.4 What is SSH Key
2.5 Use SSH protocol to clone the corresponding file code
2.5.1 Preparation
(1) Remote warehouse code status
(2) Set SSH public key
2.5.2 SSH protocol clone file code
(1) Cloning steps
(2) Effect after cloning
3. IDEA integrates Git
3.1 Configure the git.exe file
3.2 Install Gitee plug-in
3.3 Log in to Gitee in IDEA
3.3.1 Generate Token
3.3.2 Log in to Gitee
3.4 Upload the project to Code Cloud (project sharing)
3.2 IDEA clones the uploaded code cloud code
3.2.1 Copy the SSH path of the file code
3.2.2 Clone code
3.3 Submit push code in IDEA
3.3.1 Submit
3.3.2 Push
3.4 Update code in IDEA that is not pushed by you
3.5 Modify the problem of merging similar codes
1. Use of Git graphical interface
1.1 Preparation
Gitee creates a new warehouse. The specific operations are as follows:

Initialize readme file:

The effect after initialization is completed:

1.2 Use of Git graphical interface
1.2.1 File code cloning
Then go back to the local resource manager and create a new path, then right-click the mouse to open Git GUI here, and the specific operations are as follows:

It should be mentioned here that if you use Git Bash to clone the code according to the previous blog, you must use the command git clone. If you use Git Gui, you do not need to use the command operation.
The specific operations are as follows:


The effect after cloning:

1.2.2 Viewing the effect of file GIt management
You can see that there is nothing in it at this time. At this time, we create a new Person.java and write some code in it, as follows:
Then save, return to the Git Gui interface, click refresh, and you will see the file we just created, as follows:
At this time, we will change the java code in the newly created Person, and add a sql file containing the query statement in the directory where the Person is located, as follows:
Then go back to the Git Gui interface to refresh. The refreshed interface is as follows:
Then we temporarily save the Person. The operation and effect are as follows:
In fact, we can roughly see it here. Compared with the command window, the Git Gui graphical interface can greatly speed up our operation time and improve our development efficiency.
1.2.3 Git Gui page details illustration
Here we need to first understand some details of the Git Gui interface, as follows:
1.2.4 Git Gui function demonstration effect
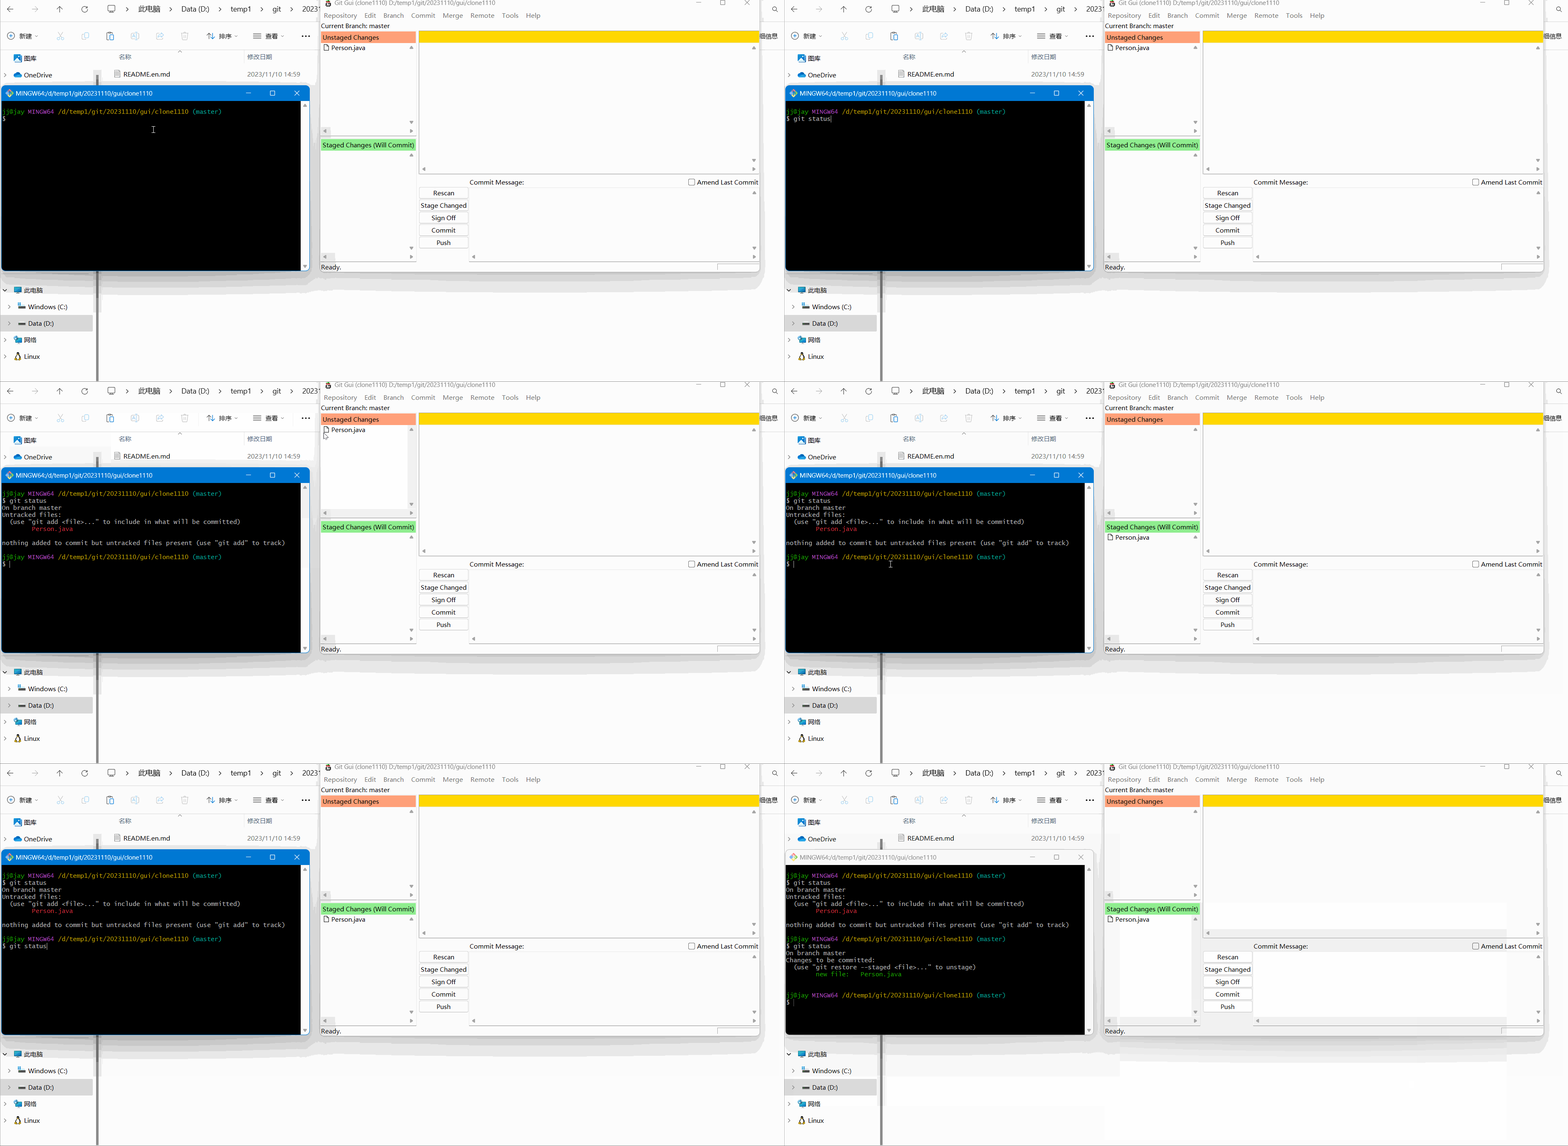
(1) Temporary storage
The temporary demonstration effect is as follows:
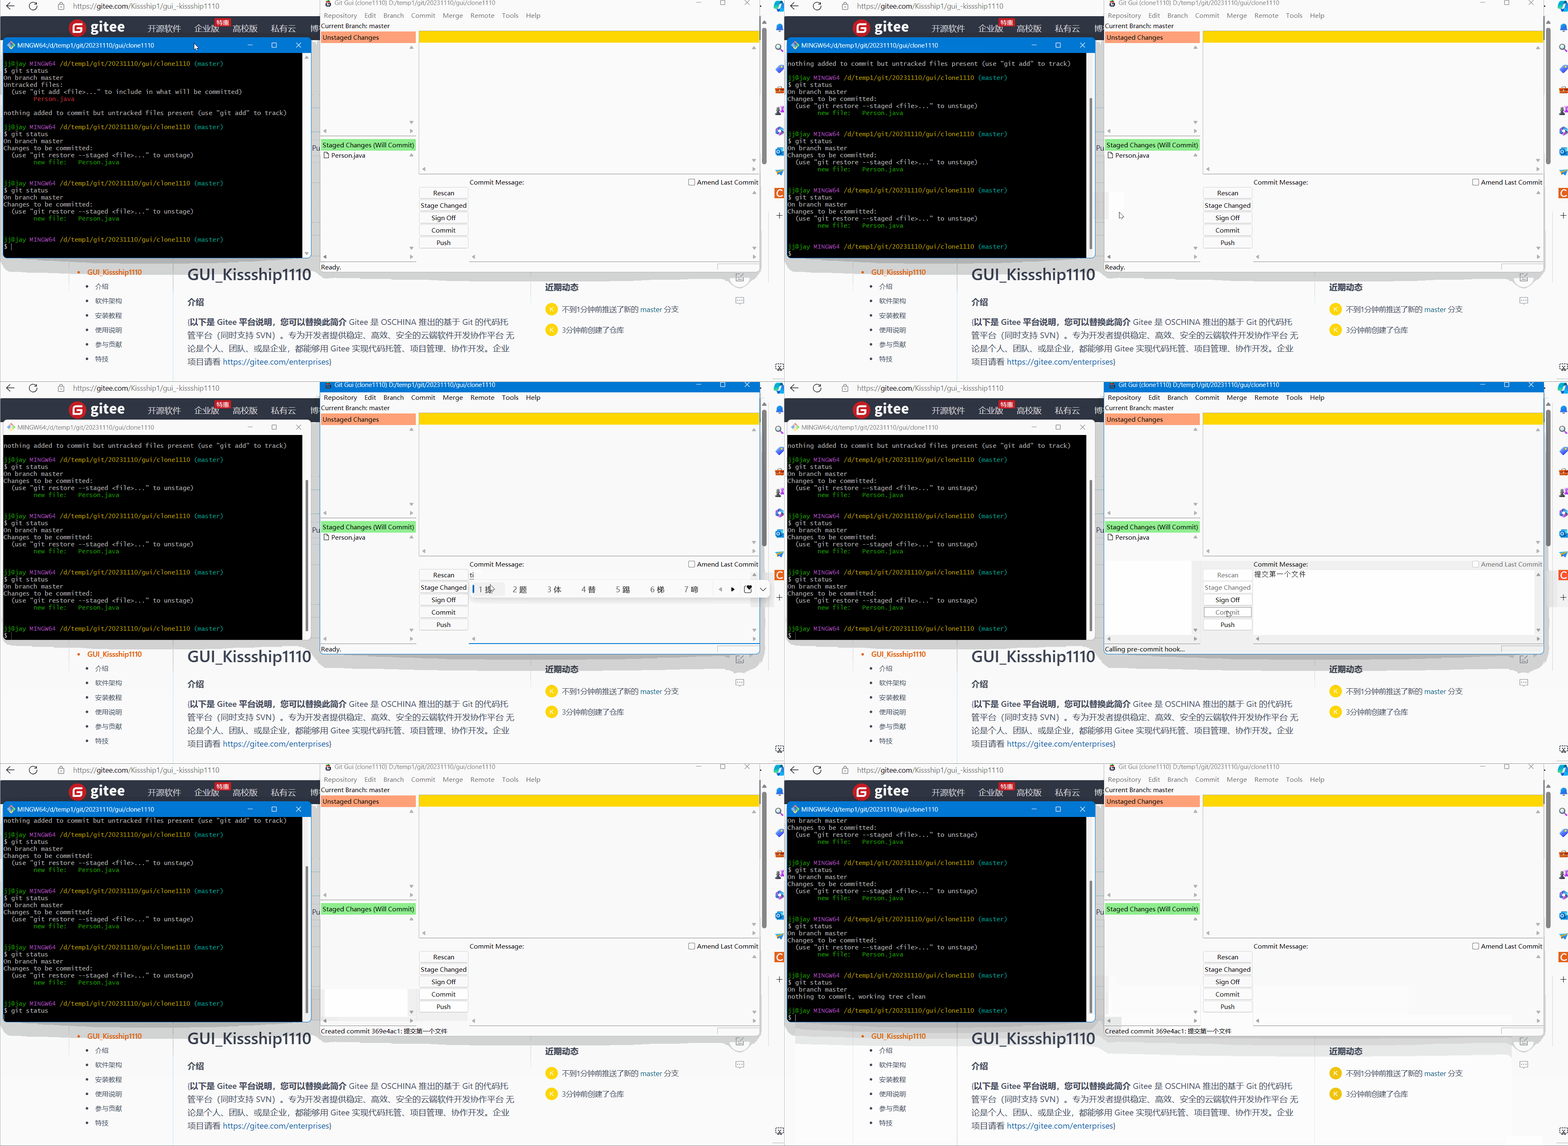
(2) Submission and comments
Submit and annotate the demonstration effect as follows:
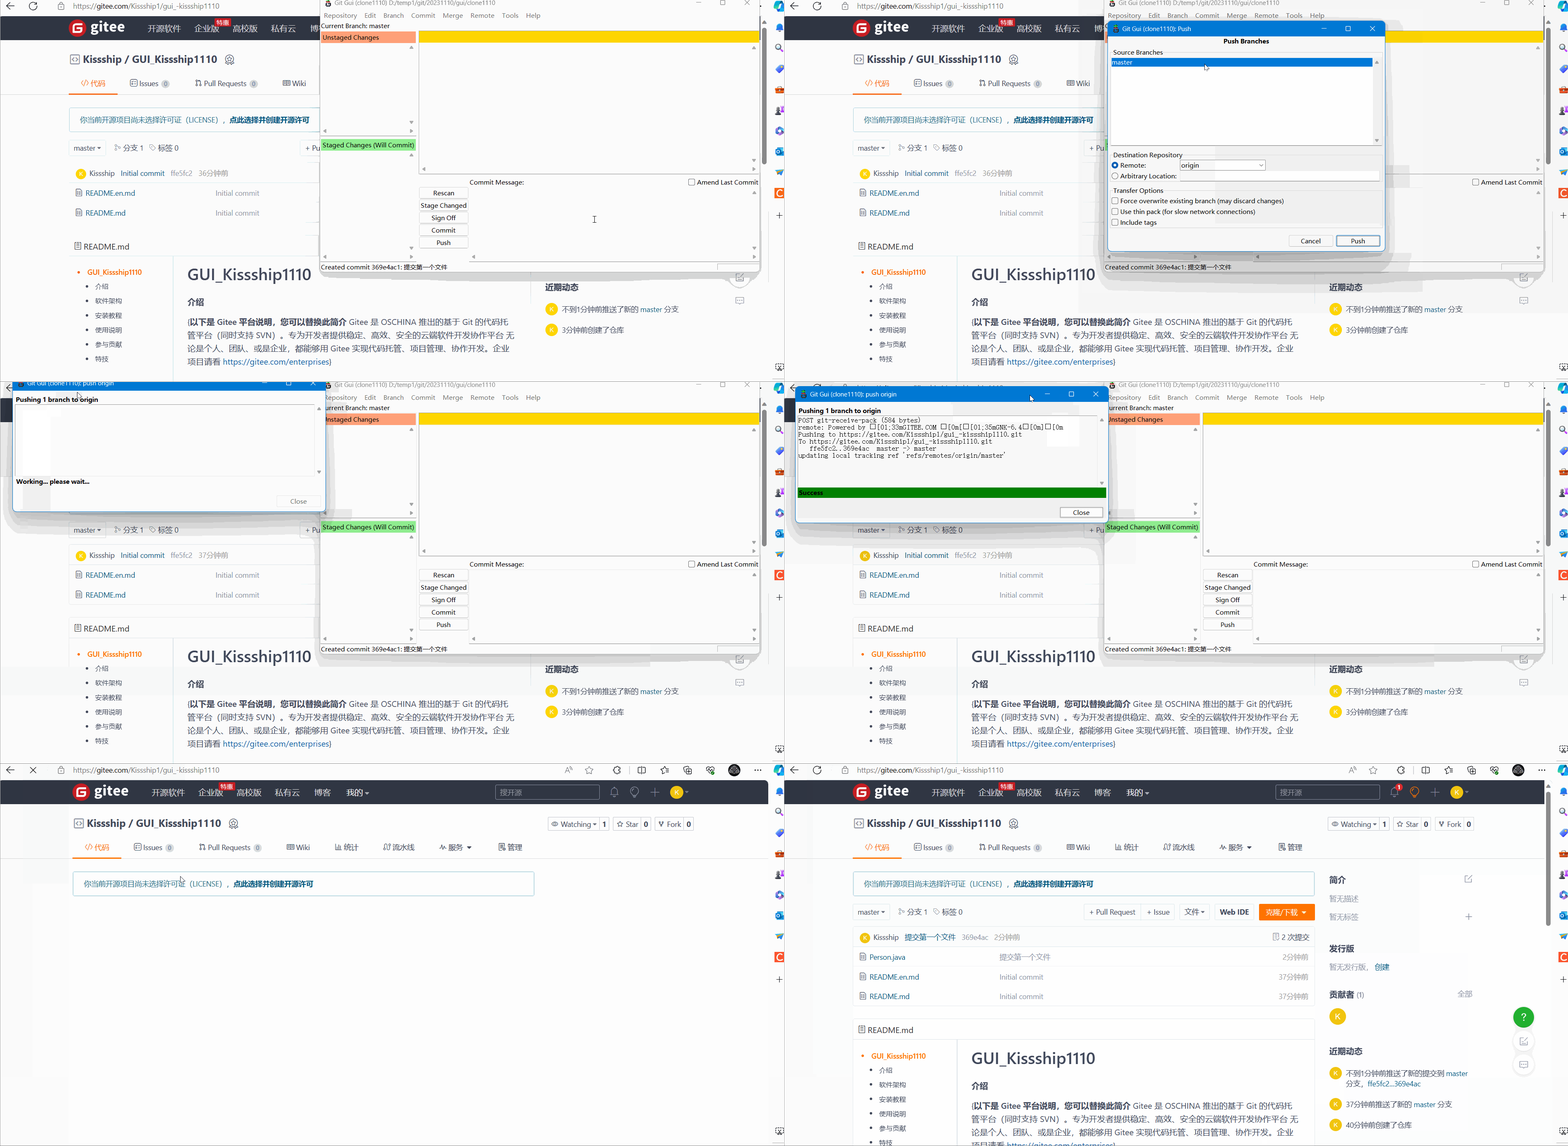
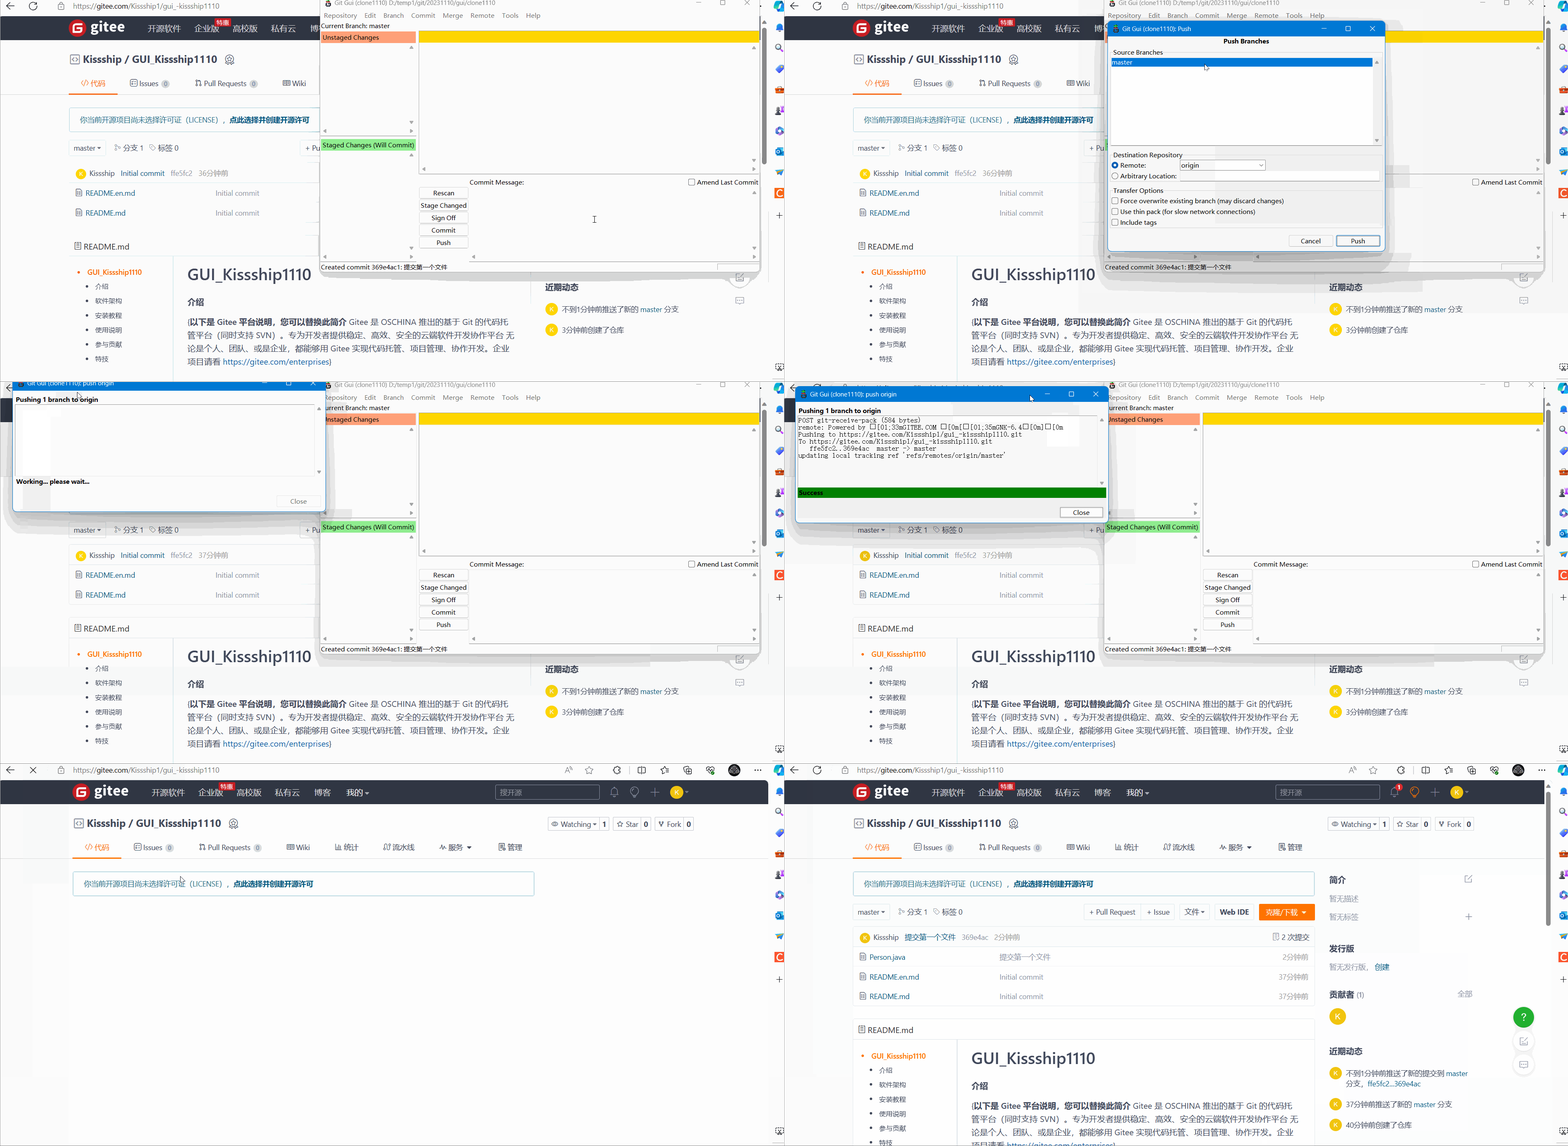
(3) Push remote push
Before performing Push remote push:
Remote push demonstration effect:
After Push remote push:
2. SSH protocol
2.1 Definition
- SSH (Secure Shell) is an encrypted network protocol used to run network services securely on insecure networks. The most common use of SSH is to remotely log into a computer system in a secure manner, but it can also be used to securely transfer files and perform a variety of network services. The main design goals of SSH are to provide strong authentication, encrypted communication, and data integrity.
- There are two main versions of the SSH protocol, SSH-1 and SSH-2. SSH-2 is a newer version of the SSH protocol that has some improvements in security and functionality, while SSH-1 is obsolete. The way SSH works involves a secure connection between a client and a server, through which encrypted remote terminal access, file transfers, and command execution occur.
2.2 Features
The SSH (Secure Shell) protocol has the following characteristics:
Encrypted Communication: The SSH protocol provides secure data transmission, using encryption technology to protect the confidentiality of communication. All data transmitted through the SSH protocol is encrypted, including usernames, passwords, executed commands and transferred files.
Authentication: SSH supports multiple authentication methods, the most common of which are public key authentication and password authentication. Public key authentication is a more secure authentication method that reduces the risk of password leaks.
End-to-end security: The SSH protocol provides end-to-end security, ensuring that data transmission between the local computer and the remote server is protected. Even when transmitting data over untrusted networks, you are not vulnerable to man-in-the-middle attacks.
Remote access: SSH allows users to remotely connect to a remote host from a local computer, execute commands, and access a remote Shell session. This is very useful in server management and maintenance.
File Transfer: SSH supports secure file transfer protocols such as SCP (Secure Copy Protocol) and SFTP (SSH File Transfer Protocol), allowing users to securely transfer files between the local computer and the remote server.
Flexibility: The SSH protocol is very flexible and can run on different operating systems and platforms, supporting various encryption algorithms and authentication methods. This makes it suitable for a variety of environments.
Multi-version support: The SSH protocol has two main versions, SSH-1 and SSH-2. SSH-2 is the newer, more secure version and is widely used, while SSH-1 is obsolete.
Configuration and customization: Users can customize the parameters of SSH connections through configuration files to suit their needs. This includes defining authentication methods, specifying port numbers, setting keys, etc.
Key management: SSH allows users to manage public and private key pairs, making it easier to authenticate. SSH agents can help users manage their keys efficiently.
Known Hosts: The SSH client maintains a “known_hosts” file, which contains the public keys of known hosts. This helps prevent man-in-the-middle attacks because the client can verify the identity of the connecting remote host.
In short, the main feature of the SSH protocol is that it provides secure, encrypted remote access and file transfer services, is suitable for various computer network environments, and provides multiple authentication methods to ensure communication security. This makes SSH the tool of choice for many organizations and individuals for protecting sensitive data and remote management.
2.3 The difference between SSH protocol and SSL/TLS protocol
The SSH protocol and the SSL/TLS protocol are two different secure communication protocols. Althoughthey are both used for encrypted communication, there are some key differences in design purposes, usage scenarios, and working methods.
2.3.1 Design purpose and application scenarios
SSH (Secure Shell): Mainly designed for remote login and command execution. It provides a secure command line interface that enables users to perform operations on remote computers. In addition to remote login, SSH also supports functions such as secure file transfer and port forwarding.
SSL/TLS (Secure Sockets Layer/Transport Layer Security): It is mainly designed to protect the security of network communications and is widely used in encrypted communications between web browsers and servers. TLS is the successor of SSL, and the two are often referred to as SSL/TLS. SSL/TLS is used in web browsers to encrypt HTTPS connections, providing end-to-end encrypted communication, and can also be used in other applications.
2.3.2 Communication methods
SSH: Provides secure peer-to-peer communication, often used for remote management and control. SSH sessions are often conducted from the command line, but can also be used for remote desktop with a graphical user interface (GUI).
SSL/TLS: Typically used for end-to-end secure communication, such as between a browser and a web server, between a client and a server. SSL/TLS can be used for a variety of applications, not just remote management.
2.3.3 Ports and Protocols
SSH: Use port 22 by default, based on TCP protocol.
SSL/TLS: Usually based on HTTP, HTTPS is formed through encryption, and the port used is 443. Can be implemented on different application layer protocols, such as HTTPS (HTTP over TLS).
2.3.4 Authentication method
SSH: Supports multiple authentication methods, including passwords, public keys, and other methods.
SSL/TLS: Authentication is often done using digital certificates, where both the server and client can verify the identity of the other.
2.3.5 Application areas
SSH: Mainly used for system management, remote terminal access and file transfer.
SSL/TLS: Mainly used to encrypt Web communications and protect data transmission between the browser and the server.
2.3.6 Working Level
SSH: Works above the application layer and provides a secure command line interface.
SSL/TLS: Works on top of the transport layer to provide encryption and authentication services to the application layer.
Overall, although both SSH and SSL/TLS provide solutions for secure communication, they differ in design purposes and usage scenarios. SSH focuses more on remote management and terminal access, while SSL/TLS is widely used for security protection of network communications, especially encrypted communications between web browsers and servers.
2.4 What is SSH Key
An SSH (Secure Shell) key is an encryption key used for secure communication between computers. The SSH protocol is mainly used for remote login and command execution, as well as secure file transfer. SSH keys enable secure communication through asymmetric encryption technology.
An SSH key is a pair of keys, including public key and private key:
Private Key: A private key is a sensitive file stored on the user’s local computer and is used to encrypt and digitally sign information. Private keys must remain confidential and should not be shared or leaked.
Public Key: The public key is the public part paired with the private key and can be spread freely on the network. The public key is used to verify information or encrypted data signed by the private key. Other users can encrypt information using your public key, and only users with the private key can decrypt it.
The main purpose of using SSH keys is to ensure the confidentiality and integrity of communications while providing an authentication mechanism. When you connect to a server that supports SSH, you can authenticate using an SSH key pair instead of entering a password.
SSH key usage process:
Generate key pair: By using the SSH key generation tool, you can generate a pair of public and private keys.
Upload your public key to the server: The SSH service on the server needs to know your public key for authentication. Typically, you need to add the public key to the
~/.ssh/authorized_keysfile on the server.Authenticate using private key: When you connect to the server, the SSH client will authenticate using the private key. If the private key matches the public key on the server, the connection will be authorized.
Protect Private Keys: Since private keys are key to security, make sure that only you have access to the private key file, and use password protection where possible.
Using SSH keys provides greater security than password authentication because private keys are generally more difficult to guess or hack.
2.5 Use SSH protocol to clone the corresponding file code
2.5.1 Preparation
(1) Remote warehouse code status
Before using SSH to clone the code, we need to change the open source status of the remote warehouse (ie gitee code cloud) to private. The operation is as follows:
Click to manage:
Change whether open source to private:
(2) Set SSH public key
Specific steps are as follows:
First open the local resources under the current user of the computer and find the .gitconfig file, as follows:
Double-click to open the file with Notepad, and then copy the email address, as follows:
Then use the command to generate the key, the command is as follows:
ssh-keygen -t rsa -C "[email protected]"//The email here should be replaced with the email you registered withThe specific operations are as follows:
Then return to the computer user directory, as follows:
Double-click it and you will find that two keys have been generated, one is the public key and the other is the private key, as follows:
Then we double-click to enter the public key, copy the public key, and configure it on the Gitee code cloud. The specific steps are as follows:
Public key added successfully:
2.5.2 SSH protocol clone file code
(1) Cloning steps
Copy SSH on the Gitee repository as follows:
Then open the command window to clone, as follows:
(2) Effect after cloning
Then enter Yes to clone successfully, the effect is as follows:
3. IDEA integrates Git
Hypothetical case:
When you create a new project and need to host it on gitee, perform the following steps:
Configure the git.exe file in IDEA.
Install the gitee plug-in in IDEA (because git.exe is used with GitHub by default).
Log in to Gitee in IDEA.
Log in to Gitee in IDEA.
Share the built projects.
3.1 Configure git.exe file
Open IDEA, click File–>Settings, and then search for git. After entering the following interface, the specific operations are as follows:

After the configuration is completed, test it. After the test is successful, you can apply it:

3.2 Install Gitee plug-in
Because by default git.exe is used with GitHub, we need to download the Gitee plug-in. Default:
Search plugins, click plugins, enter Gitee search above to download and then restart IDEA.
3.3 Log in to Gitee in IDEA
3.3.1 Generate Token
Return to the Gitee interface, click Private Token, and click Generate New Token. The specific operations are as follows:
Then customize the private token description and submit:
Then enter your Gitee password to verify your identity, as follows:
The private token is generated successfully, as follows:
Finally, copy the Token private token so that you can log in to Gitee later in IDEA.
3.3.2 Log in to Gitee
The specific operations are as follows:
Then click Log in to log in. The effect after logging in is as follows:
3.4 Upload the project to Code Cloud (project sharing)
The specific operations are as follows:
After selecting the project you want to upload, find VCS in the upper navigation bar and do the following:

Then click to select private and fill in the corresponding information, then click share, as follows:

The effect after uploading is as follows:


3.2 IDEA clones the uploaded code cloud code
3.2.1 Copy the SSH path of the file code

3.2.2 Cloning code
Specific steps are as follows:
Then click Clone and click Yes.
3.3 Submit push code in IDEA
3.3.1 Submit
After Add is added, execute commit submission, as follows:
3.3.2 Push
The specific operations are as follows:
Push successful:
The effect on Gitee:
3.4 Update code in IDEA that is not pushed by you
But at this time, the user who uploaded the code has not updated the code, as follows:
So we need to get the updated code.
The specific operations are as follows:
3.5 Modify the problem of merging similar codes
Added code:


Add code on another computer:

Push failed on another computer, and the following interface appears after push:

Effect after Merge:

I found an error here, so I tried again, as follows:
IDEA1 page code:

IDEA2 page code:

The final result is as follows:

Finally, the use of Git Gui + about SSH protocol and cloning corresponding file code + IDEA integration of Git, etc. are here. I wish everyone a smooth journey on the road to typing code!
Thank you for watching!


