Benefits of using event listening
Taking the business logic of user registration as an example, after the user fills out the information form, he or she submits the information to the backend, which processes the user information and then returns the processing result information to the user.

As shown in the figure above, when a user registers, a series of processes need to be processed in the background, and the actual business logic may be more complex. Writing this way is intuitive, but it is not conducive to adding new business logic later.
If the event listening mode is adopted, the above process can become as follows:

During the registration process, the user sends a signal to the listening object, and this signal is the event that the user is registering for. When the listening object receives the signal, it will process these processes in the background. If asynchronous event processing is used, the user’s The backbone logic can be completed quickly, and if you need to add new logic to the registration process later, you only need to add new logic in the process of listening to object processing events.
Actual code demonstration
The first is the project structure, as follows
- controller handles user registration requests
- service handles user registration logic
- event stores event objects
- listener monitors and calls logic to process events in the subdirectory of event
- config stores configuration files
Originally, there should be entity and repository layers. To simplify the logic, we will not add them for now.

Non-asynchronous event handling
Write a user registration event class and place it in the event package. This class can add some attributes according to needs, and these attributes represent the basic information about what happened. It can be understood in a popular way. To know something, you must know what it is. I added the attribute username here to represent the username.
public class UserRegisterEvent extends ApplicationEvent {

    private String userName;

    public UserRegisterEvent(Object source, String userName) {
        super(source);
        this.userName = userName;
    }

    public void setUserName(String userName) {
        this.userName = userName;
    }

    public String getUserName() {

        return userName;
    }
}
Write listener event monitoring to handle these things. When a user registers, first save the user registration information to the database, and then send an email to the user (this time the logic is simplified and only the information is printed on the console). You need to add the annotation @EventListener to the event handler. Once the event UserRegisterEvent is released, the listener will listen to the event and then process it. The processing method is: save the user information and send an email to the user. (In order to simulate the complex and time-consuming task of sending emails, I paused the thread for 5 seconds and then continued execution)
@Component
public class UserListener {

    @EventListener
    public void handleUserRegisterEvent(UserRegisterEvent userRegisterEvent) {

        // save user information
        System.out.println(Calendar.getInstance().getTime() + " " + "user information " + userRegisterEvent.getUserName());

        // send email to user
        try {
            Thread.sleep(5000);
        } catch (InterruptedException e) {
            e.printStackTrace();
        }
        System.out.println(Calendar.getInstance().getTime() + " " + "send Email to " + userRegisterEvent.getUserName());
    }

}
Write the controller layer to simulate user registration. When the user accesses localhost:8080/register/{username}, even if the user is registered, a hello will be returned to the user after successful registration.
@RestController
public class UserController {

    @Autowired
    private UserService userService;

    @GetMapping("/register/{username}")
    public ResponseEntity<String> register(@PathVariable(name = "username") String username){
        return ResponseEntity.ok(userService.register(username));
    }
}
Write the service layer. When UserService returns information about successful user registration, you must first publish the event. You need to use the pulishEvent() method in the ApplicationEventPulisher interface. The parameter of this method is an object of the UserRegisterEvent we created earlier (note that some data is stored in the object. The user’s basic information is convenient for the processor to process events through this information). When the program runs here, it is equivalent to sending a signal: a certain user is registering!
@Service
public class UserService {

    @Autowired
    ApplicationEventPublisher publisher;

    public String register(String username) {
        publisher.publishEvent(new UserRegisterEvent(this, username));
        return "hello " + username + " " + Calendar.getInstance().getTime();
    }

}
Start the application and access localhost:8080/register/tom. After waiting for a while, you can see the returned registration success message hello tom. You can also see on the console that some processes were executed when the user registered.


This completes the event listening and processing business logic.
Handling of asynchronous events
Event monitoring has been completed through the above example, but there are also some problems. For example, if sending an email is time-consuming, such as the above example, it takes 5 seconds, then the user needs to wait for five seconds before receiving the returned information. . Looking at the above example, the time when user information is saved in the background is 18:38:47, the email is sent at 18:38:52, and by the time the user receives the information, it is already 18:38:52, so the user experience is obvious Very poor. Using asynchronous events, creating a new thread and processing events in the new thread can significantly improve the user experience.
To turn it into asynchronous event processing, just slightly modify the above example:
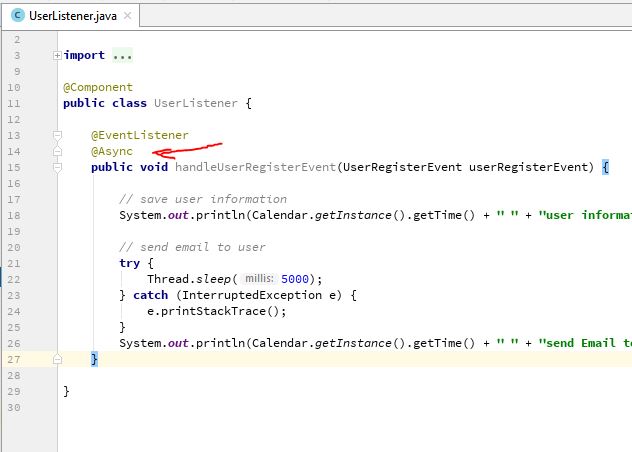
In UserListener, add the annotation @Async to the method that needs to be processed asynchronously.
Then add the annotation @EnableAsync to the project startup class
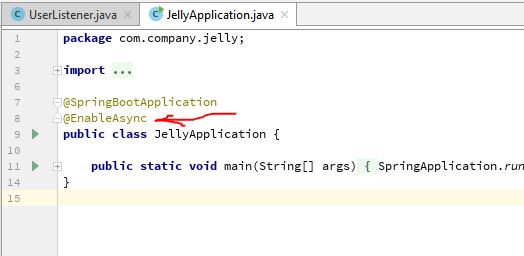
Just add these two annotations.
Start the project again and visit localhost:8080/register/john. The results are as follows


You can see that users responded quickly.
Supplement: If you want to control the thread yourself, you can add a configuration class under the config folder. The code is as follows
public class ListenerAsyncConfiguration implements AsyncConfigurer {
    @Override
    public Executor getAsyncExecutor() {
        //Use Spring's built-in thread pool task object
        ThreadPoolTaskExecutor taskExecutor = new ThreadPoolTaskExecutor();
        //Set thread pool parameters
        taskExecutor.setCorePoolSize(5);
        taskExecutor.setMaxPoolSize(10);
        taskExecutor.setQueueCapacity(25);
        taskExecutor.initialize();
        return taskExecutor;

    }

    @Override
    public AsyncUncaughtExceptionHandler getAsyncUncaughtExceptionHandler() {
        return null;
    }
}
Summary: The decoupling of business logic can be easily achieved by using event monitoring, which facilitates the expansion of business logic in the future.
The knowledge points of the article match the official knowledge files, and you can further learn related knowledge. Java Skill TreeHomepageOverview 138060 people are learning the system