Learn the I2C bus communication protocol, use STM32F103 to complete the data collection of the AHT20 temperature and humidity sensor based on the I2C protocol, and output the collected temperature-humidity values through the serial port
Article directory
- 1. Preliminary knowledge
-
- (1) I2C communication protocol
- (2) I2C physical layer
- (3) I2C timing
- (4) Hardware I2C and software I2C
- 2. AHT20 temperature and humidity sensor
- 3. CubeMX creation project related configurations
- 4. Code writing
-
- (1) Customize the aht20.h and aht20.c files
- (2) Main function
- 5. Board verification
-
- Insert image description here
- Summarize
1. Preliminary knowledge
(1) I2C communication protocol
The I2C communication protocol is a protocol used for serial communication and is often used to connect microcontrollers, sensors, peripherals, etc. It uses two wires (SDA and SCL) for bidirectional communication. Among them, the SDA line is used for data transmission, and the SCL line is used for clock synchronization. In I2C communication, all devices have a fixed address that uniquely identifies the device. The master device can send instructions to the slave device and can also receive responses and data from the slave device. When transmitting data, each data byte consists of a start bit, 8 data bits, 1 acknowledgment bit and 1 stop bit. During communication, the clock frequency of serial data transmission can run at 100KHz, 400KHz or even higher speeds.
(2) I2C physical layer
Common connection methods between I2C communication devices:

Physical layer features:
1. It is a bus that supports multiple devices. “Bus” refers to a signal line shared by multiple devices. In an I2C communication bus, multiple I2C communication devices can be connected, supporting multiple communication masters and multiple communication slaves.
2. An I2C bus uses only two bus lines, a bidirectional serial data line (SDA) and a serial clock line (SCL). The data line is used to represent data, and the clock line is used to synchronize data transmission and reception.
3. Each device connected to the bus has an independent address, and the host can use this address to access different devices.
4. The bus is connected to the power supply through a pull-up resistor. When the I2C device is idle, it will output a high-impedance state. When all devices are idle and all output a high-impedance state, the pull-up resistor will pull the bus to a high level.
5. When multiple hosts use the bus at the same time, in order to prevent data conflicts, arbitration will be used to determine which device will occupy the bus.
(3)I2C timing
Overall timing:

Status description in the above picture:
1. Idle state: no data transmission, I2C device does not work;
2. Initial state: waiting for data input, controlled by the SDA signal pulling low;
3. Read and write status: data transmission;
4. Stop state: Jumping from transmission to idle, controlled by the SDA signal pulling low.
Transmission status timing:

During the high level of the serial clock line SCL, the SDA data signal is collected, and the SDA signal remains stable. During SCL low level, SDA changes data to transmit data serially.
When a complete byte of instruction or data transmission is completed and the slave device correctly receives the instruction or data, it will send a single-bit response signal to the host device by pulling SDA low, indicating that the data or instruction is written successfully. . If the slave responds correctly, it can end or start the transmission of the next byte of data or instructions. Otherwise, it indicates that the writing of data or instructions has failed, and the host can decide whether to give up writing or reinitiate writing.
(4) Hardware I2C and software I2C
Hardware I2C corresponds to the I2C peripherals on the chip and has corresponding I2C driver circuits, and the I2C pins used are also dedicated;
Software I2C generally uses GPIO pins, and uses software to control the pin status to simulate I2C communication;
2. AHT20 temperature and humidity sensor
The I2C communication protocol is introduced above, and the temperature and humidity sensor module is introduced below, as well as how to use the I2C communication protocol to communicate with the temperature and humidity sensor module and read the temperature and humidity information.
By reading the product manual, we can know the interface definition of the temperature and humidity sensor module:

Send commands and instruction sets:
After initiating the transfer, the first I2C byte of the subsequent transfer includes the 7-bit 2 I C device address 0x38 and an SDA direction bit x (read R: 1’, write W: 0’). After the 8th SCL clock falling edge, the SDA pin (ACK bit) is pulled low to indicate that the sensor data is received normally. After sending the measurement command 0xAC, the MCU must wait until the measurement is completed.

Reading process:
1. Wait 40ms after powering on. Before reading the temperature and humidity values, first check whether the calibration enable bit Bit[3] of the status word is 1 (a byte of status word can be obtained by sending 0x71). If not, 1. To send the 0xBE command (initialization), this command parameter has two bytes, the first byte is 0x08, the second byte is 0x00, and then wait for 10ms.
2. Directly send the 0xAC command (trigger measurement). This command parameter has two bytes, the first byte is 0x33, and the second byte is 0x00.
3. Wait 80ms for the measurement to be completed. If the reading status word Bit[7] is 0, it means the measurement is completed, and then six bytes can be read continuously; otherwise, continue to wait.
4. After receiving six bytes, the next byte is CRC check data, which the user can read out as needed. If the receiving end requires CRC check, an ACK will be sent after receiving the sixth byte. Respond, otherwise send NACK to end, the initial value of CRC is 0XFF, CRC8 check polynomial CRC[7:0]=1 + x + x + x 4 5 8
Calculate temperature and humidity:

3. CubeMX creates project-related configurations
Turn on I2C1

Open the serial port:

Clock configuration

Engineering Management:

Generate code
4. Code writing
(1) Customize the aht20.h and aht20.c files
Create the aht20.h header file in the project directory/Core/Inc

#ifndef INC_AHT20_H_
#define INC_AHT20_H_

#include "i2c.h"
//Function declaration
void AHT20_Init(void);
void AHT20_Read(float *Temperature, float *Humidity);
#endif
Create the aht20.c file in the project directory/Core/src
code show as below:
#include "aht20.h"

#define AHT20_ADDRESS 0x70 //{0x38,0}

uint32_t HAL_MAX_DALAY = 0xffff;

void AHT20_Init(void)
{<!-- -->
uint8_t readBuffer;
HAL_Delay(40);
HAL_I2C_Master_Receive( & amp;hi2c1,AHT20_ADDRESS, & amp;readBuffer,1,HAL_MAX_DALAY);
if((readBuffer & amp; 0x08) == 0x00) //Judge the verification status word
{<!-- -->
uint8_t sendBuffer[3] = {<!-- -->0xBE,0x08,0x00};
HAL_I2C_Master_Transmit( & amp;hi2c1,AHT20_ADDRESS,sendBuffer,3,HAL_MAX_DALAY);
}
HAL_Delay(20);
}

void AHT20_Read(float *Temperature, float *Humidity)
{<!-- -->
\t
uint8_t sendBuffer[4] = {<!-- -->0xAC,0x33,0x00,0x71};
uint8_t readBuffer[6];
\t
HAL_I2C_Master_Transmit( & amp;hi2c1,AHT20_ADDRESS,sendBuffer,3,HAL_MAX_DALAY); //Send trigger measurement command
HAL_Delay(80);
HAL_I2C_Master_Receive( & amp;hi2c1,AHT20_ADDRESS,readBuffer,6,HAL_MAX_DALAY);
\t
\t
if(readBuffer[0] & amp; 0x80 == 0x00)//Determine whether the busy status bit[7] is 0;
{<!-- -->

uint32_t data = 0;
//Bit splicing, extract humidity data
data = ((uint32_t)readBuffer[3] >> 4) + ((uint32_t)readBuffer[2] << 4) + ((uint32_t)readBuffer[1] << 12);
*Humidity = data * 100.0f / (1<<20);
data = ((uint32_t)readBuffer[3] & amp; 0x0F << 16) + ((uint32_t)readBuffer[4] << 8) + (uint32_t)readBuffer[5] ;
*Temperature = data * 200.0f / (1<<20) - 50;
\t\t
     }
\t
}
(2) Main function
int main(void)
{<!-- -->

  HAL_Init();
  SystemClock_Config();
  MX_GPIO_Init();
  MX_I2C1_Init();
  MX_USART1_UART_Init();
  AHT20_Init();
  float temperature, humidity;

  while (1)
  {<!-- -->
       AHT20_Read( & amp;temperature, & amp;humidity);
        printf("Temperature: %1.f ℃\r\
" ,temperature);
printf("Humidity: %1.f %%\r\
" ,humidity);
HAL_Delay(1000);
  }
}
5. Board verification
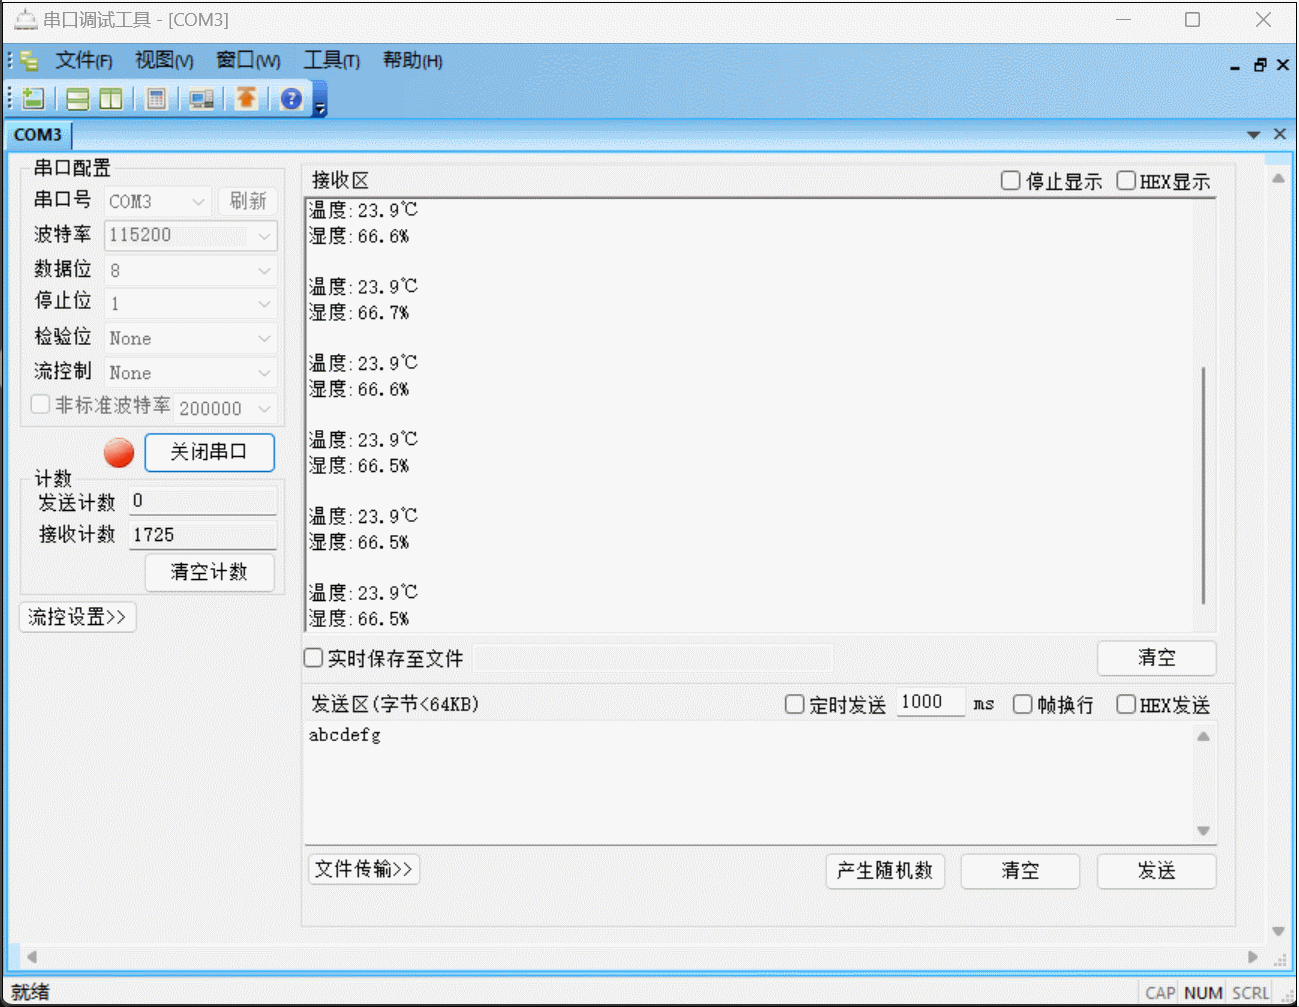
Summary
In this experiment, I learned the iic communication protocol, and practiced the iic protocol to communicate with the temperature and humidity module to collect environmental temperature and humidity information. Observing the experimental results, there are doubts about the authenticity of the temperature and humidity data, and there will be abnormal data. We are currently thinking about the reasons, and will make improvements on how to improve the accuracy of the data in the future.