Xiaoyu was very sad. Yesterday, she wanted to continue editing the blog she wrote on 1024. But she didn’t know that there is no automatic saving function for editing published articles on CSDN. Then she went to the toilet and the edge browser automatically closed. It was more than 5,000 words. All the articles are gone… I burst into tears yesterday. Today Xiaoyu adjusted her mood and continued editing. Let’s learn with Xiaoyu~~~

Table of Contents
3.How does SpringBoot MVC obtain parameters?
*Parameter rename @RequestParam
3.4 Get Json object @RequestBody
3.5 Get the parameter @PathVariable in the URL
3.6 Upload files @RequestPart
3.7 Get Cookie@CookieValue
3.8 Get Session @SessionAttribute
4.Return data
4.1 Return to .HTML page
4.2 Return Json object
3.How does SpringBoot MVC get parameters?
*Parameter rename@RequestParam
Xiaoyu would also like to add something here: In the previous article, we discussed how to obtain multiple parameters. In one case, the parameters are passed from the front end. If the back end does not want to continue to use this variable name, the parameters can be renamed (because the front end The passed parameters need to match the backend according to their names before they can continue to be used), so how to rename the parameters? An annotation is used here:
@RequesrParam(“Parameter to be renamed”) + parameter type and new name after renaming
Here we take the name parameter as an example:
package com.example.demo;

import org.springframework.web.bind.annotation.RequestMapping;
import org.springframework.web.bind.annotation.RequestParam;
import org.springframework.web.bind.annotation.RestController;

/**
 * Created with IntelliJ IDEA.
 * Description: Pass multiple parameters
 * User: yyx
 * Date: 2023-10-25
 * Time: 14:06
 */
@RestController
@RequestMapping("/test3")
public class TestContorller3 {
    @RequestMapping("/getparams")
    public String getParams(@RequestParam("n")String name, int id, String password){
        return "name" + name + "id" + id + "password" + password;
    }
}
At this point we type the URL or use postman to verify:
What needs to be noted here is that when the backend obtains the front-end parameters, they match them based on their names, regardless of the order in which the parameters are passed!!

But at the same time, we also discovered a problem: after renaming the parameters, can the previous parameter names still be used? We also used name as an example to verify: 
It seems that it can no longer be used (because it is now Niu Hulu·name), but we don’t want this to happen. Is there any setting that does not report an error?
Here we will use an attribute in the @RequestParam annotation: required. We hold down ctrl and click on this annotation to see the source code:
//
// Source code recreated from a .class file by IntelliJ IDEA
// (powered by FernFlower decompiler)
//
package org.springframework.web.bind.annotation;
import java.lang.annotation.Documented;
import java.lang.annotation.ElementType;
import java.lang.annotation.Retention;
import java.lang.annotation.RetentionPolicy;
import java.lang.annotation.Target;
import org.springframework.core.annotation.AliasFor;
@Target({ElementType.PARAMETER})
@Retention(RetentionPolicy.RUNTIME)
@Documented
public @interface RequestParam {
@AliasFor("name")
String value() default "";
@AliasFor("value")
String name() default "";
boolean required() default true;
String defaultValue() default "\\
\t\t\\
\t\t\\
\\\\\\\\
\t\t\t\ \t\\
";
}
There is a Boolean attribute called required. The default is TRUE, which means that the original name cannot be used after renaming. A parameter of the secondary name must be passed in, otherwise an error 400 will be reported. Set required=false to avoid reporting an error if it is not passed. The demonstration is as follows :
package com.example.demo;

import org.springframework.web.bind.annotation.RequestMapping;
import org.springframework.web.bind.annotation.RequestParam;
import org.springframework.web.bind.annotation.RestController;

/**
 * Created with IntelliJ IDEA.
 * Description: Pass multiple parameters
 * User: yyx
 * Date: 2023-10-25
 * Time: 14:06
 */
@RestController
@RequestMapping("/test3")
public class TestContorller3 {
    @RequestMapping("/getparams")
    public String getParams(@RequestParam(value = "n",required = false)String name, int id, String password){
        return "name" + name + "id" + id + "password" + password;
    }
}
(When entering the required attribute, the value attribute will automatically match the previous one), type the URL again to verify:

We found that no error was reported, but the price was that the parameter could not be obtained…
3.4 Get Json object@RequestBody
Some coders will ask: Haven’t we discussed the situation of incoming objects before? Are we discussing ne again? Xiaoyu would like to clarify: objects and json objects are completely different existences!! Let’s use the code to verify it : An annotation @RequestBody is required here.
We still use the user class in the model package, and then create a TestController class to verify as follows:
package com.example.demo.model;

import lombok.Data;

/**
 * Created with IntelliJ IDEA.
 * Description:
 * User: yyx
 * Date: 2023-10-24
 * Time: 22:04
 */
@Data
public class User {
    private int id;
    private String name;
    private String password;
}
package com.example.demo;

import com.example.demo.model.User;
import org.springframework.web.bind.annotation.RequestBody;
import org.springframework.web.bind.annotation.RequestMapping;
import org.springframework.web.bind.annotation.RestController;

/**
 * Created with IntelliJ IDEA.
 * Description: Accept json object
 * User: yyx
 * Date: 2023-10-25
 * Time: 14:51
 */
@RestController
@RequestMapping("/test4")
public class TestController4 {
    @RequestMapping("/getjson")
    public User getJson(@RequestBody User user){
        return user;
    }
}
Let’s use postman to verify: There are some details to note here: Above: 
json objects have format requirements:
- Use curly braces {} to represent a json object
- The attributes inside exist in the form of key-value pairs
- The key value is quoted using “”
- Use colon: to separate keys and values
- Use commas to separate key-value pairs.
If we remove this annotation and use postman verification again:

At this time we found that we continued to use the json object in the body to send post requests, but we could not get this parameter.
This is the biggest difference between objects and json objects. It depends on whether the parameters passed by your front end are ordinary parameters (the following content in the URL or the data in the form) or json objects!!!
3.5 Get the parameters in the URL @PathVariable
Some coders are unconvinced. Didn’t the parameters used before be taken from the URL? How can we explain this again?
Xiaoyu once again clarified: before, the parameters were taken from the parameter part of the URL (from the following content), but what is discussed here is from the non-parameter part of the URL:
Something to note here: When passing in a route in @RequestMapping, you need to use part of the route as a parameter. The parameters here need to be quoted using {} curly brackets to facilitate identification by the back-end code.
package com.example.demo;

import org.springframework.web.bind.annotation.PathVariable;
import org.springframework.web.bind.annotation.RequestMapping;
import org.springframework.web.bind.annotation.RestController;

/**
 * Created with IntelliJ IDEA.
 * Description: Get parameters from the non-parameter part of the URL
 * User: yyx
 * Date: 2023-10-25
 * Time: 15:33
 */
@RestController
@RequestMapping("/test5")
public class TestController5 {
    @RequestMapping("/geturlparams/{name}/{id}")
    public String getURlparams(@PathVariable("name")String name,
                               @PathVariable("id")int id){
        return "name " + name + "id " + id;
    }

}
At this point, when we type in the secondary route, we can upload parameters on the secondary route:

At this point we find that the parameters here can be regarded as part of the “entity” of the URL. If we change the position:

There can no longer be name matching here, because there is no name at all, and the order here cannot be exchanged, otherwise 400, Xiaoyu doesn’t know why it is designed like this, but one advantage is:? The following parameters are variable, the parameters here It is equivalent to the “entity” part of the URL, and the query speed will be faster…
3.6 Upload files@RequestPart
If our front-end passes a file as a parameter, how do we get a binary stream like a file? This article is the key point. It may be used when “changing the avatar” in the project~~~It needs to be used at this time An annotation:@RequestPart(“file name”)
At this point we should note: the file type is MultipartFile file
package com.example.demo;

import org.springframework.web.bind.annotation.RequestMapping;
import org.springframework.web.bind.annotation.RequestPart;
import org.springframework.web.bind.annotation.RestController;
import org.springframework.web.multipart.MultipartFile;

import java.io.File;
import java.io.IOException;
import java.util.UUID;

/**
 * Created with IntelliJ IDEA.
 * Description: Upload a file, how to obtain the binary stream of the file
 * User: yyx
 * Date: 2023-10-25
 * Time: 15:55
 */
@RestController
@RequestMapping("/test6")
public class TestContorller6 {
    @RequestMapping("/getfile")
    public String getFile(@RequestPart("myfile") MultipartFile file) throws IOException {
        file.transferTo(new File("d:\img\yyx.png"));
        return "success";
    }
}
At this time we must also use postman to verify: There are also many details. Look at the pictures and follow the steps 1-7 below:

- Must be submitted using post method
- Select body
- Select form-data
- Select file in the key value form
- Select file
- The key value filled in must be consistent with the @RequestPart(“File Name”) file name in the backend, otherwise it cannot be matched.
- After selecting the file (after the fifth step), there will be a button [select file] click to select a file (take a photo as an example, because the file written by my backend is saved in d:\img\yyx.png) (ending with .png)
Then we opened the D drive and I selected a beautiful photo of Xiaoyu to see if it was saved…

Hahaha, yes…
But in this case, we send multiple requests and can only get one photo. The previous photos are overwritten because the path saved is d:\img\yyx.png. This is unscientific. We hope that more After saving photos for the first time, even the same photo can appear separately….
Here we have to start with the file name. We mainly have two steps:
1. If we want to save a video or GIF file, wouldn’t it be bad to use .png as the suffix? So we hope to get the suffix of the original file as the suffix of the saved file, so as to ensure that the file is not damaged. .
2. We hope to generate a different file name every time, so that there will be no file overwriting problem.
package com.example.demo;

import org.springframework.web.bind.annotation.RequestMapping;
import org.springframework.web.bind.annotation.RequestPart;
import org.springframework.web.bind.annotation.RestController;
import org.springframework.web.multipart.MultipartFile;

import java.io.File;
import java.io.IOException;
import java.util.UUID;

/**
 * Created with IntelliJ IDEA.
 * Description:
 * User: yyx
 * Date: 2023-10-25
 * Time: 15:55
 */
@RestController
@RequestMapping("/test6")
public class TestContorller6 {
    @RequestMapping("/getfile")
    public String getFile(@RequestPart("myfile") MultipartFile file) throws IOException {
        //Get the file suffix name (.png/.gif)
        String lastFile = file.getOriginalFilename().substring(file.getOriginalFilename().lastIndexOf('.'))
        //Use UUID (a globally unique variable implemented by a special algorithm) to splice the suffix name
        String newFile = UUID.randomUUID() + lastFile;
        file.transferTo(new File("d:\img\" + newFile));
        return "success";
    }
}
postman verification: send several more post requests

3.7 Get Cookie@CookieValue
Let’s study how to obtain cookies. In the past, when we were learning servlets, we obtained cookies through HttpServletRequest, but in the framework we only need one annotation: @CookieValue(“cookie name”)
package com.example.demo;

import org.springframework.web.bind.annotation.CookieValue;
import org.springframework.web.bind.annotation.RequestMapping;
import org.springframework.web.bind.annotation.RestController;

/**
 * Created with IntelliJ IDEA.
 * Description: Get cookies
 * User: yyx
 * Date: 2023-10-26
 * Time: 15:21
 */
@RequestMapping("/test7")
@RestController
public class TestContorller7 {
    @RequestMapping("/cookie")
    public String getCookie(@CookieValue(value = "mycookie",required = false) String ck){
        return ck;
    }
}
At this time we need to simulate a cookie, first set a required=False for this annotation, then right-click on the page and select “Inspect”, select the application, click on the cookie, and enter the key-value pair: 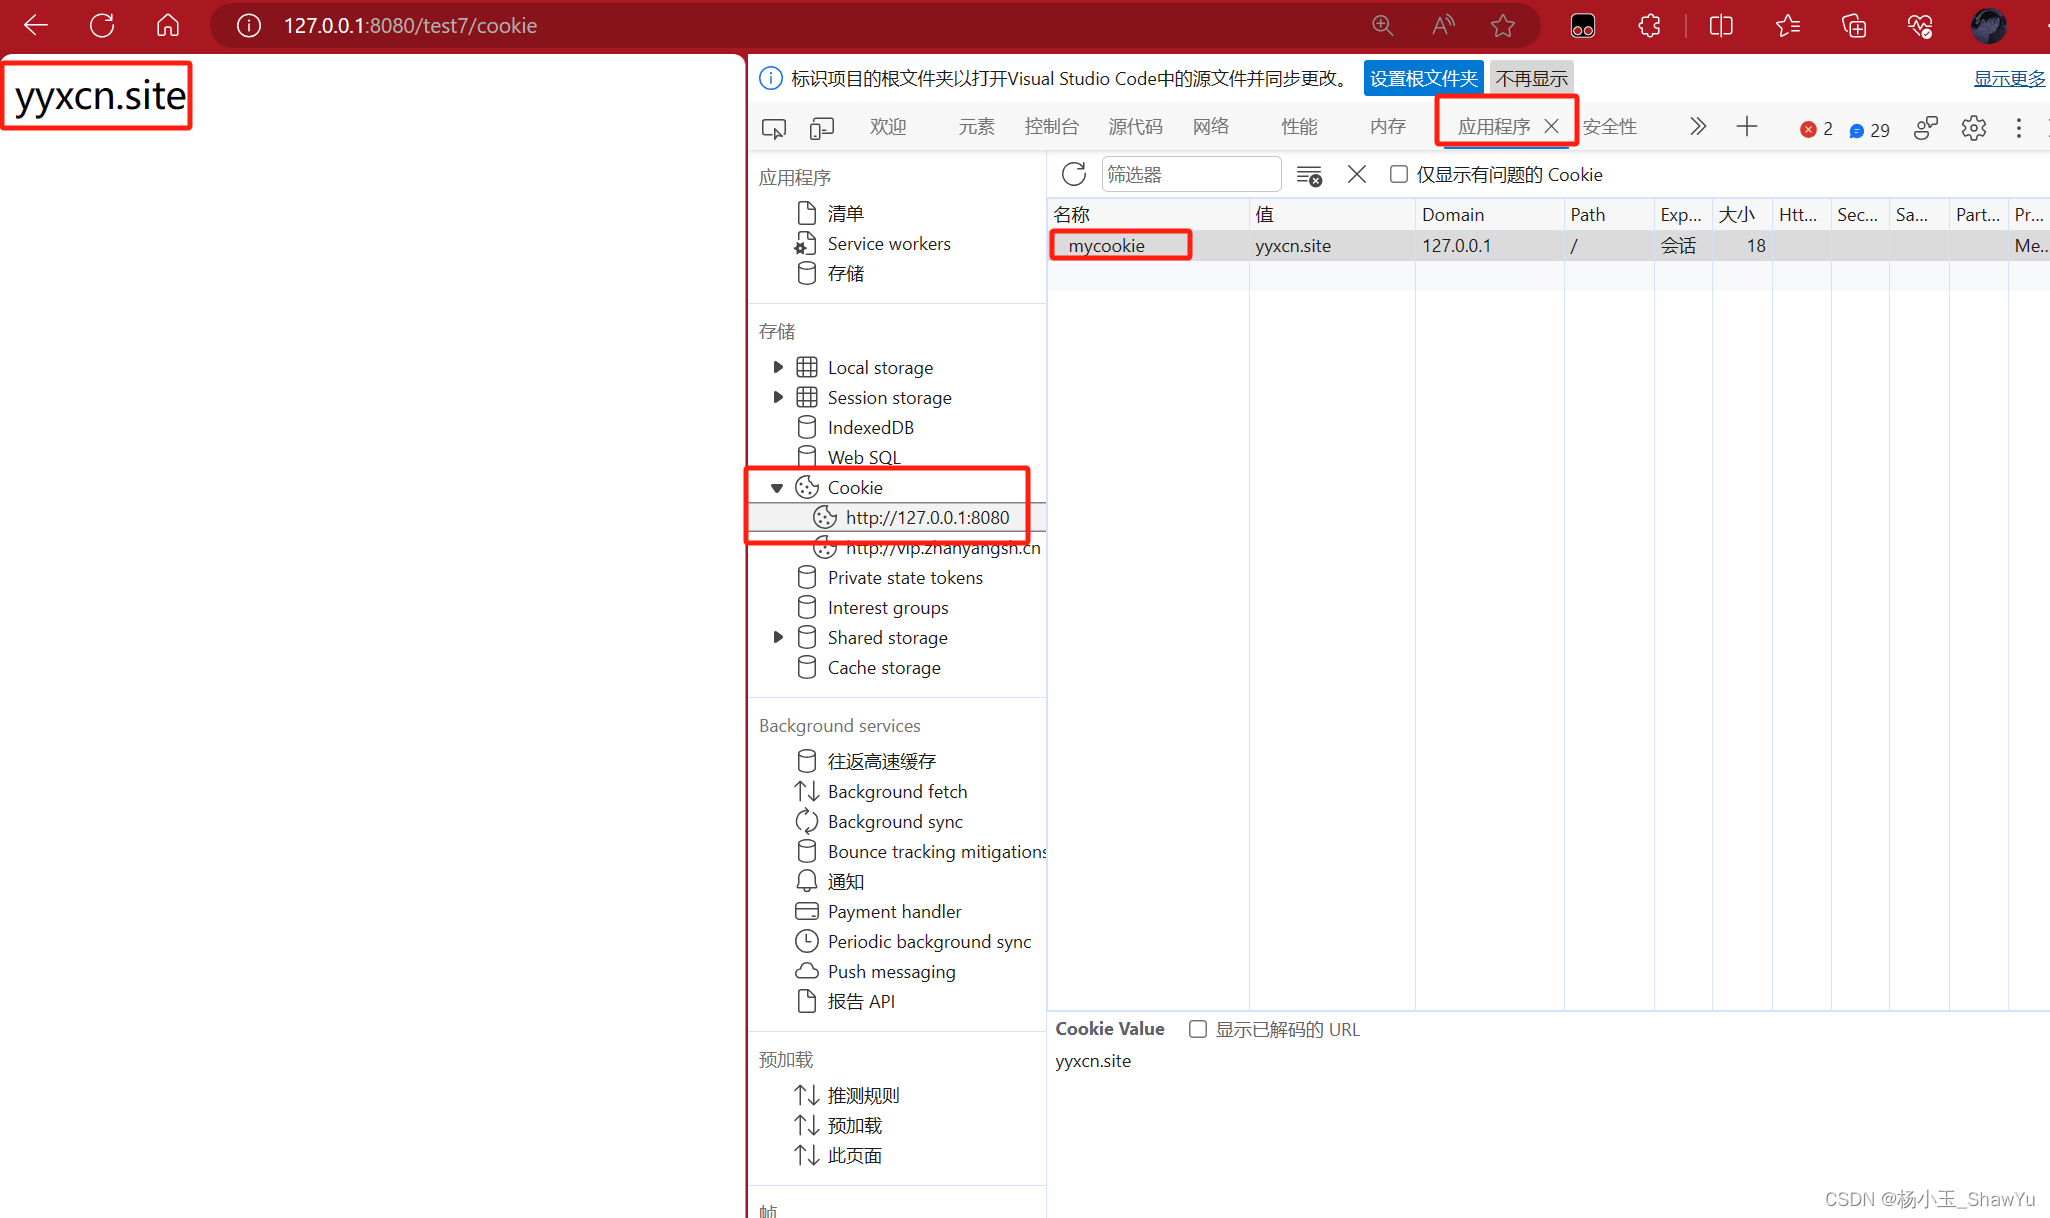
3.8 Get Session @SessionAttribute
Since session is a server-side thing, we can only set session through code (using servlet method):
package com.example.demo;

import org.springframework.web.bind.annotation.RequestMapping;
import org.springframework.web.bind.annotation.RestController;
import org.springframework.web.bind.annotation.SessionAttribute;

import javax.servlet.http.HttpServletRequest;
import javax.servlet.http.HttpSession;

/**
 * Created with IntelliJ IDEA.
 * Description: Get session
 * User: yyx
 * Date: 2023-10-26
 * Time: 15:46
 */
@RequestMapping("/test8")
@RestController
public class TestController8 {
    @RequestMapping("/session")
    public String setSession(HttpServletRequest request){
        HttpSession session = request.getSession();
        if(session != null){
            session.setAttribute("session","Zhang San");
            return "ok";
        }else {
            return "fail";
        }
    }

    @RequestMapping("/session2")
    public String getSession(@SessionAttribute(value = "session",required = false)String se){
        return se;
    }
}
Type in the URL to verify:

4.Return data
4.1 Return to .HTML page
First, we create an index.html in the static inside the resource.

The content is as follows:
<!doctype html>
<html lang="en">
<head>
    <meta charset="UTF-8">
    <meta name="viewport"
          content="width=device-width, user-scalable=no, initial-scale=1.0, maximum-scale=1.0, minimum-scale=1.0">
    <meta http-equiv="X-UA-Compatible" content="ie=edge">
    <title>This is Yang Jixuan’s HTML page</title>
</head>
<body>
    <h1>
        hi springbootMVC view!
    </h1>
</body>
</html>
Create a startup class TestController (below the default package):
package com.example.demo;

import org.springframework.stereotype.Controller;
import org.springframework.web.bind.annotation.RequestMapping;

/**
 * Created with IntelliJ IDEA.
 * Description:
 * User: yyx
 * Date: 2023-10-26
 * Time: 17:30
 */
@Controller
@RequestMapping("/test9")
public class TestController9 {
    @RequestMapping("/index")
    public String index(){
        return "/index.html";
    }
}
Note that the annotation here directly uses @Controller instead of @RestController, because the page is returned. Note that when returning, add “” double quotes and / to indicate the route. The route name must be the same as the one you created under recourse static. !
Type URL verification:

Grab a bag and take a look:
4.2 Return Json object
If what we pass to the front end is not an HTML page or an ordinary field, then take the json object as an example:
package com.example.demo;

import org.springframework.stereotype.Component;
import org.springframework.stereotype.Controller;
import org.springframework.web.bind.annotation.RequestBody;
import org.springframework.web.bind.annotation.RequestMapping;
import org.springframework.web.bind.annotation.ResponseBody;

import java.util.HashMap;
import java.util.Set;

/**
 * Created with IntelliJ IDEA.
 * Description: Return json object
 * User: yyx
 * Date: 2023-10-26
 * Time: 17:50
 */
@RequestMapping("/test10")
@ResponseBody
@Controller
public class TestController10 {
    @RequestMapping("/json")
    public HashMap<String,String> json(){
        HashMap<String,String> map = new HashMap<>();
        map.put("java","JAVA");
        map.put("mysql","MYSQL");
        map.put("redis","REDIS");
        return map;
    }
}
Type URL verification:

Huh~~ Xiaoyu has finally sorted out these contents. This blog was created with great effort by Xiaoyu. The idea is very clear, with code verification, pictures and texts, ensuring that all coders can understand clearly. I hope coders can get it. Xiaoyu’s idea, follow Xiaoyu’s practice, you will be familiar with the common annotations of spring boot, you will never forget it. Xiaoyu hopes that you will not be afraid of learning framework knowledge, but believe that the framework serves programmers, and do not deify it. , it is difficult to change, and it cannot be done without practical operation. In this case, just looking at optics is far from reaching the point of proficient use… I believe that in the future, everyone will not be confused by the interviewer’s questions, and I also believe that everyone has the ability to control it. Framework, there is even a day when the framework will be implemented!!!
