A series of articles on building an environment
Chapter 1 [Selected] Use pycharm to install the latest pytorch in 2023 under Windows system
Article directory
- Series of articles on building an environment
-
- Chapter 1 [Selected] Use pycharm to install the latest pytorch in 2023 under Windows system
- Preface
- 1. Introduction to pytorch
- 2. Check if there is an NVIDIA graphics card
- 3. Environment setup steps
-
- 1. GPU version
-
- 1.1. NVIDIA driver installation
- 1.2. CUDA program installation
- 1.3. cudnn program installation
- 1.4. anaconda installation
- 1.5. Use anaconda to create a virtual environment
- 1.6. pycharm installation and new project
- 1.7. pytorch installation
- 2. CPU version
-
- 2.1. anaconda installation
- 2.3. Use anaconda to create a virtual environment
- 2.4. pycharm installation and new project
- 2.5. pytorch installation
- Conclusion
Foreword
With the continuous development of artificial intelligence, deep learning technology is becoming more and more important. When you are ready to enter the field of deep learning and artificial intelligence, PyTorch is a powerful tool that can help you implement various deep learning models and projects. This tutorial will show you how to install PyTorch, an open source deep learning framework with extensive community support and rich functionality. Whether you’re a beginner or an experienced developer, we’ll provide you with clear steps and guidance to ensure you can easily start building your own deep learning applications with PyTorch. Let’s take the first step together and master the PyTorch installation process!
Tips: The following is the text of this article, the following cases are for reference
1. Introduction to pytorch
PyTorch is an open source machine learning library focused on deep learning tasks, developed and maintained by Facebook’s artificial intelligence research team. It has the following important features:
- Dynamic calculation graph: PyTorch adopts the method of dynamic calculation graph, allowing you to create, modify and adjust the calculation graph as needed, which makes model development more flexible and intuitive.
- Wide range of application areas: PyTorch can be used for a variety of deep learning tasks, including image processing, natural language processing, reinforcement learning, etc. It is widely used in both academia and industry, making it the tool of choice for researchers and developers.
- Rich modules and libraries: PyTorch provides a wealth of deep learning modules and tools, including various optimization algorithms, loss functions, pre-training models, etc., making model development more efficient.
- Python-friendly: PyTorch’s interface is based on Python, which makes it very easy to learn and use, especially for those who are familiar with Python programming.
- Strong community support: PyTorch has a large community, and you can find a large number of tutorials, sample code, and support resources to help solve problems and speed up development.
- Deployment options: In addition to model development, PyTorch also provides a variety of deployment options, including mobile device deployment, production environment deployment, etc., so that your deep learning model can run in various scenarios.
In summary, PyTorch is a powerful, flexible, and easy-to-use deep learning framework that provides excellent tools and resources for research, development, and solving complex problems. Whether you are a beginner or a professional, PyTorch is ideal for exploring the field of artificial intelligence.
2. Check if there is an NVIDIA graphics card
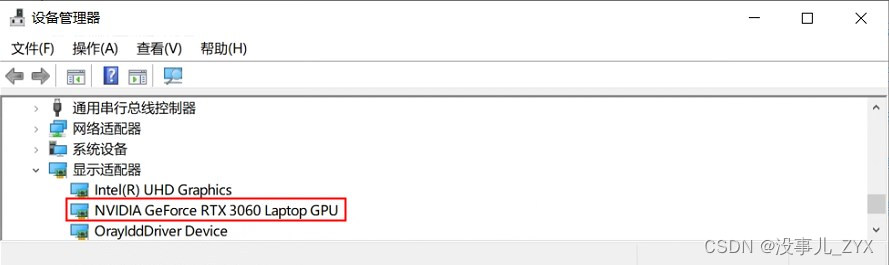
Please check whether there is an NVIDIA graphics card in the “Display Adapter” item in “Device Manager”. If “NVIDIA GeForce…” is not displayed, it means that this computer does not have an NVIDIA graphics card. Please follow the “CPU version” installation method below. Install pytorch; if “NVIDIA GeForce…” is displayed, follow the “GPU version” installation method below to install pytorch.
Warm reminder: Please be sure to confirm the graphics card model of your computer before installation, otherwise the subsequent environment construction may fail!
If you have an NVIDIA graphics card, please check the graphics card model. As shown below, my computer’s graphics card model is “NVIDIA GeForce GTX 3060 Laptop GPU”.
3. Environment setup steps
1. GPU version
1.1, NVIDIA driver installation
NVIDIA driver download link:
https://www.nvidia.cn/Download/index.aspx?lang=cn
-
Enter the NVIDIA driver download link provided above and download the corresponding NVIDIA driver package according to the computer’s graphics card model. The process is as follows;


-
After the download is complete, just follow the installation prompts. The installation steps are omitted here.


1.2, cuda program installation
cuda download link:
https://developer.nvidia.com/cuda-toolkit-archive
-
Right-click on the desktop, open the NVIDIA Control Panel, and refer to the following steps to confirm what version of cuda needs to be installed. As shown below, the highest supported cuda version is “CUDA 12.3.68”;


-
Enter the cuda download link. Please note that as of now, pytorch only supports cuda12.1 and below versions, and does not currently support cuda12.3 versions. For the subsequent smooth installation of pytorch, here we choose cuda12.1.1 to download, the steps are as follows;


-
After the download is completed, just follow the installation prompts. The installation steps are omitted here;
-
After installing cuda, you need to verify whether the installation is successful. Enter cmd in the search and open as administrator;

-
Enter “nvidia-smi” in cmd. If the following information is printed, it means that cuda is installed successfully;


1.3, cudnn program installation
cudnn download link:
https://developer.nvidia.com/rdp/cudnn-download
-
After entering the cudnn download link, you need to enter your account number and password to log in (if you have not registered, please register first)
-
Because the cuda program installed in the previous step is version 12.x, select “CUDA 12.x”;

-
Select the Windows version-based cudnn installation package to download;

-
After downloading, unzip and you will see three subfolders: “bin”, “include” and “lib”;
-
Because my cuda installation directory is in “C:\Program Files\\
VIDIA GPU Computing Toolkit\CUDA”, I copied the decompressed cudnn file to the cuda installation directory as follows:
1) Copy all files in the “bin” folder to the “C:\Program Files\\
VIDIA GPU Computing Toolkit\CUDA\v12.1\bin” directory;
2) Copy all files in the “include” folder to the “C:\Program Files\\
VIDIA GPU Computing Toolkit\CUDA\v12.1\include” directory;
3) Copy all files in the “lib/x64” folder to the “C:\Program Files\\
VIDIA GPU Computing Toolkit\CUDA\v12.1\lib\x64” directory.
Warm reminder: If cuda is installed in another folder, the cudnn files must be placed in other folders!


1.4, anaconda installation
anaconda official website link:
https://www.anaconda.com/download/
- As shown below, just click “Download” to download. The default is the latest version and the windows version of anaconda;

- After the download is completed, please follow the installation prompts and operate normally. The installation steps are omitted here.

1.5. Use anaconda to create a virtual environment
- Because each subsequent project may require different versions of dependent libraries, in order to avoid version conflicts, a virtual environment needs to be configured for each project so that they do not interfere with each other;
- Search for “anaconda prompt” and open this terminal;

- Enter “conda env list” to view all current virtual environments. As shown below, anaconda helps you create a virtual environment named “base” by default;

// View all current virtual environments
conda env list

- Create a new virtual environment. You can name the virtual environment whatever you want. Assume here that a new virtual environment with a virtual name of “torch_test” is created, then enter “conda create –n torch_test python=3.11” (here 3.11 is the python version installed on my computer. If you want to view the current python version, directly enter “python” that is Can)
//Create a virtual environment named "torch_test", the current python version is 3.11
conda create –n torch_test python=3.11

-
During the installation process, you will be prompted to enter “y” or “n”, enter “y” and press Enter;

-
After waiting for the installation to complete, enter “conda env list” to view, and you can see the newly created “torch_test” virtual environment. Use “conda activate torch_test” to switch to this virtual environment.

//Switch to the virtual environment "torch_test"
conda activate torch_test

1.6, pycharm installation and new project
pycharm official website link:
https://www.jetbrains.com.cn/en-us/pycharm/
-
After entering the pycharm official website link, click “Download”;

-
Just choose the free Community version of pycharm to download. It is recommended to choose the latest version (the default is the latest version);

-
After the download is completed, please follow the installation prompts and operate normally. The installation steps are omitted here. During the installation process, you will encounter the following prompts, just check them all;

-
After installing pycharm, open pycharm and click “New project”;

-
As shown below, the system will specify the default project path and project name, and you can change the path and project name yourself;

-
Since we have previously created a “torch_test” virtual environment through the anaconda terminal, here we need to bind this virtual environment, please select “Previously configured interpreter”, and then click “Add Local Interpreter”;

-
Follow the steps below to bind the previously created “torch_test” virtual environment;

-
Right-click the newly created project name on the left side of the interface, and then create a new “Python File”, here named “test.py”. At this point, pycharm has been installed, bound to the virtual environment, and created a new project.


1.7, pytorch installation
pytorch official website link:
https://pytorch.org/
-
After entering the pytorch official website, select “Get Started”;

-
Please select the same version as the previously installed cuda program. For example, the cuda version installed above is 12.1, then the cuda version selected here is also 12.1 (if other versions of cuda are installed, please click “install previous versions of Pytorch” and Select the corresponding version of cuda), and then copy the installation instructions;

-
Return to pycharm and open the pycharm terminal. Please observe whether the current virtual environment of the terminal is “torch_test”. If not, please use “conda activate torch_test” to switch to the “torch_test” environment;

-
Paste the installation instructions copied from the pytorch official website on the pycharm terminal and press Enter to start installing pytorch;

-
If you encounter a “read time out” problem during the installation process, add “–default-timeout=100” to extend the installation time, as shown below;


pip3 --default-timeout=100 install torch torchvision torchaudio --index-url https://download.pytorch.org/whl/cu121
- When pytorch is installed, please enter the following code in the newly created test.py;
import torch

#Print pytorch version information
print("torch.__version__ = ", torch.__version__)

# Verify whether cuda is available
print("torch.cuda.is_available() = ", torch.cuda.is_available())

- If the pytorch version number is printed and “torch.cuda.is_available()” returns “True”, it proves that the GPU version of pytorch is installed successfully.


2. CPU version
2.1, anaconda installation
anaconda official website link:
https://www.anaconda.com/download/
-
As shown below, just click “Download” to download. The default is the latest version and the windows version of anaconda;
-
After the download is completed, please follow the installation prompts and operate normally. The installation steps are omitted here.
2.3. Use anaconda to create a virtual environment
- Because each subsequent project may require different versions of dependent libraries, in order to avoid version conflicts, a virtual environment needs to be configured for each project so that they do not interfere with each other;
- Search for “anaconda prompt” and open this terminal;
- Enter “conda env list” to view all current virtual environments. As shown below, anaconda helps you create a virtual environment named “base” by default;
//View all current virtual environments
conda env list
- Create a new virtual environment. You can name the virtual environment whatever you want. Assume here that a new virtual environment with a virtual name of “torch_test” is created, then enter “conda create –n torch_test python=3.11” (here 3.11 is the python version installed on my computer. If you want to view the current python version, directly enter “python” that is Can)
//Create a virtual environment named "torch_test", the current python version is 3.11
conda create –n torch_test python=3.11
-
During the installation process, you will be prompted to enter “y” or “n”, enter “y” and press Enter;
-
After waiting for the installation to complete, enter “conda env list” to view, and you can see the newly created “torch_test” virtual environment. Use “conda activate torch_test” to switch to this virtual environment.
//Switch to the virtual environment "torch_test"
conda activate torch_test
2.4, pycharm installation and new project
pycharm official website link:
https://www.jetbrains.com.cn/en-us/pycharm/
-
After entering the pycharm official website link, click “Download”;
-
Just choose the free Community version of pycharm to download. It is recommended to choose the latest version (the default is the latest version);
-
After the download is completed, please follow the installation prompts and operate normally. The installation steps are omitted here. During the installation process, you will encounter the following prompts, just check them all;
-
After installing pycharm, open pycharm and click “New project”;
-
As shown below, the system will specify the default project path and project name, and you can change the path and project name yourself;
-
Since we have previously created a “torch_test” virtual environment through the anaconda terminal, here we need to bind this virtual environment, please select “Previously configured interpreter”, and then click “Add Local Interpreter”;
-
Follow the steps below to bind the previously created “torch_test” virtual environment;
-
Right-click the newly created project name on the left side of the interface, and then create a new “Python File”, here named “test.py”. At this point, pycharm has been installed, bound to the virtual environment, and created a new project.
2.5, pytorch installation
pytorch official website link:
https://pytorch.org/
-
After entering the pytorch official website, select “Get Started”;
-
Because the computer does not have an NVIDIA graphics card, select “CPU” for the “Compute Platform” item, and then copy the installation command;

-
Return to pycharm and open the pycharm terminal. Please observe whether the current virtual environment of the terminal is “torch_test”. If not, please use “conda activate torch_test” to switch to the “torch_test” environment;
-
Paste the installation instructions copied from the pytorch official website on the pycharm terminal and press Enter to start installing pytorch;

-
If you encounter a “read time out” problem during the installation process, add “–default-timeout=100” to extend the installation time, as shown below;


pip3 --default-timeout=100 install torch torchvision torchaudio
- When pytorch is installed, please enter the following code in the newly created test.py;
import torch

#Print pytorch version information
print("torch.__version__ = ", torch.__version__)

# Verify whether cuda is available
print("torch.cuda.is_available() = ", torch.cuda.is_available())
- If the pytorch version number is printed and “torch.cuda.is_available()” returns “False”, it proves that the CPU version of pytorch is installed.
Conclusion
After installing PyTorch, you have paved the way for exploration of deep learning and artificial intelligence. PyTorch provides powerful tools and libraries to help you build various types of neural networks, solve complex problems, and develop innovative applications. As a PyTorch user, you can now explore projects in image processing, natural language processing, reinforcement learning, and other areas.