Big factory technology advanced front-end Node advanced
Click above for Programmer Growth Guide and follow the official account
Reply 1, join the advanced Node communication group
1. Problem background
At present, in our projects, we usually use various tracking and monitoring to collect information about page visits, such as click tracking, PV tracking, etc. These tracking data can reflect most user behaviors, but For some usage scenarios that focus on context, these embedding points are not enough.
Click “Front-End Graphics” below and select “Set as Star”
Pay attention to technical information as soon as possible!
-
For products, it is sometimes not enough to judge the usage of functions through clicks or PV points. It is usually necessary to know the user’s real usage path to judge whether the user’s usage is consistent with the functional design. , thus being able to better analyze user usage and further optimize and promote it.
-
For development, when we receive a system exception notification, the monitoring system can only tell you that there is an error in the system, but it cannot give a path for error recurrence. For stable recurring errors, This is okay, but it is more difficult for us to solve the problem for occasional errors or scenarios where the recurrence path is deeply hidden.
-
For testing, when users report online bugs, the first thing they need to know is what operation triggered the problem. Sometimes users may not be able to reproduce such errors themselves. We also It is impossible to deduce the context through buried data, so a large communication cost will be incurred. The same is true when executing the test plan to report bugs.
-
…

Therefore, we need a means to obtain the user’s continuous operation behavior for a certain period of time, that is, record user behavior, including every click, slide, input and other behaviors in the entire session, and also support playback recording Operational behavior, completely and truly reproduce user behavior to help us trace back or analyze certain usage scenarios.
2. Technical solution
2.1 Video recording
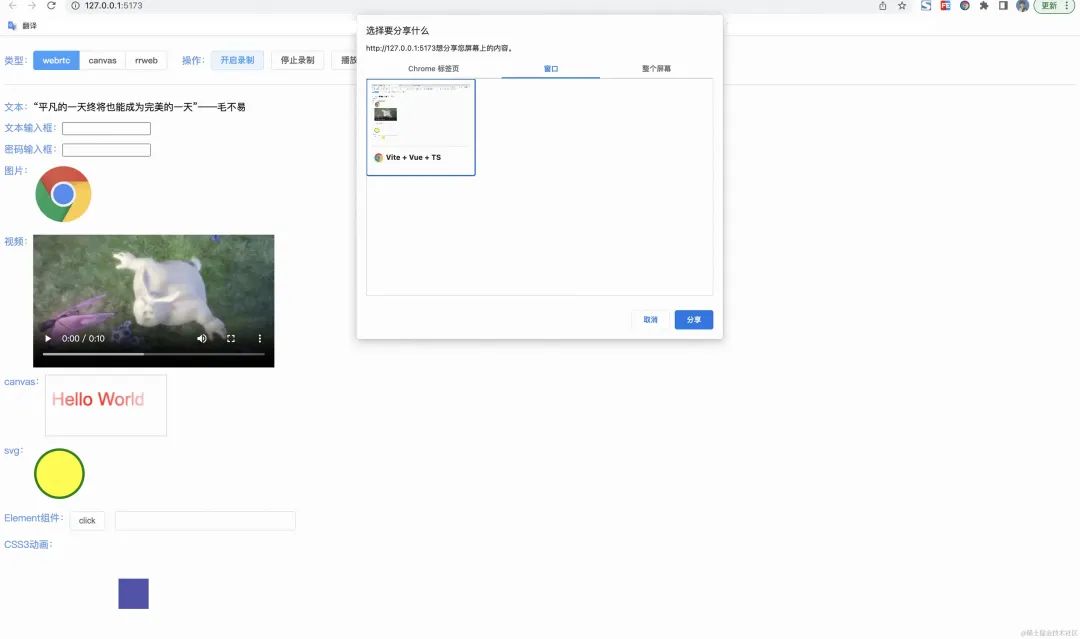
The easiest way to record user behavior is to record screen operations through video. Currently, the browser itself has provided a set of real-time data streaming transmission solutions based on audio and video tracks, WebRTC (Web Real-Time Communications). In our recording Screen usage scenarios mainly focus on the following APIs:
-
getDisplayMedia() – Prompts the user for permission to use media input to obtain a stream of the screen;
-
MediaRecorder() – Generates a MediaRecorder object that records the specified media stream;
-
ondataavailable – This event is fired when the MediaRecorder passes media data to the application for consumption;
The overall recording process is as follows:
-
Call
mediaDevices.getDisplayMedia()and authorize the user to select the screen for recording and obtain the data stream; -
Generate a
new MediaRecorder()object to record the data stream of the obtained screen; -
Set the
ondataavailablelistening event on the MediaRecorder object to obtain the recorded Blob data.
html
Copy code
<template>
  <video ref="playerRef"></video>
  <button @click="handleStart">Start recording</button>
  <button @click="handlePause">Pause recording</button>
  <button @click="handleResume">Continue recording</button>
  <button @click="handleStop">End recording</button>
  <button @click="handleReplay">Play recording</button>
  <button @click="handleReset">Reset content</button>
</template>

<script lang="ts" setup>
import { ref, reactive } from 'vue';

const playerRef = ref();
const state = reactive({
  mediaRecorder: null as null | MediaRecorder,
  blobs: [] as Blob[],
});

// Start recording
const handleStart = async () => {
  const stream = await navigator.mediaDevices.getDisplayMedia();
  state.mediaRecorder = new MediaRecorder(stream, {
    mimeType: 'video/webm',
  });
  state.mediaRecorder.addEventListener('dataavailable', (e: BlobEvent) => {
    state.blobs.push(e.data);
  });
  state.mediaRecorder?.start();
};
// Canvas recording (special processing)
const handleCanvasRecord = () => {
  const stream = canvas.captureStream(60); // 60 FPS recording
  const recorder = new MediaRecorder(stream, {
    mimeType: 'video/webm;codecs=vp9',
  });
  recorder.ondataavailable = (e) => {
    state.blobs.push(e.data);
  };
}
// Pause recording
const handlePause = () => { state.mediaRecorder?.pause() };
// continue recording
const handleResume = () => { state.mediaRecorder?.resume() };
// Stop recording
const handleStop = () => { state.mediaRecorder?.stop() };
// Play recording
const handleReplay = () => {
  if (state.blobs.length === 0 || !playerRef.value) return;
  const blob = new Blob(state.blobs, { type: 'video/webm' });
  playerRef.value.src = URL.createObjectURL(blob);
  playerRef.value.play();
};

const handleReset = () => {
  state.blobs = [];
  state.mediaRecorder = null;
  playerRef.value.src = null;
};
const handleDownload = () => {
  if (state.blobs.length === 0) return;
  const blob = new Blob(state.blobs, { type: 'video/webm' });
  const url = URL.createObjectURL(blob);
  const a = document.createElement('a');
  a.href = url;
  a.style.display = 'none';
  a.download = 'record.webm';
  a.click();
};
</script>
Although the browser natively provides such a simple and practical screen recording solution, there are still many problems in our actual application scenarios:
-
Perceived and controlled by the user: User behavior recording implemented through the API provided by WebRTC will use a pop-up window to allow the user to complete the authorization for the required recording screen before starting the recording. All recording behaviors are controlled by User autonomous control. This way of allowing users to perceive system recording is inappropriate for our expected use. Our expected recording behavior should be insensible to users. This technical solution is more suitable for applications such as woodpeckers. This kind of feedback system consists of users actively reporting problem scenarios or examination system screen monitoring, online interview screen sharing, etc.
-
Recorded data cannot be desensitized: During the video recording process, the content of the entire page is directly recorded. Some sensitive data will also be directly recorded. We cannot desensitize it during the recording process. This is not applicable to some scenarios where data security requirements are relatively high or user privacy is involved.
-
WebRTC Compatibility: Several WebRTC APIs used in the recording process have certain compatibility requirements. Different browsers have different support conditions. You can make corresponding compatibility queries.
2.2 Page screenshot
As we all know, video is composed of frames, so we can save the current page snapshot by taking screenshots at certain intervals, and then play the snapshot at the same interception speed to form a video to record user behavior. The most commonly used screenshot method is canvas screenshot represented by html2canvas library. We also found many problems during use:
-
Canvas screenshots have many limitations, such as being unable to draw animations, misaligned styles, and not supporting some CSS styles, etc.;
-
Taking screenshots has a large performance overhead and may cause frame drops. For example, the CSS animation had very obvious freezes during our attempts;
-
The size of screenshot resources is large. When we tried to take screenshots, the size of a single picture was about 200k. Calculated at 24 frames, the size of the picture recorded in one minute was nearly 300MB, which was a waste of bandwidth and resource storage;
-
Add the data-html2canvas-ignore attribute or set the ignoreElements attribute to the elements that need to be ignored. Deleting specific elements can desensitize certain data or content, but directly deleting the elements cannot achieve the effect of “placeholder but no content”. Affects page layout.
html
Copy code
<template>
  <el-button @click="handleStart">Start recording</el-button>
  <el-button @click="handleStop">Stop recording</el-button>
  <el-button @click="handleReplay">Play recording</el-button>
  <img :src="state.imgs[state.num  0]" />
</template>

<script lang="ts" setup>
import { reactive } from 'vue';
import html2canvas from 'html2canvas';

const state = reactive({
  visible: false,
  imgs: [] as string[],
  num: 0,
  recordInterval: null as any,
  replayInterval: null as any,
});

const FPS = 30;
const interval = 1000 / FPS;
const handleStart = async () => {
  handleReset();
  state.recordInterval = setInterval(() => {
    if (state.imgs.length > 100) {
      handleStop();
      return;
    }
    html2canvas(document.body).then((canvas: any) => {
      const img = canvas.toDataURL();
      state.imgs.push(img);
    });
  }, interval);
};

const handleStop = () => {
  state.recordInterval & amp; & amp; clearInterval(state.recordInterval);
};

const handleReplay = async () => {
  state.recordInterval & amp; & amp; clearInterval(state.recordInterval);
  state.num = 0;
  state.visible = true;
  state.replayInterval = setInterval(() => {
    if (state.num >= state.imgs.length - 1) {
      clearInterval(state.replayInterval);
      return;
    }
    state.num + + ;
  }, interval);
};

const handleReset = () => {
  state.imgs = [];
  state.recordInterval = null;
  state.replayInterval = null;
  state.num = 0;
};
</script>
| Actual content | Screenshot effect |
|---|---|
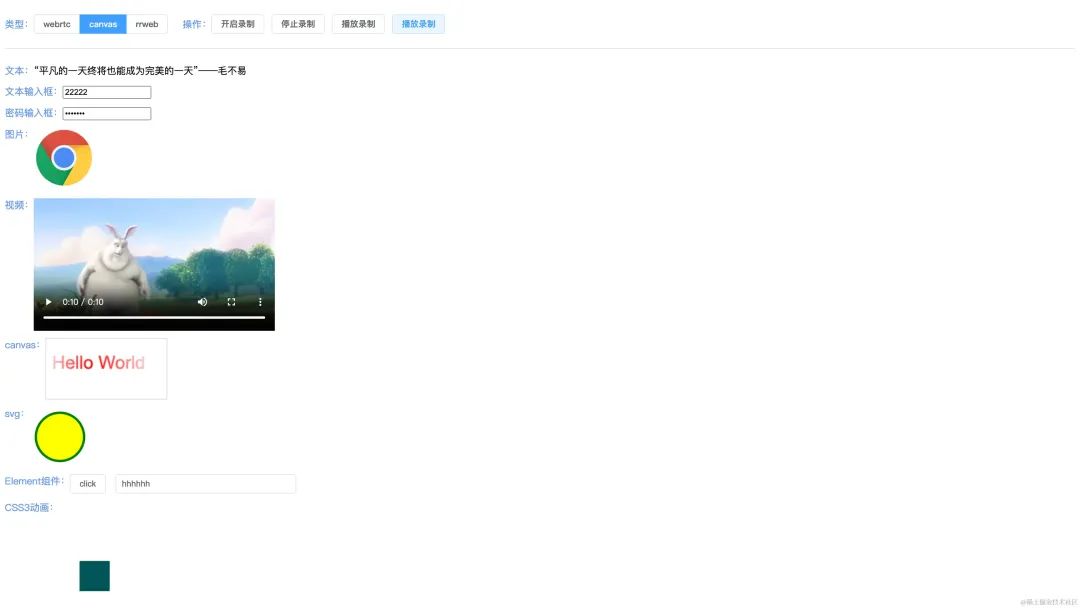 |
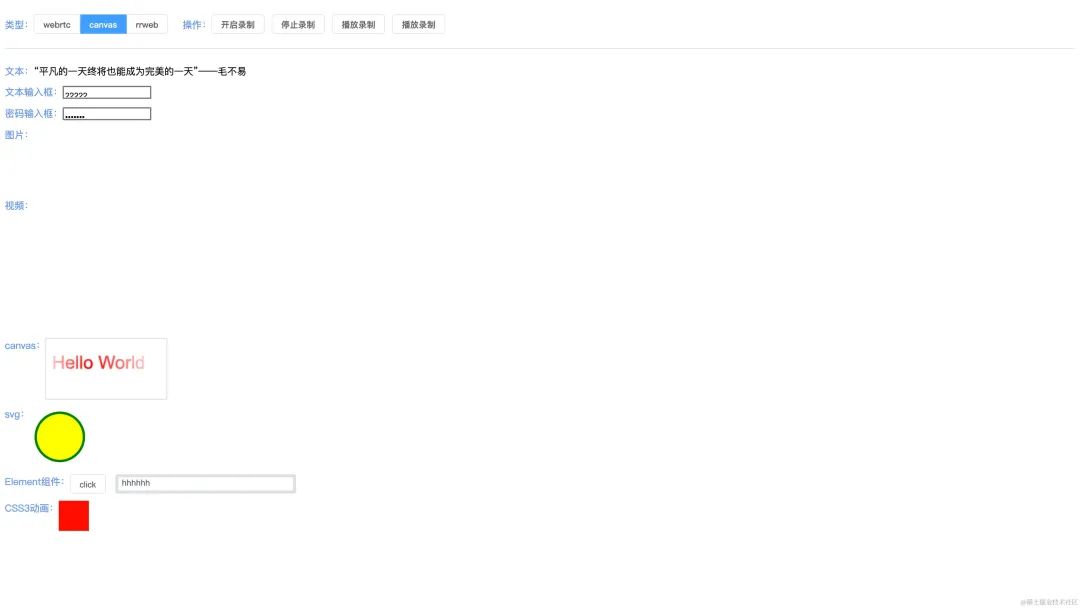 |
2.3 Dom snapshot recording
The page we see at every moment is the DOM node currently rendered by the browser, so we can save the DOM node, continue to record the changes in the DOM node, and then render and play back the recorded DOM node data through the browser. In this way, the need for user behavior recording can be realized. The whole idea is very simple, but the specific implementation is very complicated. We need to consider how to save DOM node data, how to capture user behavior and record DOM node transformations, and how to play back the recorded data on the browser. Fortunately, the current community already has a very mature library, namely rrweb (record and replay the web)
rrweb mainly consists of 3 parts:
-
rrweb-snapshot consists of two parts: snapshot and rebuild. Snapshot is used to convert the DOM and its state into a serializable data structure and add a unique identifier. Rebuild is to reconstruct the data structure recorded by the snapshot into the corresponding DOM.
-
rrweb includes two functions: record and replay. Record is used to record all changes in the DOM, and replay is to replay the recorded changes one by one according to the corresponding time.
-
rrweb-player provides a set of UI controls for rrweb, providing GUI-based functions such as pausing, fast forwarding, and dragging to any time point for playback.

Recording process
When recording, rrweb will first take a first-screen DOM snapshot, traverse the DOM Tree of the entire page, and convert it into JSON structured data through nodeType mapping. The serialization operations for node types of different nodeType types have a lot of details. If you want to know the details, you can read this part of the source code. An example of full snapshot data is as follows:
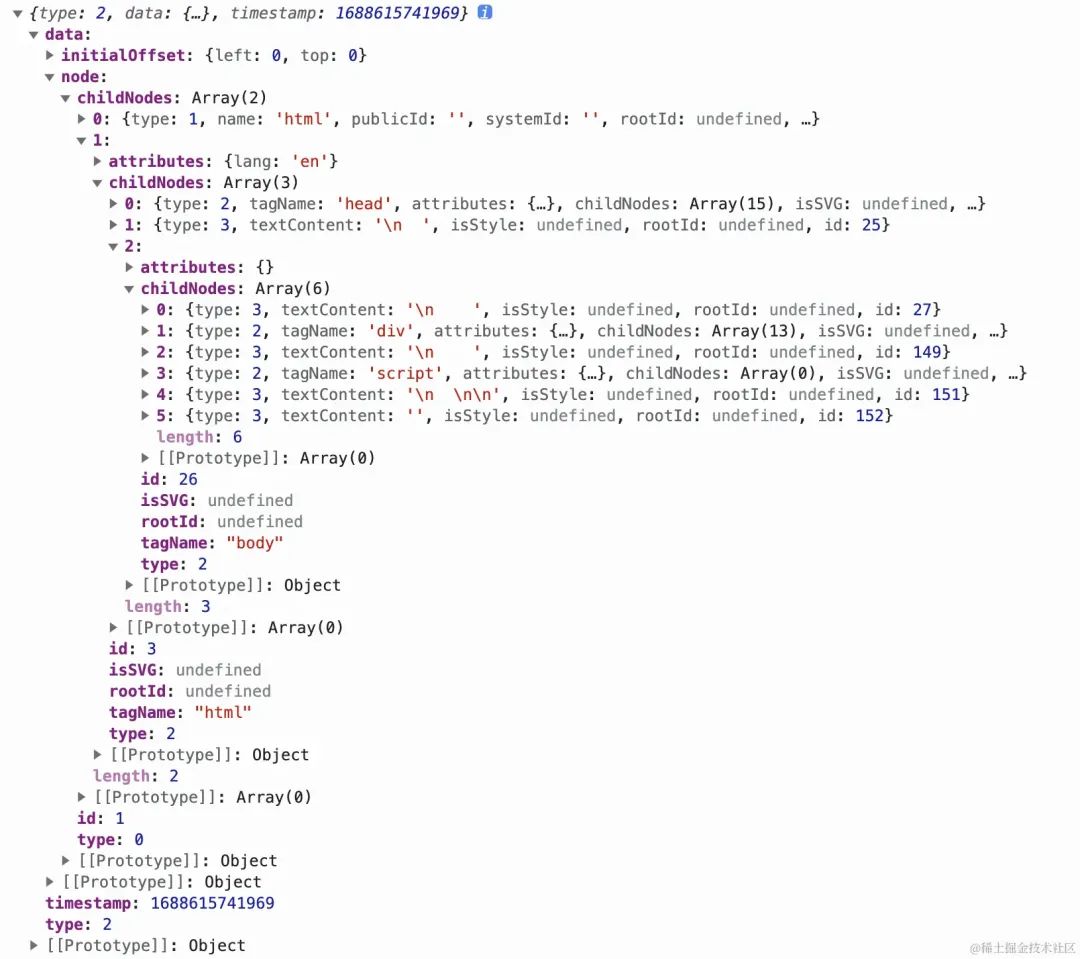
After obtaining the full snapshot of the first screen, we need to monitor various changes to obtain incremental data. The incrementally changed data also needs to be synchronously converted into JSON data for storage. For incremental data updates, DOM incremental changes are obtained through mutationObserver, and method (property) hijacking is performed through global event monitoring and event (property) proxy, and the hijacked incremental change data is stored in JSON data. . There are different monitoring and processing methods for different types of changes. If you want to know the details, you can read this part of the source code.
Playback process
Playback is mainly to reconstruct and restore the full snapshot and incremental snapshot during the recording process. To ensure a safe and reliable environment, we should not execute the JavaScript in the recorded page during playback, and rewrite it through the script tag during the process of rebuilding the snapshot. Rebuild the noscript tag and dom in the iframe and set the sandbox attribute to build a safe and reliable sandbox environment. In the sandbox environment, you first need to reconstruct the first-screen DOM snapshot. While traversing the JSON product, you can map the custom type to different node construction methods to reconstruct the first-screen DOM structure. Then, rrweb internally calls according to different incremental types. Different functions display incremental data on the page. At the same time, the playback sequence is guaranteed through the timestamp generated by the recording during playback, the Node id is used to act on the specified DOM node, and the requestAnimationFrame is used to ensure the smoothness of page playback.
For the implementation principle of rrweb, please refer to the following relevant information and source code/official documents:
rrweb: Open the black box for recording and playback of web pages – Zhihu
Shence Data Wang Lei: How to use JS to implement page recording and playback – Nuggets
A brief analysis of the principle of rrweb screen recording – Nuggets
Introduction to rrweb implementation principles – WeChat public account
rrweb takes you to restore the problem site – cloud music front-end
html
Copy code
<template>
  <button @click="handleStart">Start recording</button>
  <button @click="handleStop">End recording</button>
  <button @click="handleReplay">Play recording</button>
  <div class="replay" ref="replayRef"></div>
</template>

<script lang="ts" setup>
import { reactive, ref } from 'vue';
import * as rrweb from 'rrweb';
import rrwebPlayer from 'rrweb-player';
import 'rrweb-player/dist/style.css';

const replayRef = ref();
const state = reactive({
  events: [] as any[],
  stopFn: null as any,
});

const handleStart = () => {
  state.stopFn = rrweb.record({
    emit(event) {
      if (state.events.length > 100) {
        // Stop recording when the number of events is greater than 100
        handleStop();
      } else {
        state.events.push(event);
      }
    },
  });
  ElMessage('Start recording');
};

const handleStop = () => {
  state.stopFn?.();
  ElMessage('Recording has stopped');
};

const handleReplay = () => {
  new rrwebPlayer({
    target: replayRef.value, // DOM elements can be customized
    // Configuration items
    props: {
      events: state.events,
    },
  });
};
</script>
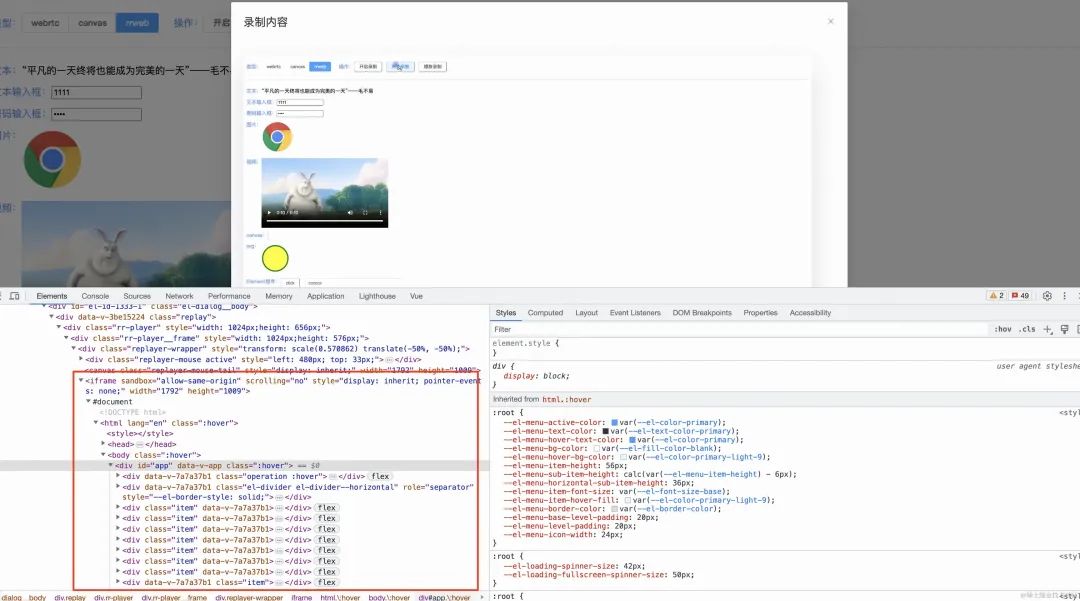
In terms of effect, rrweb recording content stores the complete page structure and can better restore the entire operation of the page, and rrweb recording lossless recording has better clarity, unlike video recording and page screenshots Resolution and product size need to be considered. At the same time, unlike canvas screenshots, which have greater limitations on content and style, some page content cannot be recorded.
In terms of performance, rrweb records and transmits JSON data and only incrementally records user operation content. When the page is silent, no additional data will be recorded. Compared with video recording and page recording, In terms of screenshots, it greatly reduces the size of the final product, reduces the pressure of data transmission, and also improves recording performance.
Functionally speaking, in addition to basic recording and playback functions, rrweb also has good scalability and operability:
-
The product recorded by rrweb is JSON data, and it also supports converting JSON data into video using the tool rrvideo
-
It allows data desensitization through configuration, not recording certain elements or blocking certain events, see the link for details
-
It also provides storage optimization strategies to reduce the amount of recorded data, see the link for details
-
It also supports custom plug-ins for expansion, see the link for details
2.4 Comparison of solutions
| Comparison content | Video recording | Page screenshot | Dom snapshot recording |
|---|---|---|---|
| Open source library | WebRTC native support | html2canvas | rrweb |
| User perception | Perception of recording | No perception of recording | No perception of recording |
| Product size | Large | Large | Relatively small |
| Compatibility | See related API compatibility for details | Some scene content screenshots cannot be displayed | Compatibility is relatively good |
| Operationability | Weak | Weak | Strong (supports data desensitization/encryption, etc.) |
| Playback clarity | Decided during recording, lossy recording | Decided during recording, lossy recording | High fidelity |
| # | Application Scenario | Description |
|---|---|---|
| 1 | Product function analysis | After the function is launched, it is not enough to only judge the usage through clicks or PV points. You should focus on some key pages/functions. In real usage scenarios, the user’s operation path is recorded through user behavior recording. Analyzing the user’s operation by playing back the operation or using algorithms to analyze the usage path can better understand the functional design and help further optimization. |
| 2 | User interview records | When the product interviews users, it organizes user oral records and plays back interview recordings. To carry out analysis and research, the overall interview cost is high and the information utilization rate is low. Recording the user’s real operation records during the interview process through user behavior recording can better help the product review the operating habits of the interviewed users. |
| 3 | On-site reproduction of the problem | The first step in solving the problem is to reproduce the problem, but sometimes the recurrence of the problem The current operation is extremely hidden or difficult to locate due to factors such as the user’s usage environment. By recording user behavior to save the context of the error reporting moment, we can better understand the user’s error reporting operation and minimize the cost of communication and content delivery. |
| 4 | Automated test cases | Usually the writing and maintenance of automated test cases are done manually, and the cost is relatively high High, and post-maintenance is also inconvenient. By converting the recorded data through user behavior recording, test case collection can be faster and more convenient, and it is also easier to manage. |
| 5 | Others | There are also case review, behavior monitoring/supervision, business process quality inspection… |
4. Platform solution
The Sentry platform provides recording and playback functions for analysis. Its application focuses on viewing operations before, during, and after errors or performance problems occur. Its recording and playback functions are also developed based on the rrweb library .

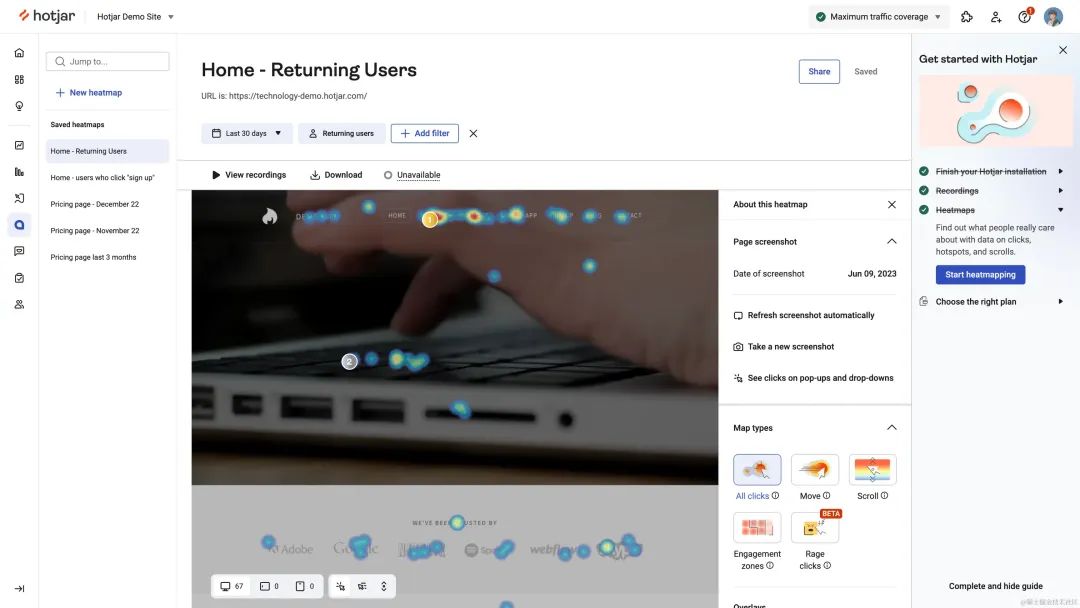
The Hotjar platform provides recording and playback functions for analysis. In addition to the recording and playback functions, it also provides analysis capabilities such as page heat maps to help users better understand the product. The official also provides a demo for experience.
Other related commercialization platforms include LogRocket, FullStory, marker.io, etc.
5. Summary
Currently, user behavior recording has been widely used in various scenarios, such as user research, product analysis, bug traceback, automated testing, behavior monitoring, etc. Technical solutions such as video recording, page screenshots, and Dom snapshot recording each have their own advantages and disadvantages. Appropriate technical solutions must be selected when facing different usage scenarios, but in general, the ones represented by rrweb library Dom snapshot recording technology is currently the most widely used and most advantageous technical solution, and this technical solution or idea is mainly used in various commercial solutions.
Reference materials
-
User behavior recording technology solution – Nuggets
-
First experience of front-end recording and playback system – Nuggets
-
Research and summary of browser recording solutions – Zhihu
-
Quick Start WebRTC: Screen and Camera Recording, Playback, and Download – Nuggets
Link: https://juejin.cn/user/1521379822015645/posts
Author: Young man from the Department of Botany
Node community
I have formed a Node.js community with a very good atmosphere. There are many Node.js friends in it. If you are interested in learning Node.js (you can also have plans in the future), we can do Node.js-related work together. Exchange, learn and build together. Add Koala friends below and reply “Node”.

"Share, Like, Watch" to support