Hello everyone, I am a passerby~~~
Click on the card below to follow me, java dry goods will be delivered in time
I have written an article about the use of Spring Validation before, but I still feel that I am superficial. This time I plan to thoroughly understand Spring Validation. This article will introduce in detail the best practices and implementation principles of Spring Validation in various scenarios. Let’s stick to it!
Project source code: https://github.com/chentianming11/spring-validation
Easy to use
The Java API specification (JSR303) defines the standard validation-api for Bean verification, but does not provide an implementation. hibernate validation is the implementation of this specification and adds verification annotations such as @Email, @Length, etc.
Spring Validation is a secondary encapsulation of hibernate validation and is used to support automatic verification of spring mvc parameters. Next, we take the spring-boot project as an example to introduce the use of Spring Validation.
Introduce dependencies
If the spring-boot version is less than 2.3.x, spring-boot-starter-web will automatically pass in the hibernate-validator dependency. If the spring-boot version is greater than 2.3.x, you need to manually introduce dependencies:
<dependency>
    <groupId>org.hibernate</groupId>
    <artifactId>hibernate-validator</artifactId>
    <version>6.0.1.Final</version>
</dependency>
For web services, in order to prevent illegal parameters from affecting the business, parameter verification must be done at the Controller layer! In most cases, request parameters are divided into the following two forms:
-
For POST and PUT requests, use requestBody to pass parameters;
-
For GET requests, use requestParam/PathVariable to pass parameters.
Below we briefly introduce the actual parameter verification of requestBody and requestParam/PathVariable!
requestBody parameter verification
POST and PUT requests generally use requestBody to pass parameters. In this case, the backend uses a DTO object to receive it. Automatic parameter verification can be implemented by simply adding the @Validated annotation to the DTO object. For example, there is an interface for saving User, which requires the length of userName to be 2-10, and the length of account and password fields to be 6-20.
If the verification fails, MethodArgumentNotValidException will be thrown, and Spring will convert it to a 400 (Bad Request) request by default.
DTO stands for Data Transfer Object, which is used for interactive transmission between the server and the client. In the spring-web project, the Bean object used to receive request parameters can be represented.
Declare constraint annotations on DTO fields
@Data
public class UserDTO {

    private Long userId;

    @NotNull
    @Length(min = 2, max = 10)
    private String userName;

    @NotNull
    @Length(min = 6, max = 20)
    private String account;

    @NotNull
    @Length(min = 6, max = 20)
    private String password;
}
Declare validation annotations on method parameters
@PostMapping("/save")
public Result saveUser(@RequestBody @Validated UserDTO userDTO) {
    // Only after the verification passes, the business logic processing will be executed.
    return Result.ok();
}
In this case, both @Valid and @Validated will work.
requestParam/PathVariable parameter verification
GET requests generally use requestParam/PathVariable to pass parameters. If there are many parameters (for example, more than 6), it is recommended to use DTO objects to receive them.
Otherwise, it is recommended to flatten the parameters into the method input parameters one by one. In this case, the @Validated annotation must be marked on the Controller class, and the constraint annotation (such as @Min, etc.) must be declared on the input parameters. If the verification fails, a ConstraintViolationException will be thrown.
The code example is as follows:
@RequestMapping("/api/user")
@RestController
@Validated
public class UserController {
    // path variable
    @GetMapping("{userId}")
    public Result detail(@PathVariable("userId") @Min(10000000000000000L) Long userId) {
        // Only after the verification passes, the business logic processing will be executed.
        UserDTO userDTO = new UserDTO();
        userDTO.setUserId(userId);
        userDTO.setAccount("111111111111111111");
        userDTO.setUserName("xixi");
        userDTO.setAccount("111111111111111111");
        return Result.ok(userDTO);
    }

    // Query parameters
    @GetMapping("getByAccount")
    public Result getByAccount(@Length(min = 6, max = 20) @NotNull String account) {
        // Only after the verification passes, the business logic processing will be executed.
        UserDTO userDTO = new UserDTO();
        userDTO.setUserId(10000000000000003L);
        userDTO.setAccount(account);
        userDTO.setUserName("xixi");
        userDTO.setAccount("111111111111111111");
        return Result.ok(userDTO);
    }
}
Unified exception handling
As mentioned before, if the verification fails, MethodArgumentNotValidException or ConstraintViolationException will be thrown. In actual project development, unified exception handling is usually used to return a more friendly prompt.
For example, our system requires that no matter what exception is sent, the http status code must return 200, and the business code is used to distinguish system exceptions.
@RestControllerAdvice
public class CommonExceptionHandler {

    @ExceptionHandler({MethodArgumentNotValidException.class})
    @ResponseStatus(HttpStatus.OK)
    @ResponseBody
    public Result handleMethodArgumentNotValidException(MethodArgumentNotValidException ex) {
        BindingResult bindingResult = ex.getBindingResult();
        StringBuilder sb = new StringBuilder("Verification failed:");
        for (FieldError fieldError : bindingResult.getFieldErrors()) {
            sb.append(fieldError.getField()).append(":").append(fieldError.getDefaultMessage()).append(", ");
        }
        String msg = sb.toString();
       return Result.fail(BusinessCode.Parameter verification failed, msg);
    }

    @ExceptionHandler({ConstraintViolationException.class})
    @ResponseStatus(HttpStatus.OK)
    @ResponseBody
    public Result handleConstraintViolationException(ConstraintViolationException ex) {
        return Result.fail(BusinessCode.Parameter verification failed, ex.getMessage());
    }
}
Advanced use
Group verification
In actual projects, multiple methods may need to use the same DTO class to receive parameters, and the verification rules of different methods are likely to be different. At this time, simply adding constraint annotations to the fields of the DTO class cannot solve the problem. Therefore, spring-validation supports the group verification function, which is specifically used to solve such problems.
Still using the above example, for example, when saving User, UserId is nullable, but when updating User, the value of UserId must be >=10000000000000000L; the verification rules for other fields are the same in both cases. The code example for using group verification at this time is as follows:
Declare applicable grouping information groups on the constraint annotation
@Data
public class UserDTO {

    @Min(value = 10000000000000000L, groups = Update.class)
    private Long userId;

    @NotNull(groups = {Save.class, Update.class})
    @Length(min = 2, max = 10, groups = {Save.class, Update.class})
    private String userName;

    @NotNull(groups = {Save.class, Update.class})
    @Length(min = 6, max = 20, groups = {Save.class, Update.class})
    private String account;

    @NotNull(groups = {Save.class, Update.class})
    @Length(min = 6, max = 20, groups = {Save.class, Update.class})
    private String password;

    /**
     * Verify grouping when saving
     */
    public interface Save {
    }

    /**
     * Verify grouping when updating
     */
    public interface Update {
    }
}
Specify the validation group on the @Validated annotation
@PostMapping("/save")
public Result saveUser(@RequestBody @Validated(UserDTO.Save.class) UserDTO userDTO) {
    // Only after the verification passes, the business logic processing will be executed.
    return Result.ok();
}

@PostMapping("/update")
public Result updateUser(@RequestBody @Validated(UserDTO.Update.class) UserDTO userDTO) {
    // Only after the verification passes, the business logic processing will be executed.
    return Result.ok();
}
Nested check
In the previous example, the fields in the DTO class are all basic data types and String types. However, in actual scenarios, it is possible that a certain field is also an object. In this case, you can use nested verification.
For example, when the User information is saved above, it also contains Job information. It should be noted that at this time, the corresponding field of the DTO class must be marked with the @Valid annotation.
@Data
public class UserDTO {

    @Min(value = 10000000000000000L, groups = Update.class)
    private Long userId;

    @NotNull(groups = {Save.class, Update.class})
    @Length(min = 2, max = 10, groups = {Save.class, Update.class})
    private String userName;

    @NotNull(groups = {Save.class, Update.class})
    @Length(min = 6, max = 20, groups = {Save.class, Update.class})
    private String account;

    @NotNull(groups = {Save.class, Update.class})
    @Length(min = 6, max = 20, groups = {Save.class, Update.class})
    private String password;

    @NotNull(groups = {Save.class, Update.class})
    @Valid
    private Job job;

    @Data
    public static class Job {

        @Min(value = 1, groups = Update.class)
        private Long jobId;

        @NotNull(groups = {Save.class, Update.class})
        @Length(min = 2, max = 10, groups = {Save.class, Update.class})
        private String jobName;

        @NotNull(groups = {Save.class, Update.class})
        @Length(min = 2, max = 10, groups = {Save.class, Update.class})
        private String position;
    }

    /**
     * Verify grouping when saving
     */
    public interface Save {
    }

    /**
     * Verify grouping when updating
     */
    public interface Update {
    }
}
Nested validation can be used in conjunction with grouped validation. There is also a nested collection verification that will verify every item in the collection. For example, the List field will verify every Job object in the list.
Set verification
If the request body directly passes a json array to the background, and you want to perform parameter verification on each item in the array. At this time, if we directly use the list or set under java.util.Collection to receive data, parameter verification will not take effect! We can use a custom list collection to receive parameters:
Wrap the List type and declare the @Valid annotation
public class ValidationList<E> implements List<E> {

    @Delegate // @Delegate is the lombok annotation
    @Valid // Be sure to add the @Valid annotation
    public List<E> list = new ArrayList<>();

    // Be sure to remember to override the toString method
    @Override
    public String toString() {
        return list.toString();
    }
}
The @Delegate annotation is limited by the lombok version and is supported by versions 1.18.6 and above. If the verification fails, NotReadablePropertyException will be thrown, which can also be handled using unified exceptions.
For example, if we need to save multiple User objects at one time, the method of the Controller layer can be written like this:
@PostMapping("/saveList")
public Result saveList(@RequestBody @Validated(UserDTO.Save.class) ValidationList<UserDTO> userList) {
    // Only after the verification passes, the business logic processing will be executed.
    return Result.ok();
}
Customized verification
Business requirements are always more complex than these simple checks provided by the framework, and we can customize checks to meet our needs.
Customizing spring validation is very simple. Suppose we customize the encrypted ID (composed of numbers or letters a-f, 32-256 length) verification, which is mainly divided into two steps:
Custom constraint annotations
@Target({METHOD, FIELD, ANNOTATION_TYPE, CONSTRUCTOR, PARAMETER})
@Retention(RUNTIME)
@Documented
@Constraint(validatedBy = {EncryptIdValidator.class})
public @interface EncryptId {

    //Default error message
    String message() default "Encrypted id format error";

    // group
    Class<?>[] groups() default {};

    // load
    Class<? extends Payload>[] payload() default {};
}
Implement the ConstraintValidator interface to write a constraint validator
public class EncryptIdValidator implements ConstraintValidator<EncryptId, String> {

    private static final Pattern PATTERN = Pattern.compile("^[a-f\d]{32,256}$");

    @Override
    public boolean isValid(String value, ConstraintValidatorContext context) {
        // Validate only if it is not null
        if (value != null) {
            Matcher matcher = PATTERN.matcher(value);
            return matcher.find();
        }
        return true;
    }
}
In this way we can use @EncryptId for parameter verification!
Programmatic verification
The above examples are all based on annotations to implement automatic verification. In some cases, we may want to call verification programmatically. At this time, you can inject the javax.validation.Validator object and then call its api.
@Autowired
private javax.validation.Validator globalValidator;

// Programmatic verification
@PostMapping("/saveWithCodingValidate")
public Result saveWithCodingValidate(@RequestBody UserDTO userDTO) {
    Set<ConstraintViolation<UserDTO>> validate = globalValidator.validate(userDTO, UserDTO.Save.class);
    // If the verification passes, validate is empty; otherwise, validate contains unverified items.
    if (validate.isEmpty()) {
        // Only after the verification passes, the business logic processing will be executed.

    } else {
        for (ConstraintViolation<UserDTO> userDTOConstraintViolation : validate) {
            // Verification fails, do other logic
            System.out.println(userDTOConstraintViolation);
        }
    }
    return Result.ok();
}
Fail Fast
Spring Validation will verify all fields by default before throwing an exception. You can enable Fali Fast mode through some simple configurations, and return immediately once verification fails.
@Bean
public Validator validator() {
    ValidatorFactory validatorFactory = Validation.byProvider(HibernateValidator.class)
            .configure()
            // fail fast mode
            .failFast(true)
            .buildValidatorFactory();
    return validatorFactory.getValidator();
}
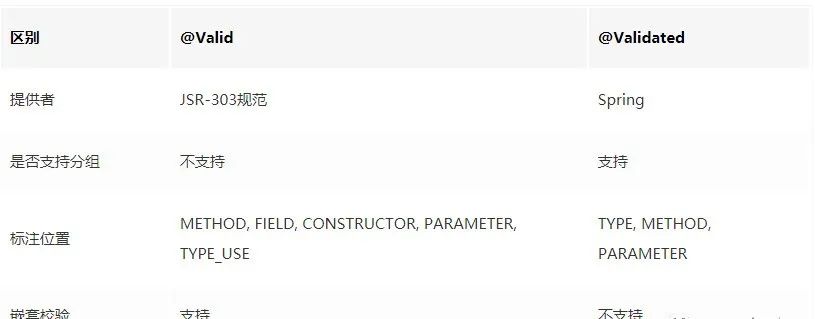
The difference between @Valid and @Validated
Implementation principle
RequestBody parameter verification implementation principle
In spring-mvc, RequestResponseBodyMethodProcessor is used to parse the parameters of the @RequestBody annotation and process the return value of the @ResponseBody annotation method. Obviously, the logic for performing parameter verification must be in the method resolveArgument() that parses parameters:
public class RequestResponseBodyMethodProcessor extends AbstractMessageConverterMethodProcessor {
    @Override
    public Object resolveArgument(MethodParameter parameter, @Nullable ModelAndViewContainer mavContainer,
                                  NativeWebRequest webRequest, @Nullable WebDataBinderFactory binderFactory) throws Exception {

        parameter = parameter.nestedIfOptional();
        //Encapsulate the request data into a DTO object
        Object arg = readWithMessageConverters(webRequest, parameter, parameter.getNestedGenericParameterType());
        String name = Conventions.getVariableNameForParameter(parameter);

        if (binderFactory != null) {
            WebDataBinder binder = binderFactory.createBinder(webRequest, arg, name);
            if (arg != null) {
                //Perform data verification
                validateIfApplicable(binder, parameter);
                if (binder.getBindingResult().hasErrors() & amp; & amp; isBindExceptionRequired(binder, parameter)) {
                    throw new MethodArgumentNotValidException(parameter, binder.getBindingResult());
                }
            }
            if (mavContainer != null) {
                mavContainer.addAttribute(BindingResult.MODEL_KEY_PREFIX + name, binder.getBindingResult());
            }
        }
        return adaptArgumentIfNecessary(arg, parameter);
    }
}
As you can see, resolveArgument() calls validateIfApplicable() for parameter verification.
protected void validateIfApplicable(WebDataBinder binder, MethodParameter parameter) {
    // Get parameter annotations, such as @RequestBody, @Valid, @Validated
    Annotation[] annotations = parameter.getParameterAnnotations();
    for (Annotation ann : annotations) {
        // First try to get the @Validated annotation
        Validated validatedAnn = AnnotationUtils.getAnnotation(ann, Validated.class);
        //If @Validated is directly marked, then verification is turned on directly.
        //If not, then determine whether there is an annotation starting with Valid before the parameter.
        if (validatedAnn != null || ann.annotationType().getSimpleName().startsWith("Valid")) {
            Object hints = (validatedAnn != null ? validatedAnn.value() : AnnotationUtils.getValue(ann));
            Object[] validationHints = (hints instanceof Object[] ? (Object[]) hints : new Object[] {hints});
            //Perform verification
            binder.validate(validationHints);
            break;
        }
    }
}
Seeing this, everyone should be able to understand why the @Validated and @Valid annotations can be mixed in this scenario. Let’s continue to look at the WebDataBinder.validate() implementation.
@Override
public void validate(Object target, Errors errors, Object... validationHints) {
    if (this.targetValidator != null) {
        processConstraintViolations(
            //Call Hibernate Validator here to perform real verification
            this.targetValidator.validate(target, asValidationGroups(validationHints)), errors);
    }
}
Finally, it was discovered that the bottom layer finally called Hibernate Validator for real verification processing.
Implementation principle of method level parameter verification
The above-mentioned verification method of flattening parameters into method parameters one by one, and then declaring constraint annotations in front of each parameter is method-level parameter verification.
In fact, this method can be used for any Spring Bean method, such as Controller/Service, etc. Its underlying implementation principle is AOP. Specifically, it dynamically registers AOP aspects through MethodValidationPostProcessor, and then uses MethodValidationInterceptor to weave in enhancements to the pointcut method.
public class MethodValidationPostProcessor extends AbstractBeanFactoryAwareAdvisingPostProcessorimplements InitializingBean {
    @Override
    public void afterPropertiesSet() {
        //Create aspects for all beans marked with `@Validated`
        Pointcut pointcut = new AnnotationMatchingPointcut(this.validatedAnnotationType, true);
        //Create Advisor for enhancement
        this.advisor = new DefaultPointcutAdvisor(pointcut, createMethodValidationAdvice(this.validator));
    }

    //Create Advice, which is essentially a method interceptor
    protected Advice createMethodValidationAdvice(@Nullable Validator validator) {
        return (validator != null ? new MethodValidationInterceptor(validator) : new MethodValidationInterceptor());
    }
}
Then take a look at MethodValidationInterceptor:
public class MethodValidationInterceptor implements MethodInterceptor {
    @Override
    public Object invoke(MethodInvocation invocation) throws Throwable {
        //No need to enhance the method, skip it directly
        if (isFactoryBeanMetadataMethod(invocation.getMethod())) {
            return invocation.proceed();
        }
        //Get group information
        Class<?>[] groups = determineValidationGroups(invocation);
        ExecutableValidator execVal = this.validator.forExecutables();
        Method methodToValidate = invocation.getMethod();
        Set<ConstraintViolation<Object>> result;
        try {
            //Method parameter verification is ultimately entrusted to Hibernate Validator for verification.
            result = execVal.validateParameters(
                invocation.getThis(), methodToValidate, invocation.getArguments(), groups);
        }
        catch (IllegalArgumentException ex) {
            ...
        }
        //If there is an exception, throw it directly
        if (!result.isEmpty()) {
            throw new ConstraintViolationException(result);
        }
        //Real method call
        Object returnValue = invocation.proceed();
        //Verify the return value, and ultimately entrust it to Hibernate Validator for verification.
        result = execVal.validateReturnValue(invocation.getThis(), methodToValidate, returnValue, groups);
        //If there is an exception, throw it directly
        if (!result.isEmpty()) {
            throw new ConstraintViolationException(result);
        }
        return returnValue;
    }
}
In fact, whether it is requestBody parameter verification or method-level verification, Hibernate Validator is ultimately called to perform verification, and Spring Validation only provides a layer of encapsulation.
More good articles
-
Java High Concurrency Series (34 articles in total)
-
MySql master series (27 articles in total)
-
Maven Master Series (10 articles in total)
-
Mybatis series (12 articles in total)
-
Let’s talk about common implementation methods of db and cache consistency
-
Interface idempotence is so important, what is it? How to achieve it?
-
Generics are a bit difficult and will confuse many people. That’s because you haven’t read this article!
↓↓↓ Click to read the original text and go directly to your personal blog
The knowledge points of the article match the official knowledge files, and you can further learn related knowledge. Java Skill TreeHomepageOverview 139,460 people are learning the system