1. Pycharm configures PyQt5.
The configuration method is the previous article.
Second, open Qt Designer to add the required controls.

The MainWindow is created here, and the added controls are as shown in the figure above. Here, you can modify the name of the added button for subsequent calls. Click Save and rename the project and the following .ui file will appear

3. Right-click the generated .ui file, click PyUIC in Qt to generate the corresponding .py file

from PyQt5 import QtCore, QtGui, QtWidgets

class Ui_MainWindow(object):
    def setupUi(self, MainWindow):
        MainWindow.setObjectName("MainWindow")
        MainWindow. resize(800, 600)
        self.centralwidget = QtWidgets.QWidget(MainWindow)
        self.centralwidget.setObjectName("centralwidget")
        self.label = QtWidgets.QLabel(self.centralwidget)
        self.label.setGeometry(QtCore.QRect(50, 100, 231, 191))
        self.label.setStyleSheet("background-color: rgb(255, 255, 255);")
        self.label.setObjectName("label")
        self.handlePictureBtn = QtWidgets.QPushButton(self.centralwidget)
        self. handlePictureBtn. setGeometry(QtCore. QRect(460, 110, 112, 34))
        self. handlePictureBtn. setObjectName("handlePictureBtn")
        self.recogBtn = QtWidgets.QPushButton(self.centralwidget)
        self.recogBtn.setGeometry(QtCore.QRect(460, 260, 112, 34))
        self.recogBtn.setObjectName("recogBtn")
        self.textEdit = QtWidgets.QTextEdit(self.centralwidget)
        self.textEdit.setGeometry(QtCore.QRect(390, 350, 251, 131))
        self.textEdit.setObjectName("textEdit")
        self.loadPictureBtn = QtWidgets.QPushButton(self.centralwidget)
        self.loadPictureBtn.setGeometry(QtCore.QRect(110, 310, 112, 34))
        self.loadPictureBtn.setObjectName("loadPictureBtn")


        MainWindow.setCentralWidget(self.centralwidget)
        self.menubar = QtWidgets.QMenuBar(MainWindow)
        self.menubar.setGeometry(QtCore.QRect(0, 0, 800, 30))
        self.menubar.setObjectName("menubar")
        MainWindow. setMenuBar(self. menubar)
        self.statusbar = QtWidgets.QStatusBar(MainWindow)
        self.statusbar.setObjectName("statusbar")
        MainWindow. setStatusBar(self. statusbar)

        self. retranslateUi(MainWindow)
        QtCore.QMetaObject.connectSlotsByName(MainWindow)

    def retranslateUi(self, MainWindow):
        _translate = QtCore.QCoreApplication.translate
        MainWindow.setWindowTitle(_translate("MainWindow", "MainWindow"))
        self.label.setText(_translate("MainWindow", "Image"))
        self.handlePictureBtn.setText(_translate("MainWindow", "handle picture"))
        self.recogBtn.setText(_translate("MainWindow", "Start recognition"))
        self.loadPictureBtn.setText(_translate("MainWindow", "load picture"))
The code in the file is shown above. This is the code for UI design. It is recommended to create a new .py file for the logic implementation of each control.
4. Create a new .py file to write the logic implementation of each control.
Here I created a new recognition.py file.
-
First of all, the trained model should be saved, and it can be loaded here. I use the LinearSVC model.
Models can be saved and loaded using pickle.
-
In order to display images, a dataset without any image transformation is required.
-
For subsequent image recognition tasks, a data set that realizes image conversion is also required. In addition, in order to obtain input that conforms to model recognition, it is necessary to pass the test image through the trained network. Here, the parameters of the convolutional layer can be called directly. Saved parameter data.
The saving of conv layer parameters can be used: torch.save(conv.state_dict(), “conv.parameter”)
The conv layer parameter call can be used: conv.load_state_dict(torch.load(“conv.parameter”))
-
Finally, the model can be used to predict the image category and displayed in textEdit.
import sys

import torch
from PyQt5.QtGui import QPixmap
from torchvision.datasets import ImageFolder

from SpykeTorch import snn, utils
from mainWindow import Ui_MainWindow
from PyQt5.QtWidgets import *
import pickle
import cv2
import dill
import random
import torchvision.transforms as transforms
import SpykeTorch. functional as sf
import numpy as np

# image conversion
kernels = [ utils. GaborKernel(window_size = 3, orientation = 45 + 22.5),
            utils.GaborKernel(3, 90 + 22.5),
            utils.GaborKernel(3, 135 + 22.5),
            utils.GaborKernel(3, 180 + 22.5)]
filter = utils. Filter(kernels, use_abs = True)

def time_dim(input):
    return input. unsqueeze(0)

transform = transforms. Compose(
    [transforms. Grayscale(),
    transforms.ToTensor(),
    time_dim,
    filter,
    sf. pointwise_inhibition,
    utils.Intensity2Latency(number_of_spike_bins = 15, to_spike = True)])

# display image
dataset = ImageFolder("dataset/eth")
# process images
dataset_transfrom = ImageFolder("dataset/eth", transform)

class recognition(Ui_MainWindow, QMainWindow):
    def __init__(self, parent=None):
        super(recognition, self).__init__(parent)
        self. setupUi(self)
        # slot function
        self.loadPictureBtn.clicked.connect(self.loadPicture)
        self. handlePictureBtn. clicked. connect(self. handlePicture)
        self.recogBtn.clicked.connect(self.showResult)
        # load the model
        self.clf_spike = pickle.load(open("clf_spike_model", "rb"))
        self.clf_pot = pickle.load(open("clf_pot_model", "rb"))


    def loadPicture(self):
        # Randomly select a picture in the data set for identification
        self. sample_idx = random. randint(0, len(dataset) - 1)
        self.label.setPixmap(QPixmap(dataset.imgs[self.sample_idx][0]))
        # The size of the picture is adapted to the label, otherwise the picture may not be displayed completely
        self.label.setScaledContents(True)

    def handlePicture(self):
        # Process the test image
        pool = snn. Pooling(kernel_size=3, stride=2)
        conv = snn. Convolution(in_channels=4, out_channels=20, kernel_size=30)
        conv.load_state_dict(torch.load("conv.parameter"))

        x = dataset_transfrom[self. sample_idx][0]
        t = dataset_transfrom[self. sample_idx][1]
        x = pool(x)
        p = conv(x)
        o = sf. fire(p, 20)
        self.test_x_spike = np.array(o.reshape(-1).cpu().numpy()).reshape(1,-1)
        self.test_x_pot = np.array(p.reshape(-1).cpu().numpy()).reshape(1,-1)
        self.test_y = t

        self.textEdit.setText("The test image has been processed")

    def showResult(self):
        predict_spike = self.clf_spike.predict(self.test_x_spike)
        predict_pot = self.clf_pot.predict(self.test_x_pot)

        if predict_spike[0] == 0:
            self.textEdit.append("The prediction result using pulse information is: cup")
        else:
            self.textEdit.append("The prediction result using pulse information is: dog")

        if predict_pot[0] == 0:
            self.textEdit.append("The prediction result using potential information is: cup")
        else:
            self.textEdit.append("The prediction result using potential information is: dog")

        if self.test_y == 0:
            self.textEdit.append("The label of the image is: Cup")
        else:
            self.textEdit.append("The label of the image is: dog")

if __name__ == '__main__':
    app = QApplication(sys. argv)
    recog = recognition()
    recog. show()
    sys. exit(app. exec_())
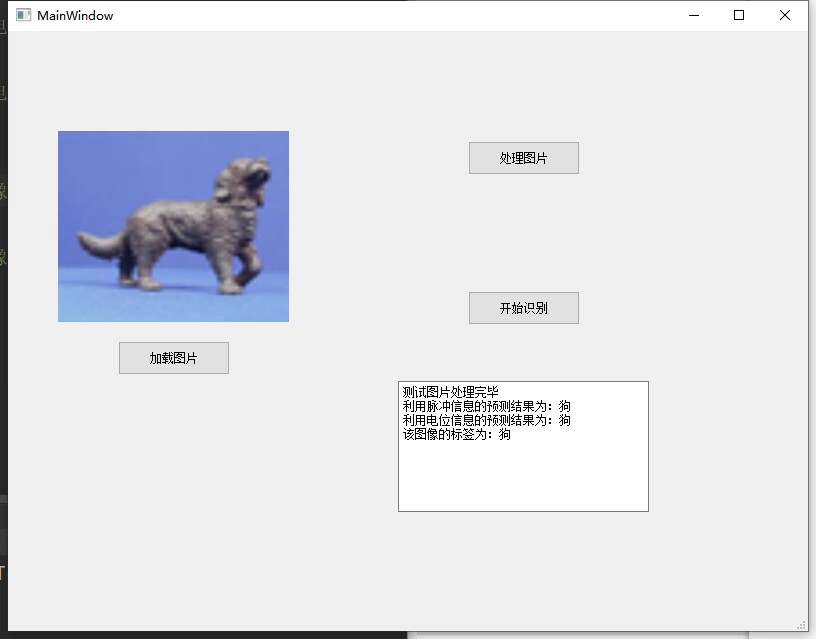
5. Results