Article directory
- Let’s take a look at the final effect first
- Preface
- material
- initial preparation work
-
- 1. Simple drawing of terrain
- 2. Draw dialog box
- 3. Configure character animation
- 4. Achieve simple control of character movement
- Control the display and hiding of dialog boxes
- Define conversation content
- Implement simple conversation function
- Verbatim printing effect
- Quickly display text at the press of a key
- Implement multiple NPC configurations with different dialogues
- Expand
-
- TextAsset reads document files
- Practical application
- Modify font style (Added on 2023/12/26)
- Replenish
- Source code
- refer to
- end
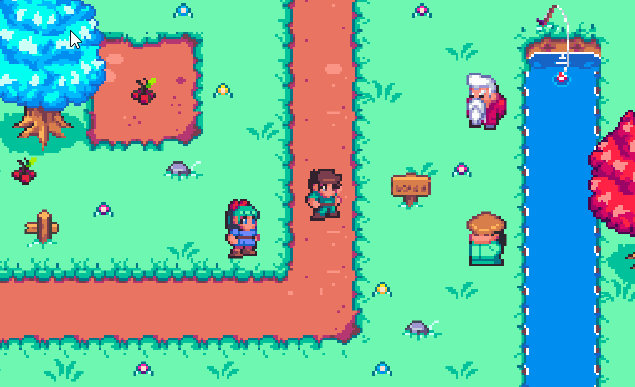
Let’s take a look at the final effect
Foreword
The previous dialogue system was removed because there were some errors and the original author did not allow me to share it. Moreover, the previous dialogue system did lack some functions, such as the most basic verbatim printing function, which was originally planned to be added later.
Dialogue systems are too common to be implemented in games, so I went back to find some dialogue system courses to learn, and shared the implementation process and notes, which will definitely be used later.
This article is a reference to the older course of Teacher Mai Kou from Station B. I have finished reading it, and then I found that it is missing and has many functions:
- For example, the scalability is not good, and it is difficult to separate conversations with multiple NPCs.
- The implementation of quick display is too cumbersome
- The dialog box is displayed in world coordinates, and the UI cannot adapt to screen changes.
- Text only supports displaying content, and does not support displaying character names and different expression changes of characters.
- Lack of control over certain text style changes, such as changing colors
So I may change a lot, because what I want to implement is a universal dialogue script, which can easily bind different dialogue contents to multiple NPCs. Of course, I will put the video link of Teacher Maikou in the article. At the bottom, if you are interested, you can also check out the original version and learn from it!
Material
Material download address:
https://bakudas.itch.io/generic-rpg-pack

Preparatory work
1. Simple drawing of terrain
Regarding the use of TileMap, I won’t introduce it too much here. If you are interested, you can check out my previous articles:
[Unity tips] Exploration of Unity2D TileMap (the simplest and most comprehensive introduction to using TileMap)

2. Draw dialog box

3. Configure character animation

4. Implement simple control of character movement
Create a new script to simply control character movement and animation switching
public class Player : MonoBehaviour
{<!-- -->
    [Header("Movement Speed")]
    public float speed;
    Animator animator;
    Vector3 movement;

    void Start()
    {<!-- -->
        animator = GetComponent<Animator>();
    }

    void Update()
    {<!-- -->
        //move
        movement = new Vector3(Input.GetAxisRaw("Horizontal") * Time.deltaTime * speed, Input.GetAxisRaw("Vertical") * Time.deltaTime * speed, transform.position.z);
        transform.Translate(movement);

        //animation
        if (movement != Vector3.zero)
        {<!-- -->
            animator.SetBool("run", true);
        }else{<!-- -->
            animator.SetBool("run", false);
        }

        //Turn over
        if(movement.x>0){<!-- -->
            transform.localScale = new Vector3(1, 1, 1);
        }
        if(movement.x<0){<!-- -->
            transform.localScale = new Vector3(-1, 1, 1);
        }
    }
}
</code><img class="look-more-preCode contentImg-no-view" src="//i2.wp.com/csdnimg.cn/release/blogv2/dist/pc/img/newCodeMoreBlack. png" alt="" title="">
Effect
Control the display and hiding of dialog boxes
Added a new script TalkButton to control the display and hiding of NPC dialogue prompts and dialog boxes
public class TalkButton : MonoBehaviour
{<!-- -->
    private GameObject tipsButton;//Dialogue prompt button
    [Header("Dialog")]
    public GameObject dialogBox;

    private void OnTriggerEnter2D(Collider2D other)
    {<!-- -->
        tipsButton = other.transform.Find("Dialogue Tips").gameObject;
        tipsButton.SetActive(true);
    }

    private void OnTriggerExit2D(Collider2D other)
    {<!-- -->
        tipsButton.SetActive(false);
        dialogBox.SetActive(false);
    }

    private void Update()
    {<!-- -->
        if (tipsButton != null & amp; & amp; tipsButton.activeSelf & amp; & amp; Input.GetKeyDown(KeyCode.R))
        {<!-- -->
            dialogBox.SetActive(true);
        }
    }
}
</code><img class="look-more-preCode contentImg-no-view" src="//i2.wp.com/csdnimg.cn/release/blogv2/dist/pc/img/newCodeMoreBlack. png" alt="" title="">
Effect
Define dialogue content
Create a new DialogNode and define various attributes of each dialogue
// Represents a dialogue node.
[Serializable]
public class DialogNode
{<!-- -->
    [Header("Character's name")]
    public string name;
    [Header("Character's avatar")]
    public Sprite sprite;

    [TextArea, Header("Content of conversation")]
    public string content;
}
Create a new Dialogue script and inherit ScriptableObject, so that we can easily create various dialogues on the interface.
// represents a conversation
[CreateAssetMenu(menuName="Create Conversation", fileName = "Conversation")]
public class Dialogue : ScriptableObject
{<!-- -->
    // Dialogue node
    public DialogNode[] dialogNodes;
}
Return to the interface, create various conversations, and configure conversation content

Implement simple dialogue function
Define NPC script
public class NPC : MonoBehaviour {<!-- -->
    [Header("Conversation Content")]
    public Dialogue dialogue;
}
Mount different dialogues for different NPCs

Modify the TalkButton to obtain the corresponding NPC dialogue content and modify it to a singleton to facilitate calling the dialogue content in other places.
[NonSerialized]
public Dialogue dialogue;//dialogue content

//single case
public static TalkButton instance;
private void Awake()
{<!-- -->
if(instance == null)
{<!-- -->
instance = this;
}else{<!-- -->
if(instance != this){<!-- -->
Destroy(gameObject);
}
}
DontDestroyOnLoad(gameObject);
}
\t
private void OnTriggerEnter2D(Collider2D other)
{<!-- -->
    dialogue = other.GetComponent<NPC>().dialogue;
    //. . .
}
</code><img class="look-more-preCode contentImg-no-view" src="//i2.wp.com/csdnimg.cn/release/blogv2/dist/pc/img/newCodeMoreBlack. png" alt="" title="">
Added DialogSystem script, mounted on the dialog box
public class DialogSystem : MonoBehaviour
{<!-- -->
    private Dialogue dialogue;//dialogue content
    //index
    private int index;

    //Dialogue content box
    TextMeshProUGUI dialogueContent;
    //name box
    TextMeshProUGUI dialogueName;
    //Avatar frame
    Image dialogueImage;

    private void Awake() {<!-- -->
        gameObject.SetActive(false);
    }

    private void OnEnable()
    {<!-- -->
        dialogue = TalkButton.instance.dialogue;
        dialogueContent = transform.Find("content").GetComponent<TextMeshProUGUI>();
        dialogueName = transform.Find("name").GetComponent<TextMeshProUGUI>();
        dialogueImage = transform.Find("avatar").GetComponent<Image>();

        //Set the character avatar to maintain the aspect ratio and prevent compression and deformation
        dialogueImage.preserveAspect = true;

        index = 0;
        Play();
    }

    private void Update()
    {<!-- -->
        if (Input.GetKeyDown(KeyCode.R) & amp; & amp; dialogue != null)
        {<!-- -->
             //After the dialogue is played, close the dialogue
              if (index == dialogue.dialogNodes.Length)
              {<!-- -->
                  gameObject.SetActive(false);
                  index = 0;
              }
              else
              {<!-- -->
                  //Start conversation
                  Play();
              }
        }
    }

    // The Play function is used to start playing the dialogue.
    private void Play()
    {<!-- -->
        // Get the current dialogue node and update the index value.
        DialogNode node = dialogue.dialogNodes[index + + ];

        //Set dialogue content, character name and avatar
        dialogueContent.text = node.content;
        dialogueName.text = node.name;
        dialogueImage.sprite = node.sprite;
    }
}
</code><img class="look-more-preCode contentImg-no-view" src="//i2.wp.com/csdnimg.cn/release/blogv2/dist/pc/img/newCodeMoreBlack. png" alt="" title="">
Effect

Word-by-word printing effect
Modify DialogSystem and create Ctrip to achieve word-by-word printing effect. In order to prevent font confusion, we need to make additional judgments. Only after each line is executed can we continue to the next dialogue.
[SerializeField, Header("Current verbatim printing speed")]
private float textSpeed;

bool isDialogue;//Whether there is a dialogue going on

private void OnEnable()
{<!-- -->
    isDialogue = false;

    // . . .
}

private void Update()
{<!-- -->
    if (Input.GetKeyDown(KeyCode.R) & amp; & amp; dialogue != null)
    {<!-- -->
        if (!isDialogue)
        {<!-- -->
            //After the dialogue is played, close the dialogue
            if (index == dialogue.dialogNodes.Length)
            {<!-- -->
                gameObject.SetActive(false);
                index = 0;
            }
            else
            {<!-- -->
                //Start conversation
                Play();
            }
        }
    }
}

// The Play function is used to start playing the dialogue.
private void Play()
{<!-- -->
    // Get the current dialogue node and update the index value.
    DialogNode node = dialogue.dialogNodes[index + + ];

    //Set dialogue content, character name and avatar
    // dialogueContent.text = node.content;
    StartCoroutine(SetTextUI(node));
    dialogueName.text = node.name;
    dialogueImage.sprite = node.sprite;
}

//print word by word
IEnumerator SetTextUI(DialogNode node)
{<!-- -->
    isDialogue = true;
    dialogueContent.text = "";
    for (int i = 0; i < node.content.Length; i + + )
    {<!-- -->
        dialogueContent.text + = node.content[i];
        yield return new WaitForSeconds(textSpeed);
    }
    isDialogue = false;
}
</code><img class="look-more-preCode contentImg-no-view" src="//i2.wp.com/csdnimg.cn/release/blogv2/dist/pc/img/newCodeMoreBlack. png" alt="" title="">
For effect, remember to configure the textSpeed value in the panel. I set it to 0.1 here.

Press the key to quickly display text
Modify DialogSystem, we achieve this by controlling the text playback speed
private float startTextSpeed;//Start printing speed word by word
private void OnEnable()
{<!-- -->
//...
startTextSpeed = textSpeed;
}

private void Update()
{<!-- -->
    if (Input.GetKeyDown(KeyCode.R) & amp; & amp; dialogue != null)
    {<!-- -->
        //If you are having a conversation, press R again to quickly display all conversations
        if(isDialogue)
        {<!-- -->
             textSpeed = 0;
        }
        else
        {<!-- -->
            //Reply text speed
            textSpeed = startTextSpeed;
            //After the dialogue is played, close the dialogue
            if (index == dialogue.dialogNodes.Length)
            {<!-- -->
                gameObject.SetActive(false);
                index = 0;
            }
            else
            {<!-- -->
                //Start conversation
                Play();
            }
        }
    }
}
</code><img class="look-more-preCode contentImg-no-view" src="//i2.wp.com/csdnimg.cn/release/blogv2/dist/pc/img/newCodeMoreBlack. png" alt="" title="">
Effect
Achieve multiple NPC configurations with different dialogues
Configure multiple NPCs and configure different dialogues for each NPC

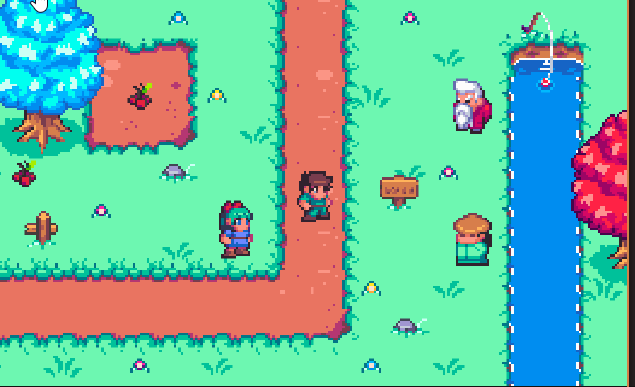
final effect

Extension
Mai Kou’s course uses TextAsset to read txt text. This method is inconvenient to display character names and avatar expression changes, so I gave up. However, I still want to add the usage of TextAsset, because it may be applicable in other places.
TextAsset reads document files
TextAsset imports a file in a certain format into our game project, and then it can help us convert the text here.
The types it can support are:

It also has a method with one parameter, which is .text, which will convert the entire file into a single character data.
Practical application
For example, text like this

Code to read text
public class DialogSystem : MonoBehaviour
{<!-- -->
    [Header("Text File")]
    public TextAsset textFile; // Text file used to store conversation text
    public int index; // Dialogue index, used to track the current dialogue position

    List<string> textList = new List<string>(); // Stores a list of conversation content read from a text file

    void Start()
    {<!-- -->
        GetTextFromFile(textFile);
    }

    void GetTextFromFile(TextAsset file)
    {<!-- -->
        var lineData = file.text.Split('\\
'); // Split the text file by lines
        foreach (var line in lineData)
        {<!-- -->
            textList.Add(line); // Add each line of dialogue text to the dialogue content list
        }
    }
}
</code><img class="look-more-preCode contentImg-no-view" src="//i2.wp.com/csdnimg.cn/release/blogv2/dist/pc/img/newCodeMoreBlack. png" alt="" title="">
Modify font style (Added on 2023/12/26)
Recently, a friend came to me and asked me how to change the color of certain fonts or highlight certain texts.
In fact, it is very simple, as follows, I will add it here.

This syntax is called Rich Text markup and can be used for rich text display in Unity. In addition to tags, there are other tags that can be used to modify the style, size, font, etc. of text, such as:
<color=red>red</color>
<color=#FF0000>Red</color>
<color=rgb(255,0,0)>Red</color>

<b>Bold</b>
<i>italic</i>
<size=30>Large</size>
code control
// Use Rich Text tags to modify text content
myText.text = "This is a <color=red>red</color> text, <b>bold</b> and changed to <size=30>large</size> font.";

//Change text font
Font myFont = Resources.GetBuiltinResource<Font>("Arial.ttf");
myText.font = myFont;
Here we want to modify the text style of a certain dialogue, it is very simple

Supplement
When printing word for word, you can also add some typing sound effects, but I will not add them here, leaving it to you to add them by yourself.
Source code
https://gitcode.net/unity1/dialoguesystem

Reference
【Video】https://www.bilibili.com/video/BV1WJ411Y71J/
Complete
Gifts of roses, hand a fragrance! If the content of the article is helpful to you, please don’t be stingy with your likes, comments and follows so that I can receive feedback as soon as possible. Every time you support My biggest motivation to keep creating. Of course, if you find an error in the article or have a better solution, please feel free to comment and send me a private message!
Okay, I’m Xiang Yu, https://xiangyu.blog.csdn.net
A developer who has been working quietly in a small company recently started studying Unity by himself out of interest. If you encounter any problems, you are also welcome to comment and send me a private message. Although I may not necessarily know some of the questions, I will check the information from all parties and try to give the best suggestions. I hope to help more people who want to learn programming. People, encourage each other~
